639 lines
16 KiB
Markdown
639 lines
16 KiB
Markdown
---
|
||
title: ubuntu
|
||
date: 2025-05-09 09:44:01
|
||
tags:
|
||
---
|
||
|
||
# Server
|
||
|
||
## 安装
|
||
|
||
默认选中「Try or Install Ubuntu Server」安装选项,回车(或等待 30 秒后),等待系统镜像自检并进行安装初始化。
|
||
|
||

|
||
|
||
### 选择语言:English
|
||
|
||

|
||
|
||
### 键盘默认:English
|
||
|
||

|
||
|
||
### 安装类型:Ubuntu Server
|
||
|
||
选择默认第一个(会自带一些组件,方便使用)
|
||
|
||

|
||
|
||
### 网络配置
|
||
|
||
使用 DHCP 或者 静态IP (建议这里设置好 静态IP,如果选择 DHCP,则在此界面直接选择Done 后即可)
|
||
|
||

|
||
|
||
静态IP 选择 Edit IPv4
|
||
|
||

|
||
|
||
然后选择 Manual
|
||
|
||

|
||
|
||

|
||
|
||
### 代理配置
|
||
|
||
**Configure proxy配置页面的Proxy address无需配置**
|
||
|
||

|
||
|
||
### 镜像源配置
|
||
|
||
默认清华源
|
||
|
||

|
||
|
||
### 安装磁盘配置
|
||
|
||
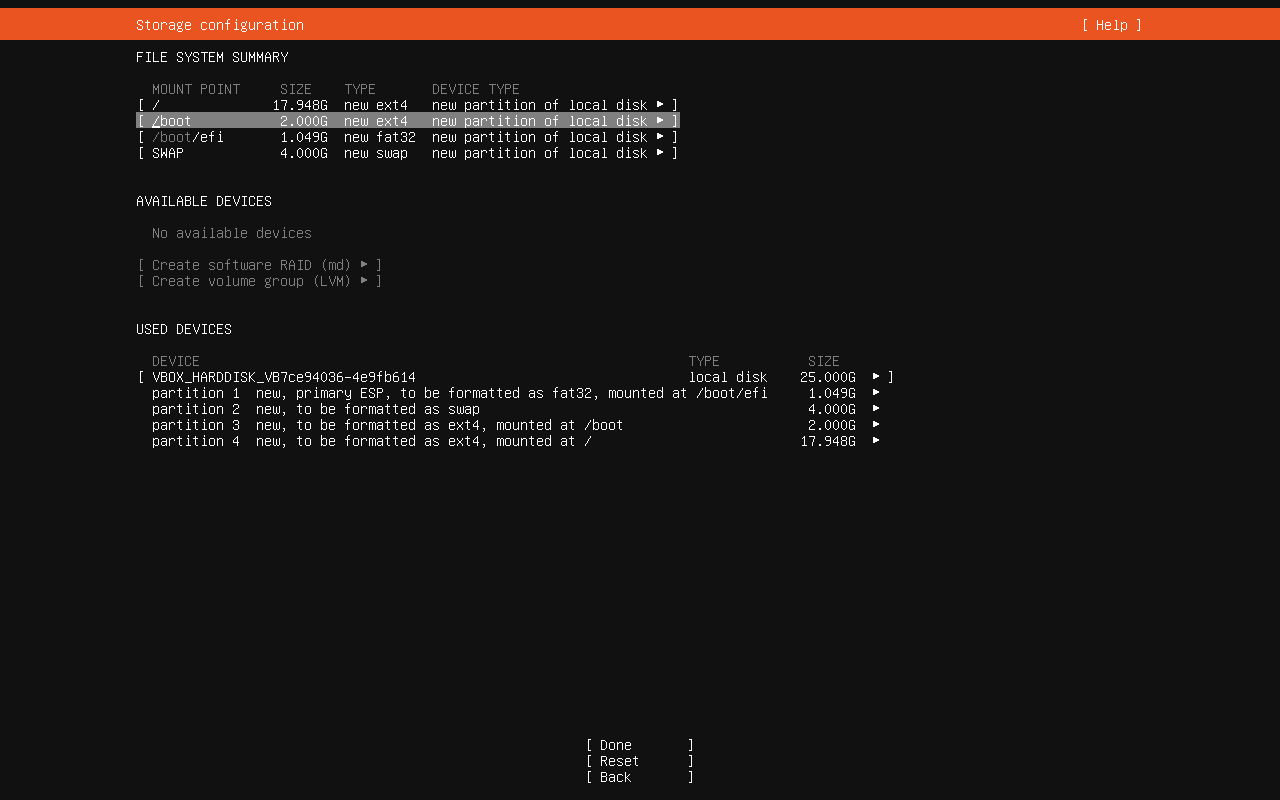
**选择安装磁盘,直接回车默认自动分配,需要手动分区的话选择 [custom storage layout]**
|
||
|
||

|
||
|
||
选择 **custom storage layout**
|
||
|
||

|
||
|
||

|
||
|
||
首先分配swap分区:一般基于物理内存的 2-4倍
|
||
|
||

|
||
|
||
/boot 分区,一般2G足以
|
||
|
||
/ 根分区,分配剩余空间
|
||
|
||
|
||
|
||
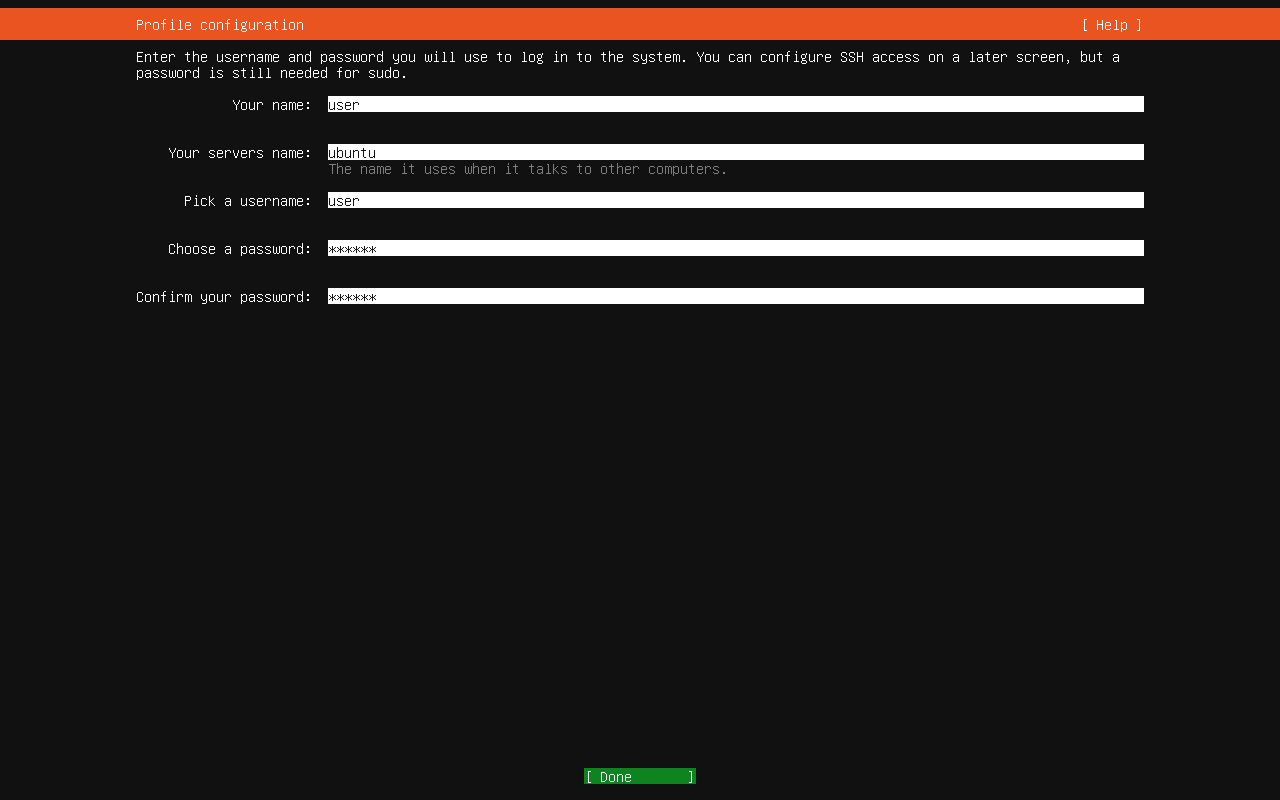
### 设置计算机名及用户名
|
||
|
||
|
||
|
||
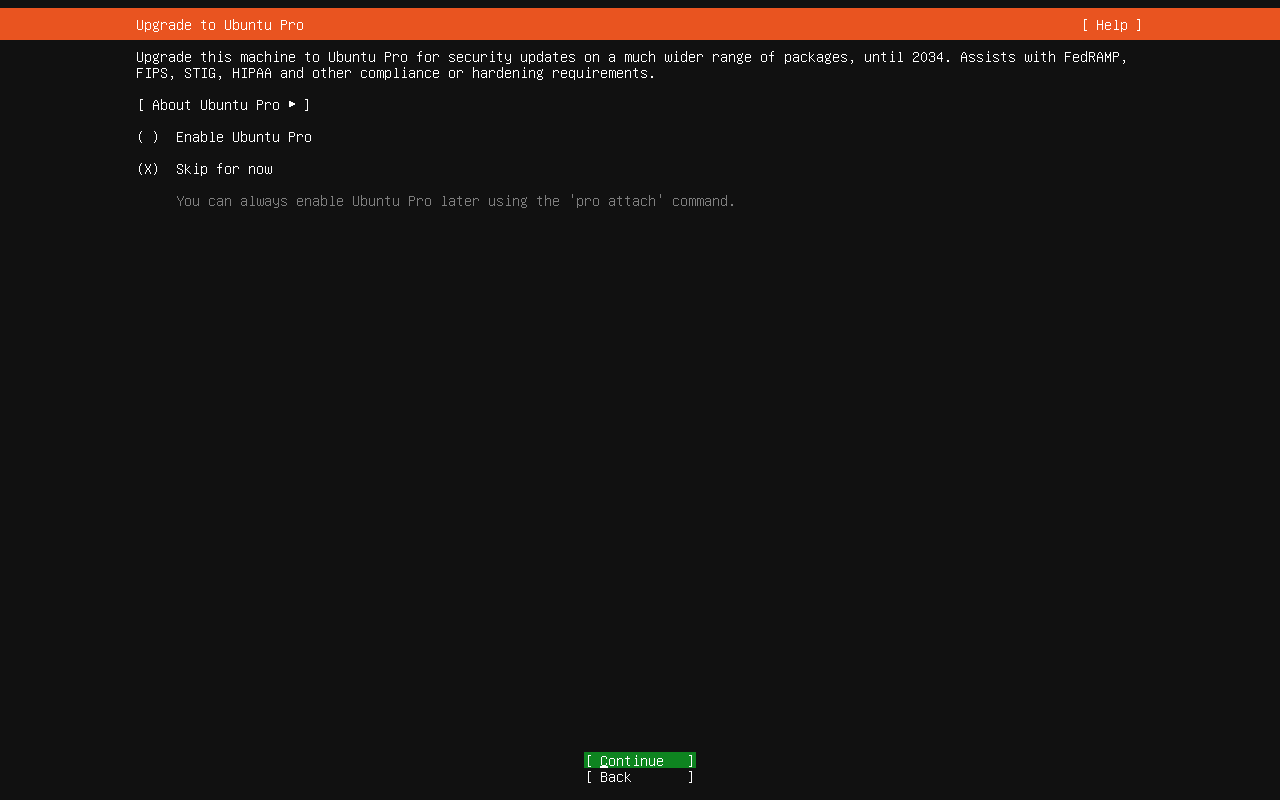
### 是否升级 Ubuntu Pro
|
||
|
||
直接默认跳过即可
|
||
|
||
|
||
### 安装 OpenSSH 服务
|
||
|
||

|
||
|
||
### 选择预置环境
|
||
|
||
按需选取,不需要则直接选择 Done 回车继续
|
||
|
||

|
||
|
||
安装系统中
|
||
|
||

|
||
|
||
安装完成后重启即可
|
||
|
||

|
||
|
||
重启完成,进入系统
|
||
|
||

|
||
|
||
## 配置网络
|
||
|
||

|
||
|
||
```shell
|
||
cd /etc/netplan
|
||
ls
|
||
# 编辑当前目录下以yaml扩展名的网卡配置文件
|
||
sudo vim 50-cloud-init.yaml
|
||
```
|
||
|
||
文件内容
|
||
|
||
```shell
|
||
network:
|
||
version: 2
|
||
ethernets:
|
||
enp0s3:
|
||
dhcp4: true
|
||
```
|
||
|
||
在VirtualBox中工具->网络中 增加仅主机(Host-Only)网络
|
||
|
||

|
||
|
||
网卡如果要是DHCP就选自动配置网卡,否则手动分配就选手动配置网卡
|
||
|
||
如果选DHCP,还需要启动服务器
|
||
|
||

|
||
|
||
配置好后,在对应虚拟机中,添加好网卡,连接方式选择仅主机(Host-Only)网络,名称选择刚刚在工具中配置的
|
||
|
||

|
||
|
||
以上修改需要先重启虚拟机
|
||
|
||
查看是否生效,需要执行`ip a`命令
|
||
|
||
看是否有网卡名称为`enp0s8`
|
||
|
||
紧接着回到刚刚在`/etc/netplan`目录,下编辑的网卡配置文件`50-cloud-init.yaml`
|
||
|
||
增加`enp0s8`,若是自动分配网络,则直接`dhcp4: true`即可,否则按一下分配`addressed`,手动分配一个根据子网的ipv4地址,并将`dhcp4`设置为`false`
|
||
|
||
```shell
|
||
network:
|
||
version: 2
|
||
ethernets:
|
||
enp0s3:
|
||
dhcp4: true
|
||
enp0s8:
|
||
addresses: [192.168.56.35/24]
|
||
dhcp4: no
|
||
|
||
```
|
||
|
||
`:wq`保存后,执行一下命令
|
||
|
||
```shell
|
||
sudo netplan generate
|
||
sudo netplan apply
|
||
```
|
||
|
||
若不报错,则修改成功,再执行`ip a`查看网卡信息
|
||
|
||

|
||
|
||
ip地址已经生效,可以在主机里 ping 一下
|
||
|
||
## 安装GUI
|
||
|
||
默认情况下,Ubuntu Server不包括图形用户界面(GUI)。GUI占用了用于面向服务器的任务的系统资源(内存和处理器)。但是,某些任务和应用程序在GUI环境中更易于管理并且可以更好地工作。
|
||
|
||
### 更新存储库和软件包
|
||
|
||
首先更新存储库和软件包列表:
|
||
|
||
```shell
|
||
sudo apt-get update && sudo apt-get upgrade
|
||
```
|
||
|
||
这样可以确保正在使用最新的软件更新。
|
||
|
||
接下来,安装**tasksel manager**实用程序:
|
||
|
||
```shell
|
||
sudo apt install tasksel
|
||
```
|
||
|
||
> **注意:** **Tasksel**是用于一次安装多个相关软件包的实用程序。有关更多详细信息,请参见[文档](https://help.ubuntu.com/community/Tasksel)。
|
||
|
||
### 选择一个显示管理器
|
||
|
||
显示管理器是启动显示服务器,启动桌面并管理用户身份验证的应用程序。默认的**GDM3**(与[KDE-Plasma一起使用](https://kde.org/plasma-desktop))是资源密集型显示管理器。如果需要节省系统资源,请考虑使用更浅的显示管理器,例如**SDDM**,**SLiM**或**LightDM**。
|
||
|
||
默认情况下,只有一个显示管理器可以管理服务器。仅当配置为管理其他服务器时,它们才能同时运行。本文假定您将使用单个默认显示管理器。
|
||
|
||
显示当前使用的显示管理器:
|
||
|
||
```shell
|
||
cat /etc/X11/default-display-manager
|
||
```
|
||
|
||
要安装特定的显示管理器,请使用**apt-get**程序包管理器:
|
||
|
||
要安装SLiM:
|
||
|
||
```shell
|
||
sudo apt-get install slim
|
||
```
|
||
|
||
要安装LightDM:
|
||
|
||
```shell
|
||
sudo apt-get install lightdm
|
||
```
|
||
|
||
该**SDDM**显示管理器可从安装**中的tasksel** KDE的安装过程中的菜单。
|
||
|
||
切换显示管理器
|
||
|
||
```shell
|
||
sudo dpkg-reconfigure gdm3
|
||
```
|
||
|
||
|
||
|
||
### 选择服务器的GUI
|
||
|
||
GNOME是大多数Ubuntu安装的默认GUI,并且(宽松地)基于Apple生态系统。
|
||
|
||
KDE是另一种流行的GUI,(宽松地)基于Microsoft生态系统。如果要具有常规Ubuntu系统的外观,请选择以下桌面环境之一。
|
||
|
||
#### GNOME
|
||
|
||
要安装GNOME,请首先启动**taskel**:
|
||
|
||
```
|
||
tasksel
|
||
```
|
||
|
||
将会启动一个彩色界面。使用箭头键向下滚动列表,找到**Ubuntu桌面**。
|
||
|
||
使用**空格**键将其选中`ubuntu-desktop`,然后按**Tab**键选择底部的**确定**,然后按**Enter键**。
|
||
|
||
> 要使用`ubuntu-desktop`,需事先安装好,通过 sudo apt install -y ubuntu-desktop
|
||
|
||
系统将安装软件并重新引导,为您提供由默认显示管理器生成的图形登录屏幕。在我们的例子中是SLiM。
|
||
|
||
输入您的**登录凭据**。如果您安装了多个接口,请使用**F1**在GUI之间切换。
|
||
|
||
卸载ubuntu-desktop
|
||
|
||
```shell
|
||
sudo apt remove -y --purge ubuntu-desktop
|
||
sudo apt-get autoremove
|
||
sudo snap remove thunderbird
|
||
sudo snap remove gnome-42-2204
|
||
sudo snap remove firefox
|
||
sudo snap remove gtk-common-themes
|
||
sudo apt-get remove gnome-tweak-tool
|
||
sudo apt-get remove gnome-shell
|
||
```
|
||
|
||
|
||
|
||
#### KDE Plasma
|
||
|
||
要安装KDE Plasma,请使用以下Linux命令:
|
||
|
||
```
|
||
sudo apt-get install kde-plasma-desktop
|
||
```
|
||
|
||
在安装过程中可能会提示您选择默认显示管理器。使用箭头键进行选择,然后按**Enter**。
|
||
|
||
使用以下命令启动KDE Plasma:
|
||
|
||
```
|
||
sudo service display_manager start
|
||
```
|
||
|
||
代替*display_manager,* 输入已安装的显示管理器的名称(例如SLiM,lightDM,SDDM)。输入您的凭据并登录。
|
||
|
||
> **注意:**这些传统的Ubuntu Server GUI应用程序需要大量的系统资源。它们可能会影响服务器的功能。如果需要最大程度地利用服务器资源,请考虑下面列出的较轻的GUI应用程序之一。
|
||
|
||
#### Mate 服务器核心桌面
|
||
|
||
**Mate**是一种流行的轻量级图形界面。通过执行以下命令进行安装:
|
||
|
||
```
|
||
sudo tasksel install ubuntu-mate-core
|
||
```
|
||
|
||
等待taskel完成操作。完成后,使用以下命令启动桌面界面:
|
||
|
||
```
|
||
sudo service display_manager start
|
||
```
|
||
|
||
代替*display_manager,* 输入已安装的显示管理器的名称(例如SLiM,lightDM,SDDM)。系统将提示您登录。
|
||
|
||
要退出GUI,请打开命令行并输入:
|
||
|
||
```
|
||
sudo service display_manager stop
|
||
```
|
||
|
||
> **注意**:您可能需要按**Ctrl-Alt-F1**才能返回到服务器的命令行界面。另请注意,此过程会自动安装并使用**lightdm**显示管理器。
|
||
|
||
#### Lubuntu核心服务器桌面
|
||
|
||
Lubuntu是一个非常轻量级的GUI。如果需要图形界面,但要最大程度地减少对系统内存和处理器的影响,请使用此应用程序。
|
||
|
||
要安装Lubuntu,请输入以下内容:
|
||
|
||
```
|
||
sudo tasksel install lubuntu-core
|
||
```
|
||
|
||
或者,您可以使用以下命令从**taskel**菜单安装:
|
||
|
||
```
|
||
tasksel
|
||
```
|
||
|
||
使用箭头键突出显示要使用的Lubuntu GUI。按**空格**键进行选择,然后按**Tab键**至**OK**按钮,然后按**Enter键**。
|
||
|
||
使用以下命令启动GUI:
|
||
|
||
```
|
||
sudo service display_manager start
|
||
```
|
||
|
||
通过打开终端窗口并输入以下内容来退出GUI:
|
||
|
||
```
|
||
sudo service display_manager stop
|
||
```
|
||
|
||
#### Xubuntu服务器核心桌面
|
||
|
||
Xubuntu是使用Xfce桌面环境的Ubuntu的派生版本。
|
||
|
||
通过输入以下命令安装Xubuntu:
|
||
|
||
```
|
||
sudo tasksel install xubuntu-core
|
||
```
|
||
|
||
输入以下命令启动它:
|
||
|
||
```
|
||
sudo service display_manager start
|
||
```
|
||
|
||
#### Xfce桌面
|
||
|
||
Xfce桌面环境可以单独使用。它被设计为响应迅速,轻巧且用户友好。
|
||
|
||
使用以下命令安装Xfce:
|
||
|
||
```
|
||
sudo apt-get install xfce4 slim
|
||
```
|
||
|
||
输入以下命令启动Xfce:
|
||
|
||
```
|
||
sudo service slim start
|
||
```
|
||
|
||
> **注意:** Xfce GUI仅与SLiM显示管理器兼容。
|
||
|
||
### 在GUI之间切换
|
||
|
||
如果安装了多个GUI,则可以选择要使用的GUI。启动显示管理器后,将提示您登录。但是,该屏幕还允许您选择要启用的GUI。
|
||
|
||
通过按**F1**在GUI之间切换。该界面将在会话(或GUI)之间切换。切换到所选的GUI后登录。
|
||
|
||
### 关闭与打开GUI
|
||
|
||
#### 关闭
|
||
|
||
```shell
|
||
sudo systemctl set-default multi-user.target
|
||
sudo reboot
|
||
```
|
||
|
||
#### 打开
|
||
|
||
```shell
|
||
sudo systemctl set-default graphical.target
|
||
sudo reboot
|
||
```
|
||
|
||
## 远程桌面配置
|
||
|
||
### RDP
|
||
|
||
Windows 带有一个非常方便的功能,称为远程桌面连接,它使用 RDP 协议远程连接 PC。虽然在建立从 Windows 到 Windows 系统的远程桌面连接时使用起来非常容易,但对于 Linux 系统来说就不一样了。这是因为Linux默认没有安装RDP协议。在这种情况下,我们必须在 Linux 系统上手动执行一些配置来启用 RDP,在本指南中我们知道如何做到这一点。
|
||
|
||
什么是XRDP?
|
||
|
||
> XRDP 是一个免费的开源程序,是 Microsoft RDP(远程桌面协议)的实现,可通过 GUI 轻松远程访问 Linux 系统。使用 XRDP,可以登录到远程 Linux 计算机并创建一个真实的桌面会话,就像您登录到本地计算机一样。
|
||
|
||
#### 执行存储库更新
|
||
|
||
```shell
|
||
sudo apt update
|
||
```
|
||
|
||
#### 在 Ubuntu 24.04.2 LTS 上安装XRDP
|
||
|
||
我们知道 Ubuntu 没有像 Windows 操作系统那样安装 RDP,因此,我们需要在我们的 Linux 系统上安装 RDP 的开源实现 XRDP。好在我们不需要添加任何第三方存储库,因为它可以使用系统默认安装。
|
||
|
||
```shell
|
||
sudo apt install xrdp
|
||
```
|
||
|
||
#### 启动并启用 XRDP 服务
|
||
|
||
要在系统启动时自动启动并启用 XRDP 服务,请使用给定的命令:
|
||
|
||
启动它:
|
||
|
||
```shell
|
||
sudo systemctl start xrdp
|
||
```
|
||
|
||
开机并启用它:
|
||
|
||
```shell
|
||
sudo systemctl enable xrdp
|
||
```
|
||
|
||
检查状态:
|
||
|
||
```shell
|
||
systemctl status xrdp
|
||
```
|
||
|
||
#### 在防火墙中放行3389端口
|
||
|
||
要让网络中的其他系统通过 RDP 远程访问 Ubuntu 24.04.2 LTS,请在系统防火墙上放行端口号 3389。
|
||
|
||
```shell
|
||
sudo ufw allow from any to any port 3389 proto tcp
|
||
```
|
||
|
||

|
||
|
||
**接下来**,查看你的 Ubuntu 系统的 IP 地址,并在某处记下它。在您的终端上运行:
|
||
|
||
```shell
|
||
ip a
|
||
```
|
||
|
||
#### KDE Plasma解决XRDP无法连接的问题
|
||
|
||
> [Installing KDE Plasma and XRDP Service on Remote Ubuntu 22](https://www.vps-mart.com/blog/install-kde-plasma-and-xrdp-service-on-remote-ubuntu)
|
||
|
||
通过XRDP登录时启动KDE等离子会话。 CAT命令用于创建具有指定环境变量的.xsessionrc文件。执行这些命令后,将使用指定内容创建或覆盖〜/.xsession和〜/.xsessionRC文件。这些文件通常在X会话启动过程中用于设置环境变量并定义要执行的启动命令或脚本。
|
||
|
||
```shell
|
||
echo "/usr/bin/startplasma-x11" > ~/.xsession
|
||
D=/usr/share/plasma:/usr/local/share:/usr/share:/var/lib/snapd/desktop
|
||
C=/etc/xdg/xdg-plasma:/etc/xdg
|
||
C=${C}:/usr/share/kubuntu-default-settings/kf5-settings
|
||
cat < ~/.xsessionrc
|
||
export XDG_SESSION_DESKTOP=KDE
|
||
export XDG_DATA_DIRS=${D}
|
||
export XDG_CONFIG_DIRS=${C}
|
||
EOF
|
||
```
|
||
|
||
重启 XRDP服务
|
||
|
||
```shell
|
||
systemctl restart xrdp
|
||
```
|
||
|
||
## 更换时区
|
||
|
||
### 查看当前时区:
|
||
|
||
```shell
|
||
timedatectl
|
||
```
|
||
|
||
类似输出
|
||
|
||
```shell
|
||
Local time: Mon 2025-07-21 01:05:37 UTC
|
||
Universal time: Mon 2025-07-21 01:05:37 UTC
|
||
RTC time: Mon 2025-07-21 01:05:37
|
||
Time zone: Etc/UTC (UTC, +0000)
|
||
System clock synchronized: yes
|
||
NTP service: active
|
||
RTC in local TZ: no
|
||
|
||
```
|
||
|
||
### 列出所有可用时区:
|
||
|
||
```shell
|
||
timedatectl list-timezones
|
||
```
|
||
|
||
时区太多了,可以使用管道过滤查找你所在的城市,例如:
|
||
|
||
```shell
|
||
timedatectl list-timezones | grep Shanghai
|
||
```
|
||
|
||
输出:
|
||
```shell
|
||
Asia/Shanghai
|
||
```
|
||
|
||
### 设置新的时区:
|
||
|
||
例如,将时区设置为 **上海(北京时间)** :
|
||
|
||
```shell
|
||
sudo timedatectl set-timezone Asia/Shanghai
|
||
```
|
||
|
||
#### 再次查看时区确认是否更改成功:
|
||
|
||
```shell
|
||
timedatectl
|
||
```
|
||
|
||
## snap包管理器
|
||
|
||
> [Linux snap 命令 | 菜鸟教程](https://www.runoob.com/linux/linux-comm-snap.html)
|
||
|
||
### 安装snap软件
|
||
|
||
```shell
|
||
sudo snap install hello-world
|
||
```
|
||
|
||
### 卸载snap软件
|
||
|
||
```shell
|
||
sudo snap remove hello-world
|
||
```
|
||
|
||
### 查看已安装的snap软件
|
||
|
||
```shell
|
||
snap list
|
||
```
|
||
|
||
|
||
|
||
### 解决snap包管理器下载报错 x509: certificate signed by unknown authority
|
||
|
||
#### 代理方式
|
||
|
||
```shell
|
||
sudo snap set system proxy.https="http://127.0.0.1:7890"
|
||
sudo snap set system proxy.http="http://127.0.0.1:7890"
|
||
```
|
||
|
||
然后可以正常安装:
|
||
|
||
```shell
|
||
sudo snap install hello-world
|
||
```
|
||
|
||
## 禁止自动挂起
|
||
|
||
```shell
|
||
Broadcast message from user@ubuntu-ai-dev-server (Tue 2025-07-22 15:34:31 CST):
|
||
|
||
The system will suspend now!
|
||
```
|
||
|
||
### 解决方式
|
||
|
||
```shell
|
||
sudo vim /etc/systemd/logind.conf
|
||
```
|
||
|
||
将里面的
|
||
|
||
```shell
|
||
IdleAction=suspend
|
||
```
|
||
|
||
改为
|
||
|
||
```shell
|
||
IdleAction=ignore
|
||
```
|
||
|
||
# apt包管理器
|
||
|
||
## 安装Fastfetch
|
||
|
||
**添加 Fastfetch PPA:**
|
||
|
||
```Bash
|
||
sudo add-apt-repository ppa:zhangsongcui3371/fastfetch
|
||
```
|
||
|
||
这条命令会提示并按回车确认添加 PPA。
|
||
|
||
**更新软件包列表:** 添加 PPA 后,需要更新软件包列表,以便系统能够识别新添加的软件源。
|
||
|
||
```Bash
|
||
sudo apt update
|
||
```
|
||
|
||
**安装 Fastfetch:** 现在,可以安装 Fastfetch 了:
|
||
|
||
```Bash
|
||
sudo apt install fastfetch
|
||
```
|
||
|
||
**运行 Fastfetch:** 安装完成后,可以在终端中输入 `fastfetch` 来运行它:
|
||
|
||
```Bash
|
||
fastfetch
|
||
```
|