Compare commits
No commits in common. "master" and "0db99cc46006c7e515fb46ba3895cbcfb332999e" have entirely different histories.
master
...
0db99cc460
@ -39,6 +39,7 @@ highlight_shrink: false #true代码框不展开,需点击 '>' 打开 false展
|
||||
code_word_wrap: true
|
||||
index_img: https://gcore.jsdelivr.net/gh/volantis-x/cdn-wallpaper/abstract/BBC19066-E176-47C2-9D22-48C81EE5DF6B.jpeg
|
||||
archive_img: https://gcore.jsdelivr.net/gh/volantis-x/cdn-wallpaper/abstract/67239FBB-E15D-4F4F-8EE8-0F1C9F3C4E7C.jpeg
|
||||
|
||||
# Footer设置
|
||||
since: 2022
|
||||
footer_custom_text: Hi, welcome to my Xiaowen blog!
|
||||
|
||||
@ -14,7 +14,7 @@
|
||||
"dependencies": {
|
||||
"cheerio": "^0.22.0",
|
||||
"hexo": "^6.3.0",
|
||||
"hexo-asset-img": "^1.2.0",
|
||||
"hexo-asset-image": "^1.0.0",
|
||||
"hexo-deployer-git": "^3.0.0",
|
||||
"hexo-generator-archive": "^2.0.0",
|
||||
"hexo-generator-category": "^2.0.0",
|
||||
@ -31,6 +31,5 @@
|
||||
"hexo-theme-volantis": "^5.7.6",
|
||||
"hexo-wordcount": "^6.0.1",
|
||||
"save": "^2.9.0"
|
||||
},
|
||||
"devDependencies": {}
|
||||
}
|
||||
}
|
||||
|
||||
@ -1,321 +0,0 @@
|
||||
---
|
||||
title: ArchLinux
|
||||
date: 2025-07-28 10:26:05
|
||||
tags:
|
||||
---
|
||||
|
||||
# WSL
|
||||
|
||||
## 安装
|
||||
|
||||
### 在线安装
|
||||
|
||||
```powershell
|
||||
wsl --install archlinux
|
||||
```
|
||||
|
||||
# 包管理器 pacman
|
||||
|
||||
> [pacman - Arch Linux 中文维基](https://wiki.archlinuxcn.org/wiki/Pacman)
|
||||
|
||||
## 安装软件
|
||||
|
||||
```shell
|
||||
pacman -S fastfetch
|
||||
```
|
||||
|
||||
## 更新库
|
||||
|
||||
```shell
|
||||
pacman -Syyu
|
||||
```
|
||||
|
||||
# Vim设置
|
||||
|
||||
编辑当前用户下的vim配置文件`~/.vimrc`
|
||||
|
||||
```shell
|
||||
if has('mouse')
|
||||
set mouse-=a
|
||||
endif
|
||||
|
||||
set number
|
||||
syntax on
|
||||
set ignorecase
|
||||
set t_Co=256
|
||||
```
|
||||
|
||||
# Containerd + Nerdctl
|
||||
|
||||
## 安装
|
||||
|
||||
**1. 更新系统**
|
||||
|
||||
首先,确保你的 Arch Linux 系统是最新的:
|
||||
|
||||
```Bash
|
||||
sudo pacman -Syu
|
||||
```
|
||||
|
||||
**2. 安装 Containerd**
|
||||
|
||||
Containerd 是一个核心的容器运行时。它作为 `containerd` 包在官方仓库中提供。
|
||||
|
||||
```Bash
|
||||
sudo pacman -S containerd
|
||||
```
|
||||
|
||||
安装完成后,你需要启动并启用 Containerd 服务,以便它在系统启动时自动运行:
|
||||
|
||||
```Bash
|
||||
sudo systemctl enable --now containerd
|
||||
```
|
||||
|
||||
你可以通过以下命令检查 Containerd 的运行状态:
|
||||
|
||||
```Bash
|
||||
sudo systemctl status containerd
|
||||
```
|
||||
|
||||
确保它显示为 `active (running)`。
|
||||
|
||||
**3.安装Nerdctl**
|
||||
|
||||
```bash
|
||||
sudo pacman -S nerdctl
|
||||
```
|
||||
|
||||
**4.安装CNI Plugin**
|
||||
|
||||
> [Releases · containernetworking/plugins (github.com)](https://github.com/containernetworking/plugins/releases)
|
||||
|
||||
从Github上下载
|
||||
|
||||
```bash
|
||||
wget https://github.com/containernetworking/plugins/releases/download/v1.7.1/cni-plugins-linux-amd64-v1.7.1.tgz
|
||||
```
|
||||
|
||||
解压到指定目录`/opt/cni/bin`
|
||||
|
||||
```bash
|
||||
tar -zxvf cni-plugins-linux-amd64-v1.7.1.tgz -C /opt/cni/bin
|
||||
```
|
||||
|
||||
即可完成安装
|
||||
|
||||
可以验证下
|
||||
|
||||
```bash
|
||||
nerdctl run -it hello-world
|
||||
```
|
||||
|
||||
不报错,并且输出了结果,说明已经安装好了 CNI Plugin。
|
||||
|
||||

|
||||
|
||||
**5.安装Buildkit**
|
||||
|
||||
> [Release v0.23.2 · moby/buildkit (github.com)](https://github.com/moby/buildkit/releases/tag/v0.23.2)
|
||||
|
||||
下载 BuildKit 二进制文件:
|
||||
|
||||
```bash
|
||||
wget https://github.com/moby/buildkit/releases/download/v0.23.2/buildkit-v0.23.2.linux-amd64.tar.gz
|
||||
```
|
||||
|
||||
解压到临时目录下
|
||||
|
||||
```bash
|
||||
tar -zxvf
|
||||
```
|
||||
|
||||
安装 `buildctl` 和 `buildkitd`
|
||||
|
||||
将解压后的 `bin` 目录中的 `buildctl` 和 `buildkitd` 可执行文件移动到系统 `$PATH` 中的某个目录,例如 `/usr/local/bin`。
|
||||
|
||||
```bash
|
||||
sudo mv /tmp/bin/buildctl /usr/local/bin/
|
||||
sudo mv /tmp/bin/buildkitd /usr/local/bin/
|
||||
```
|
||||
|
||||
验证 `buildctl` 是否在 `$PATH` 中
|
||||
|
||||
```bash
|
||||
which buildctl
|
||||
buildctl version
|
||||
```
|
||||
|
||||
如果显示路径和版本信息,说明 `buildctl` 已经正确安装并可执行。
|
||||
|
||||
启动 BuildKit 守护进程 (`buildkitd`)
|
||||
|
||||
配置为 Systemd 服务
|
||||
|
||||
创建一个 systemd service 文件,例如 `/etc/systemd/system/buildkit.service`
|
||||
|
||||
```toml
|
||||
[Unit]
|
||||
Description=BuildKit Daemon
|
||||
Documentation=https://github.com/moby/buildkit
|
||||
|
||||
[Service]
|
||||
ExecStart=/usr/local/bin/buildkitd --addr unix:///run/buildkit/buildkitd.sock
|
||||
Type=notify
|
||||
Delegate=yes
|
||||
KillMode=process
|
||||
# 在某些环境中,可能需要调整用户和组
|
||||
# User=buildkit
|
||||
# Group=buildkit
|
||||
|
||||
[Install]
|
||||
WantedBy=multi-user.target
|
||||
```
|
||||
|
||||
保存后,重载 systemd 并启动服务
|
||||
|
||||
```bash
|
||||
sudo systemctl daemon-reload
|
||||
sudo systemctl enable buildkit # 设置开机自启
|
||||
sudo systemctl start buildkit
|
||||
```
|
||||
|
||||
检查 BuildKit 状态
|
||||
|
||||
```bash
|
||||
sudo systemctl status buildkit
|
||||
```
|
||||
|
||||

|
||||
|
||||
配置buildkitd镜像加速,解决构建时的镜像拉取问题
|
||||
|
||||
**BuildKit Daemon 的配置文件 (`buildkitd.toml`):** BuildKit 守护进程 (buildkitd) 可以通过配置文件进行更高级的配置,通常是 `/etc/buildkit/buildkitd.toml`(或 rootless 模式下的 `~/.config/buildkit/buildkitd.toml`)。在这个文件中,可以配置:
|
||||
|
||||
- **Registry Mirrors (镜像加速器/代理):** 为特定仓库定义镜像源,例如将 `docker.io` 的请求重定向到私有加速器。
|
||||
|
||||
```bash
|
||||
mkdir -p /etc/buildkit
|
||||
vim /etc/buildkit/buildkitd.toml
|
||||
```
|
||||
|
||||
添加以下内容
|
||||
```toml
|
||||
# registry configures a new Docker register used for cache import or output.
|
||||
[registry."docker.io"]
|
||||
# mirror configuration to handle path in case a mirror registry requires a /project path rather than just a host:port
|
||||
mirrors = ["https://docker.m.daocloud.io",
|
||||
"https://docker.imgdb.de",
|
||||
"https://docker-0.unsee.tech",
|
||||
"https://docker.hlmirror.com",
|
||||
"https://docker.1ms.run",
|
||||
"https://cjie.eu.org",
|
||||
"https://func.ink",
|
||||
"https://lispy.org",
|
||||
"https://docker.xiaogenban1993.com"]
|
||||
# Use plain HTTP to connect to the mirrors.
|
||||
http = true
|
||||
```
|
||||
|
||||
保存后,重启服务生效
|
||||
|
||||
```bash
|
||||
systemctl restart buildkit
|
||||
```
|
||||
|
||||
|
||||
|
||||
## Containerd的config.toml实现镜像加速
|
||||
|
||||
> [containerd/docs/cri/config.md at main · containerd/containerd](https://github.com/containerd/containerd/blob/main/docs/cri/config.md#registry-configuration)
|
||||
|
||||
如果没有`/etc/containerd/config.toml`,执行以下命令生成默认配置
|
||||
|
||||
```bash
|
||||
sudo containerd config default | sudo tee /etc/containerd/config.toml
|
||||
```
|
||||
|
||||
编辑Containerd的配置文件,添加以下镜像配置
|
||||
|
||||
```toml
|
||||
# 找到[plugins.'io.containerd.grpc.v1.cri']配置处
|
||||
[plugins.'io.containerd.grpc.v1.cri']
|
||||
disable_tcp_service = true
|
||||
stream_server_address = '127.0.0.1'
|
||||
stream_server_port = '0'
|
||||
stream_idle_timeout = '4h0m0s'
|
||||
enable_tls_streaming = false
|
||||
|
||||
[plugins.'io.containerd.grpc.v1.cri'.x509_key_pair_streaming]
|
||||
tls_cert_file = ''
|
||||
tls_key_file = ''
|
||||
|
||||
[plugins."io.containerd.grpc.v1.cri".containerd]
|
||||
[plugins."io.containerd.grpc.v1.cri".containerd.runtimes]
|
||||
[plugins."io.containerd.grpc.v1.cri".containerd.runtimes.runc]
|
||||
runtime_type = "io.containerd.runc.v2"
|
||||
[plugins."io.containerd.grpc.v1.cri".containerd.runtimes.runc.options]
|
||||
SystemdCgroup = true
|
||||
|
||||
[plugins."io.containerd.grpc.v1.cri".registry] #在这里增加
|
||||
config_path = "/etc/containerd/certs.d"
|
||||
```
|
||||
|
||||
创建目录`/etc/containerd/certs.d/docker.io`
|
||||
|
||||
```shell
|
||||
mkdir -p /etc/containerd/certs.d/docker.io
|
||||
```
|
||||
|
||||
进入到创建好的目录下,编辑文件`hosts.toml`
|
||||
|
||||
```toml
|
||||
server = "https://docker.io"
|
||||
|
||||
[host."https://docker.m.daocloud.io"]
|
||||
capabilities = ["pull", "resolve"]
|
||||
|
||||
[host."https://docker.imgdb.de"]
|
||||
capabilities = ["pull", "resolve"]
|
||||
```
|
||||
|
||||
然后重启`containerd`服务即可
|
||||
|
||||
```shell
|
||||
systemctl restart containerd
|
||||
```
|
||||
|
||||
## containerd管理命令介绍
|
||||
|
||||
使用docker作为容器运行时需要经过多层转换(kubelet <-> dockershim <-> docker <-> containerd),这会导致连接不稳定和性能下降。K8s从v1.24版本开始,不再支持docker容器运行时,而是默认使用containerd
|
||||
|
||||
切换到containerd之后,有以下几种替代docker的管理命令:
|
||||
|
||||
使用k8s自带的crictl命令。crictl是一个符合CRI接口规范的命令行工具,可以用它来检查和管理kubelet节点上的容器运行时和镜像。
|
||||
使用containerd自带的ctr命令。ctr是一个本地CLI工具,可以用它来管理镜像、容器、任务、快照等。因为containerd支持多个命名空间,所以ctr命令需要指定命名空间。要管理k8s创建的容器,需要使用k8s.io名字空间,即ctr -n k8s.io。
|
||||
使用containerd额外提供的nerdctl工具。nerdctl是一个与docker兼容的containerd的命令行工具,需要额外安装。它支持一些docker没有的功能,比如延迟拉取镜像、镜像加密等。
|
||||
使用其他第三方管理容器的开源工具。
|
||||
|
||||
## docker、crictl和ctr命令对比
|
||||
|
||||
| 命令 | docker | crictl(k8s) | ctr(containerd) | nerdctl(containerd) |
|
||||
| ------------------- | ----------------- | -------------------------------- | ---------------------------- | --------------------- |
|
||||
| 查看运行的容器 | docker ps | crictl ps | ctr task ls/ctr container ls | nerdctl ps |
|
||||
| 查看镜像 | docker images | crictl images | ctr image ls | nerdctl images |
|
||||
| 查看容器日志 | docker logs | crictl logs | 无 | nerdctl logs |
|
||||
| 查看容器信息 | docker inspect | crictl inspect | ctr container info | nerdctl inspect |
|
||||
| 查看容器资源使用 | docker stats | crictl stats | 无 | nerdctl stats |
|
||||
| 启动/关闭已有的容器 | docker start/stop | crictl start/stop | ctr task start/kill | nerdctl start/stop |
|
||||
| 运行一个新的容器 | docker run | 比较麻烦,因为它的最小单元为 Pod | ctr run | nerdctl run |
|
||||
| 创建一个新的容器 | docker create | 比较麻烦,因为它的最小单元为 Pod | ctr container create | nerdctl create |
|
||||
| 在容器内部执行命令 | docker exec | crictl exec | 无 | nerdctl exec |
|
||||
| 删除容器 | docker rm | crictl rm | ctr container rm | nerdctl rm |
|
||||
| 删除镜像 | docker rmi | crictl rmi | ctr image rm | nerdctl rmi |
|
||||
| 导入镜像 | docker load | 无 | ctr image import | nerdctl load |
|
||||
| 导出镜像 | docker save | 无 | ctr image export | nerdctl save |
|
||||
| 拉取镜像 | docker pull | crictl pull | ctr image pull | nerdctl pull |
|
||||
| 给镜像打标签 | docker tag | 无 | ctr image tag | nerdctl tag |
|
||||
| 推送镜像 | docker push | 无 | ctr image push | nerdctl push |
|
||||
| 构建镜像 | docker build | 无 | 无 | nerdctl build |
|
||||
|
||||
(需要额外安装buildkit服务)
|
||||
注意:ctr和nerdctl命令需要指定名字空间,管理k8s创建的容器,需要使用k8s.io名字空间,即ctr/nerdctl -n k8s.io。
|
||||
@ -5,195 +5,5 @@ author: 文永达
|
||||
top_img: https://gcore.jsdelivr.net/gh/volantis-x/cdn-wallpaper/abstract/67239FBB-E15D-4F4F-8EE8-0F1C9F3C4E7C.jpeg
|
||||
---
|
||||
|
||||
# 选择器与属性
|
||||
|
||||
## 基本语法结构
|
||||
|
||||
CSS的规则通常长这样:
|
||||
```css
|
||||
选择器 {
|
||||
属性: 值;
|
||||
}
|
||||
```
|
||||
|
||||
## 元素选择器
|
||||
|
||||
举个例子,如果我们想把网页上所有的`<h1>`标题变成红色:
|
||||
|
||||
```css
|
||||
h1 {
|
||||
color: red;
|
||||
}
|
||||
```
|
||||
|
||||
- `h1` 是 **选择器**(选中所有 h1 标签)。
|
||||
- `color` 是 **属性**(我们要改颜色)。
|
||||
- `red` 是 **值**(改成红色)。
|
||||
|
||||
这叫 **元素选择器**,因为它选中了所有叫 `h1` 的元素。没问题,我们继续!🚀
|
||||
|
||||
为了确保你完全掌握了刚才的逻辑,我先揭晓一下刚才小练习的答案。要把 `<p>` 标签的文字变成蓝色,代码是这样的:
|
||||
|
||||
CSS
|
||||
|
||||
假设你的 HTML 里有这样一个段落标签:
|
||||
|
||||
```html
|
||||
<p>我是一个普通的段落。</p>
|
||||
```
|
||||
|
||||
如果想把这个段落的文字颜色改成 **蓝色 (blue)**
|
||||
|
||||
```css
|
||||
p {
|
||||
color: blue;
|
||||
}
|
||||
```
|
||||
|
||||
很简单对吧?这叫 **元素选择器**,因为它选中了所有叫 `p` 的元素。
|
||||
|
||||
------
|
||||
|
||||
🔥 进阶:如何只选中“某一个”?
|
||||
|
||||
在实际做网页时,我们通常不希望**所有**的段落都长得一样。比如,你可能希望有一个段落是特别的“警告信息”。
|
||||
|
||||
这时候,我们需要给 HTML 标签起个“名字”或者贴个“标签”。
|
||||
|
||||
1. **类 (Class)**:
|
||||
- **作用**:就像给一群人穿上同样的制服。多个元素可以共用同一个 class。
|
||||
- **CSS 写法**:用 `.` (小圆点) 开头。
|
||||
2. **ID**:
|
||||
- **作用**:就像身份证号。整个页面里,一个 ID 只能给一个元素用,是唯一的。
|
||||
- **CSS 写法**:用 `#` (井号) 开头。
|
||||
|
||||
## 类选择器
|
||||
|
||||
假设我们的 HTML 代码是这样的:
|
||||
|
||||
```html
|
||||
<p class="alert">注意:这是一个警告!</p>
|
||||
|
||||
<p>我只是一个路人甲。</p>
|
||||
```
|
||||
|
||||
如果我们只想选中那个带有 `alert` 类的段落,把它的颜色变成 **红色 (red)**,CSS 选择器应该怎么写?
|
||||
|
||||
**提示**:记得 Class 选择器要用 `.` 开头哦。
|
||||
|
||||
```css
|
||||
.alert {
|
||||
color: red;
|
||||
}
|
||||
```
|
||||
|
||||
## ID 选择器
|
||||
|
||||
比 Class 更“独一无二”的:**ID**。
|
||||
|
||||
在 CSS 里,我们要用 **井号 (#)** 来代表 ID。
|
||||
|
||||
```html
|
||||
<h1 id="main-title">欢迎来到我的主页</h1>
|
||||
```
|
||||
|
||||
如果我们想把这个标题的 **字体大小 (font-size)** 设置为 **40px**,你应该怎么写这段 CSS?
|
||||
|
||||
**提示**:记得 ID 要用 `#` 开头哦。
|
||||
|
||||
```css
|
||||
#main-title {
|
||||
font-size: 40px;
|
||||
}
|
||||
```
|
||||
|
||||
## 后代选择器 (Descendant Selector)
|
||||
|
||||
**根据“位置”来选元素**。
|
||||
|
||||
有时候,你不想选中“所有的 `a` 标签”,你只想选中“侧边栏 (Sidebar) 里的 `a` 标签”。这就需要用到**后代选择器**。
|
||||
|
||||
**语法规则**: 我们在两个选择器之间加一个 **空格 (Space)**,表示“里面的”意思。
|
||||
|
||||
```css
|
||||
/* 选中所有在 div 里面的 p 标签 */
|
||||
div p {
|
||||
color: green;
|
||||
}
|
||||
```
|
||||
|
||||
- `div` 是父元素(外面的)。
|
||||
|
||||
- `p` 是子元素(里面的)。
|
||||
|
||||
- 中间的**空格**很关键!
|
||||
|
||||
假设我们有下面这段 HTML,里面有两个链接,但我们只想修改在 `.nav` 里面的那个链接:
|
||||
|
||||
```html
|
||||
<div class="nav">
|
||||
<a href="#">我是导航菜单</a>
|
||||
</div>
|
||||
|
||||
<a href="#">我是普通链接</a>
|
||||
```
|
||||
|
||||
选中 **`.nav` 里面的 `a` 标签**,并把它的颜色改成 **橙色 (orange)**。
|
||||
|
||||
**提示**:记得利用空格来表示层级关系哦!
|
||||
|
||||
```css
|
||||
.nav a {
|
||||
color: orange;
|
||||
}
|
||||
```
|
||||
|
||||
## 伪类 (Pseudo-classes)
|
||||
|
||||
现在你已经能控制元素“静止”时的样子了,接下来我们要让网页变得更有**互动感**。我们要学习的是 **伪类 (Pseudo-classes)**。
|
||||
|
||||
最常用的一个伪类是 `:hover`。
|
||||
|
||||
- **作用**:它是指“当鼠标**悬停**在元素上时”的那个瞬间。
|
||||
- **语法**:在选择器后面紧跟着写 `:hover` (注意:冒号前面**不能**有空格)。
|
||||
|
||||
```css
|
||||
/* 例子:所有按钮在鼠标放上去时,背景变黑 */
|
||||
button:hover {
|
||||
background-color: black;
|
||||
}
|
||||
```
|
||||
|
||||
```html
|
||||
<div class="nav">
|
||||
<a href="#">我是导航菜单</a>
|
||||
</div>
|
||||
|
||||
<a href="#">我是普通链接</a>
|
||||
```
|
||||
|
||||
要求: 当鼠标**悬停**在 `.nav` 里面的 `a` 标签上时,把它的**文字颜色**变成 **绿色 (green)**。
|
||||
|
||||
**提示**:你需要把刚才学的“后代选择器”和现在的“伪类”结合起来写哦!
|
||||
|
||||
```css
|
||||
.nav a:hover {
|
||||
color: green;
|
||||
}
|
||||
```
|
||||
|
||||
# 盒模型
|
||||
|
||||
既然你已经学会了怎么给元素“上色”,接下来我们要学怎么控制它们的“身材”和“距离”。
|
||||
|
||||
在 CSS 的世界里,**所有的元素(无论是图片、段落还是标题)本质上都是一个矩形的盒子**。
|
||||
|
||||
我们要控制这个盒子,主要靠这四个属性(由内向外):
|
||||
|
||||
1. **内容 (Content)**:盒子的核心,就是文字或图片本身。
|
||||
2. **内边距 (Padding)**:内容和边框之间的空间。就像快递盒子里的气泡膜,保护内容不紧贴着纸箱壁。
|
||||
3. **边框 (Border)**:盒子的边缘。
|
||||
4. **外边距 (Margin)**:盒子和其他盒子之间的距离。就像人与人之间的社交距离。
|
||||
|
||||
## CSS Text(文本)
|
||||
|
||||
|
||||
@ -58,54 +58,6 @@ sudo ln -s /usr/local/bin/docker-compose /usr/bin/docker-compose
|
||||
docker-compose version
|
||||
```
|
||||
|
||||
# 命令
|
||||
|
||||
### 运行
|
||||
|
||||
```shell
|
||||
# 默认以所在目录名,为Name -d 为后台运行
|
||||
docker compose up -d
|
||||
# 指定Name运行
|
||||
docker compose --project-name dify-docker up -d
|
||||
```
|
||||
|
||||
## 停止并清理容器
|
||||
|
||||
默认情况下不会清理挂载卷,除非额外指定 -v
|
||||
|
||||
```shell
|
||||
# 进入到之前启动容器的所在目录
|
||||
docker compose down
|
||||
# 指定Name
|
||||
docker compose --project-name dify-docker down
|
||||
```
|
||||
|
||||
## 修改Dockerfile后,通过Docker Compose重新构建镜像
|
||||
|
||||
1. **修改 `Dockerfile`**。
|
||||
|
||||
2. 进入到 `Dockerfile` 和 `docker-compose.yml` 所在的目录。
|
||||
|
||||
3. **构建新镜像:**
|
||||
|
||||
Bash
|
||||
|
||||
```
|
||||
docker-compose build jenkins
|
||||
```
|
||||
|
||||
(如果遇到问题或想完全重来,可以加 `--no-cache`:`docker-compose build --no-cache jenkins`)
|
||||
|
||||
4. **使用新镜像启动容器:**
|
||||
|
||||
Bash
|
||||
|
||||
```
|
||||
docker-compose up -d --force-recreate jenkins
|
||||
```
|
||||
|
||||
执行这些步骤后,你的 Jenkins 容器就会运行在新修改并构建的 Docker 镜像上,其中包含了你所有新增的工具和配置。
|
||||
|
||||
|
||||
|
||||
# 集群搭建
|
||||
@ -287,109 +239,3 @@ networks:
|
||||
external: true
|
||||
```
|
||||
|
||||
# 容器搭建
|
||||
|
||||
## Gitea
|
||||
|
||||
docker-compose.yaml
|
||||
|
||||
```yaml
|
||||
networks:
|
||||
gitea:
|
||||
external: false
|
||||
|
||||
services:
|
||||
server:
|
||||
image: gitea/gitea:1.23
|
||||
container_name: gitea
|
||||
environment:
|
||||
- USER_UID=1000
|
||||
- USER_GID=1000
|
||||
- DB_TYPE=mysql
|
||||
- DB_HOST=<ip>:33061
|
||||
- DB_NAME=gitea
|
||||
- DB_USER=gitea
|
||||
- DB_PASSWD=Wyd210213
|
||||
restart: always
|
||||
networks:
|
||||
- gitea
|
||||
volumes:
|
||||
- /usr/local/docker/gitea:/data
|
||||
- /etc/timezone:/etc/timezone:ro
|
||||
- /etc/localtime:/etc/localtime:ro
|
||||
ports:
|
||||
- "3000:3000"
|
||||
- "222:22"
|
||||
|
||||
```
|
||||
|
||||
## Oracle-12C
|
||||
|
||||
docker-compose.yaml
|
||||
|
||||
```yaml
|
||||
services:
|
||||
server:
|
||||
image: truevoly/oracle-12c
|
||||
container_name: oracle-12c
|
||||
volumes:
|
||||
- /etc/localtime:/etc/localtime:ro
|
||||
- /etc/timezone:/etc/timezone:ro
|
||||
- /var/oracle:/u01/app/oracle
|
||||
ports:
|
||||
- "2122:22"
|
||||
- "1521:1521"
|
||||
- "9090:8080"
|
||||
```
|
||||
|
||||
首先创建挂载目录,并赋予权限
|
||||
|
||||
```bash
|
||||
mkdir -p /var/oracle && chmod 777 /var/oracle
|
||||
```
|
||||
|
||||
启动
|
||||
|
||||
```bash
|
||||
docker compose up -d
|
||||
```
|
||||
|
||||
连接Oracle数据库
|
||||
|
||||
```yml
|
||||
hostname: localhost #主机名
|
||||
port: 1521 #端口号
|
||||
sid: xe
|
||||
service name: xe #服务名
|
||||
username: system #用户名
|
||||
password: oracle #密码
|
||||
```
|
||||
|
||||
```bash
|
||||
sqlplus system/oracle@localhost:1521/xe
|
||||
|
||||
sqlplus /nolog
|
||||
conn sys/oracle@localhost:1521/xe as sysdba
|
||||
```
|
||||
|
||||
使用 `sqlplus / as sysdba`登录
|
||||
|
||||
```bash
|
||||
su - oracle
|
||||
export ORACLE_HOME=/u01/app/oracle/product/12.1.0/xe
|
||||
export ORACLE_SID=xe
|
||||
export PATH=$ORACLE_HOME/bin:$PATH
|
||||
sqlplus / as sysdba
|
||||
```
|
||||
|
||||
环境变量永久生效
|
||||
|
||||
```bash
|
||||
echo 'export ORACLE_HOME=/u01/app/oracle/product/12.1.0/xe' >> ~/.bashrc
|
||||
echo 'export ORACLE_SID=xe' >> ~/.bashrc
|
||||
echo 'export PATH=$ORACLE_HOME/bin:$PATH' >> ~/.bashrc
|
||||
source ~/.bashrc
|
||||
```
|
||||
|
||||
|
||||
|
||||
|
||||
@ -23,11 +23,9 @@ CentOS占CPU Docker CPU引擎占用低
|
||||
|
||||
# Docker 安装
|
||||
|
||||
## CentOS 7
|
||||
|
||||
```shell
|
||||
curl -fsSL https://get.docker.com | bash -s docker --mirror Aliyun
|
||||
# 另一种方式
|
||||
# 另一种方式
|
||||
curl -sSL https://get.daocloud.io/docker | sh
|
||||
# 如上述两种方式都不行
|
||||
yum-config-manager --add-repo http://mirrors.aliyun.com/docker-ce/linux/centos/docker-ce.repo
|
||||
@ -35,11 +33,8 @@ yum-config-manager --add-repo http://mirrors.aliyun.com/docker-ce/linux/centos/d
|
||||
yum list docker-ce --showduplicates | sort -r
|
||||
# 安装
|
||||
yum install docker-ce-18.03.1.ce
|
||||
```
|
||||
|
||||
## AlmaLinux CentOS 8
|
||||
|
||||
```shell
|
||||
# almalinux centos8
|
||||
dnf clean all
|
||||
dnf update
|
||||
# 添加必要的Docker存储库
|
||||
@ -49,89 +44,9 @@ dnf list docker-ce --showduplicates | sort -r
|
||||
# 安装Docker CE
|
||||
dnf install docker-ce-3:24.0.7-1.el9 -y
|
||||
# 镜像源配置
|
||||
vim /etc/docker/daemon.json
|
||||
vim /etc/docker/daemon.json
|
||||
```
|
||||
|
||||
## Ubuntu
|
||||
|
||||
```shell
|
||||
# 安装前先卸载操作系统默认安装的docker,
|
||||
sudo apt-get remove docker docker-engine docker.io containerd runc
|
||||
|
||||
# 安装必要支持
|
||||
sudo apt install apt-transport-https ca-certificates curl software-properties-common gnupg lsb-release
|
||||
|
||||
# 阿里源(推荐使用阿里的gpg KEY)
|
||||
curl -fsSL https://mirrors.aliyun.com/docker-ce/linux/ubuntu/gpg | sudo gpg --dearmor -o /usr/share/keyrings/docker-archive-keyring.gpg
|
||||
|
||||
# 添加 apt 源:
|
||||
# 阿里apt源
|
||||
echo "deb [arch=$(dpkg --print-architecture) signed-by=/usr/share/keyrings/docker-archive-keyring.gpg] https://mirrors.aliyun.com/docker-ce/linux/ubuntu $(lsb_release -cs) stable" | sudo tee /etc/apt/sources.list.d/docker.list > /dev/null
|
||||
|
||||
# 更新源
|
||||
sudo apt update
|
||||
sudo apt-get update
|
||||
|
||||
# 安装最新版本的Docker
|
||||
sudo apt install docker-ce docker-ce-cli containerd.io
|
||||
|
||||
# 等待安装完成
|
||||
|
||||
# 查看Docker版本
|
||||
sudo docker version
|
||||
|
||||
# 查看Docker运行状态
|
||||
sudo systemctl status docker
|
||||
|
||||
# 可选安装Docker 命令补全工具(bash shell)
|
||||
sudo apt-get install bash-completion
|
||||
|
||||
sudo curl -L https://raw.githubusercontent.com/docker/docker-ce/master/components/cli/contrib/completion/bash/docker -o /etc/bash_completion.d/docker.sh
|
||||
|
||||
source /etc/bash_completion.d/docker.sh
|
||||
|
||||
```
|
||||
|
||||
安装docker后,执行docker ps命令时提示
|
||||
permission denied while trying to connect to the Docker daemon socket at unix:///var/run/docker.sock: Get "http://%2Fvar%2Frun%2Fdocker.sock/v1.24/containers/json": dial unix /var/run/docker.sock: connect: permission denied
|
||||
|
||||
首先查看当前存在的用户组中是否存在 `docker`用户组
|
||||
|
||||
```bash
|
||||
cat /etc/group | grep docker
|
||||
|
||||
docker:x:988:
|
||||
```
|
||||
|
||||
若不存在,则需要使用以下命令添加`docker`用户组
|
||||
|
||||
```shell
|
||||
sudo groupadd docker
|
||||
```
|
||||
|
||||
然后执行以下命令将当前用户加入到`docker`用户组中
|
||||
|
||||
```shell
|
||||
sudo gpasswd -a $USER docker
|
||||
```
|
||||
|
||||
更新用户组
|
||||
|
||||
```shell
|
||||
newgrp docker
|
||||
```
|
||||
|
||||
也可以直接编辑当前Shell环境变量
|
||||
|
||||
```shell
|
||||
vim ~/.zshrc
|
||||
|
||||
# 末尾添加 groupadd -f docker
|
||||
groupadd -f docker
|
||||
```
|
||||
|
||||
|
||||
|
||||
1、镜像:image。一个镜像代表一个软件。如:redis镜像,mysql镜像,tomcat镜像。。
|
||||
特点:只读
|
||||
2、容器:container。一个镜像只要一启动,称之为启动了一个容器。
|
||||
@ -180,7 +95,7 @@ sed -e 's/"//g' -e "s/name:/$1:/g" -e "s/{count:/$1总版本数-/"
|
||||
docker-tags脚本编辑好之后,需要通过chmod修改文件权限才可以执行。在权限修改完成之后,就可以使用docker-tags脚本来查询相关镜像的最近版本信息了。
|
||||
|
||||
```shell
|
||||
chmod 777 docker-tags
|
||||
chmod 777 docker-tags
|
||||
./docker-tags ubuntu
|
||||
```
|
||||
|
||||
@ -189,7 +104,7 @@ chmod 777 docker-tags
|
||||
```shell
|
||||
# 第一步:新建或编辑daemon.json
|
||||
vim /etc/docker/daemon.json
|
||||
|
||||
|
||||
# 第二步:daemon.json中编辑如下
|
||||
{
|
||||
"registry-mirrors": [
|
||||
@ -204,10 +119,10 @@ vim /etc/docker/daemon.json
|
||||
"https://docker.xiaogenban1993.com"
|
||||
]
|
||||
}
|
||||
|
||||
|
||||
# 第三步:重启docker
|
||||
systemctl restart docker.service
|
||||
|
||||
|
||||
# 第四步:执行docker info查看是否修改成功
|
||||
docker info
|
||||
|
||||
@ -259,7 +174,7 @@ docker inspect <IMAGE ID>
|
||||
### 运行容器
|
||||
|
||||
```shell
|
||||
# 第一个8080是外部海豚上的 第二个8080是内部集装箱上的
|
||||
# 第一个8080是外部海豚上的 第二个8080是内部集装箱上的
|
||||
docker run -p 8080:8080
|
||||
```
|
||||
|
||||
@ -281,22 +196,6 @@ docker run -p 8080:8080
|
||||
--link=[]: 添加链接到另一个容器;
|
||||
--expose=[]: 开放一个端口或一组端口;
|
||||
--volume , -v 绑定一个卷
|
||||
--restart:重启策略:
|
||||
|
||||
- **`no`** – 此策略永远不会自动启动容器。这是使用 `docker run` 创建的所有容器的默认策略。
|
||||
- **`always`** – Docker 将确保容器始终运行。如果容器停止,它将立即重新启动。您仍然可以使用 `docker stop` 手动停止容器,但 Docker 会在下次守护进程重新启动时将其恢复。
|
||||
- **`on-failure`** – 如果容器因错误而停止,它将重新启动。守护进程重启后,Docker 不会启动容器。
|
||||
|
||||
`on-failure` 重启策略允许您指定应尝试重试的次数。如果连续多次启动失败,Docker 将放弃并让容器处于停止状态。
|
||||
|
||||
```sql
|
||||
docker run httpd:latest --restart on-failure:5
|
||||
```
|
||||
|
||||
在此示例中,Docker 将在失败(非零退出代码)后尝试重新启动容器五次。如果容器在第五次尝试时启动失败,将不再尝试重试。此选项对于在没有手动干预的情况下不太可能解决持续启动错误的容器很有用。
|
||||
- **`unless-stopped`** – 其功能类似于`always`。不同之处在于,如果容器已被手动停止,Docker 将永远不会重新启动容器。
|
||||
|
||||
|
||||
|
||||
### 启动容器
|
||||
|
||||
@ -347,7 +246,7 @@ docker inspect <container id>
|
||||
```shell
|
||||
docker pull hello-world
|
||||
docker pull nginx
|
||||
docker save -o images.tar nginx hello-world
|
||||
docker save -o images.tar nginx hello-world
|
||||
ll images.tar
|
||||
```
|
||||
|
||||
@ -359,14 +258,14 @@ ll images.tar
|
||||
|
||||
```shell
|
||||
docker load -i images.tar
|
||||
docker images
|
||||
docker images
|
||||
```
|
||||
|
||||
## Docker 容器快照的导出和导入
|
||||
|
||||
### 容器快照的导出
|
||||
|
||||
当容器文件修改之后,可以通过`docker export`命令将容器以快照的形式导出到文件。其命令的格式为`docker export 容器名 > 快照文件名`。**导出容器会丢失历史记录和元数据,类似与快照。**
|
||||
当容器文件修改之后,可以通过`docker export`命令将容器以快照的形式导出到文件。其命令的格式为`docker export 容器名 > 快照文件名`。和镜像导出不同,快照的导出,会将容器的镜像,和容器在镜像之上的修改部分同时导出
|
||||
|
||||
```shell
|
||||
docker export python-1 > python-snapshot.tar
|
||||
@ -375,7 +274,7 @@ ll python-snapshot.tar
|
||||
|
||||
### 容器快照的导入
|
||||
|
||||
对于通过`docker export`导出的容器快照文件。可以通过`docker import`命令将其导入到docker中,在这里需要特别注意的是:`docker import是以镜像而不是容器的形式导入快照`。也就是说导入的快照并不能直接运行,而是需要根据此快照镜像再次创建容器才可以使用。`docker import`命令的格式为`docker import 快照文件 导入镜像名称:版本号` **启动export与import命令导出导入的镜像必须加/bin/bash或者其他/bin/sh,否则会报错。**
|
||||
对于通过`docker export`导出的容器快照文件。可以通过`docker import`命令将其导入到docker中,在这里需要特别注意的是:`docker import是以镜像而不是容器的形式导入快照`。也就是说导入的快照并不能直接运行,而是需要根据此快照镜像再次创建容器才可以使用。`docker import`命令的格式为`docker import 快照文件 导入镜像名称:版本号`
|
||||
|
||||
```shell
|
||||
docker import python-snapshot.tar python-snapshot:latest
|
||||
@ -394,7 +293,7 @@ docker save new_image_name > image.tar
|
||||
|
||||
### 导入容器镜像
|
||||
|
||||
迁移到 B 服务器上cd
|
||||
迁移到 B 服务器上
|
||||
|
||||
```shell
|
||||
docker load < image.tar
|
||||
@ -419,8 +318,6 @@ docker load < image.tar
|
||||
|
||||
将A服务器宿主机的目录备份到B服务器上
|
||||
|
||||
## Docker 网络 network
|
||||
|
||||
|
||||
|
||||
## Docker 容器与宿主机时间不同步
|
||||
@ -476,7 +373,7 @@ docker start <container id>
|
||||
修改线上容器--restart参数值
|
||||
|
||||
```shell
|
||||
docker update --restart=no [容器名]
|
||||
docker update --restart=no [容器名]
|
||||
docker update --restart=always [容器名]
|
||||
docker update --restart=on-failure:3 [容器名]
|
||||
```
|
||||
@ -588,7 +485,7 @@ Dockerfile 是一个用来构建镜像的文本文件,文本内容包含了一
|
||||
docker build -t nginx:v3 .
|
||||
```
|
||||
|
||||

|
||||

|
||||
|
||||
### 上下文路径
|
||||
|
||||
@ -608,26 +505,26 @@ docker build -t nginx:v3 .
|
||||
|
||||
### 指令详解
|
||||
|
||||
| Dockerfile 指令 | 说明 |
|
||||
| --------------- | ------------------------------------------------------------------ |
|
||||
| FROM | 指定基础镜像,用于后续的指令构建。 |
|
||||
| MAINTAINER | 指定Dockerfile的作者/维护者。(已启用,推荐使用LABEL指令) |
|
||||
| LABEL | 添加镜像的元数据,使用键值对的形式。 |
|
||||
| RUN | 在构建过程中在镜像中执行命令。 |
|
||||
| CMD | 指定容器创建时的默认命令。(可以被覆盖) |
|
||||
| ENTRYPOINT | 设置容器创建时的主要命令。(不可被覆盖) |
|
||||
| EXPOSE | 声明容器运行时监听的特定网络端口。 |
|
||||
| ENV | 在容器内部设置环境变量。 |
|
||||
| ADD | 将文件、目录或远程URL复制到镜像中。 |
|
||||
| COPY | 将文件或目录复制到镜像中。 |
|
||||
| VOLUME | 为容器创建挂载点或声明卷。 |
|
||||
| WORKDIR | 设置后续指令的工作目录。 |
|
||||
| USER | 指定后续指令的用户上下文。 |
|
||||
| Dockerfile 指令 | 说明 |
|
||||
| --------------- | ------------------------------------------------------------ |
|
||||
| FROM | 指定基础镜像,用于后续的指令构建。 |
|
||||
| MAINTAINER | 指定Dockerfile的作者/维护者。(已启用,推荐使用LABEL指令) |
|
||||
| LABEL | 添加镜像的元数据,使用键值对的形式。 |
|
||||
| RUN | 在构建过程中在镜像中执行命令。 |
|
||||
| CMD | 指定容器创建时的默认命令。(可以被覆盖) |
|
||||
| ENTRYPOINT | 设置容器创建时的主要命令。(不可被覆盖) |
|
||||
| EXPOSE | 声明容器运行时监听的特定网络端口。 |
|
||||
| ENV | 在容器内部设置环境变量。 |
|
||||
| ADD | 将文件、目录或远程URL复制到镜像中。 |
|
||||
| COPY | 将文件或目录复制到镜像中。 |
|
||||
| VOLUME | 为容器创建挂载点或声明卷。 |
|
||||
| WORKDIR | 设置后续指令的工作目录。 |
|
||||
| USER | 指定后续指令的用户上下文。 |
|
||||
| ARG | 定义在构建过程中传递给构建器的变量,可使用"docker build"命令设置。 |
|
||||
| ONBUILD | 当该镜像被用作另一个构建过程的基础时,添加触发器。 |
|
||||
| STOPSIGNAL | 设置发送给容器以退出的系统调用信号。 |
|
||||
| HEALTHCHECK | 定义周期性检查容器健康状态的命令。 |
|
||||
| SHELL | 覆盖Docker中默认的shell,用于RUN、CMD和ENTRYPOINT。 |
|
||||
| ONBUILD | 当该镜像被用作另一个构建过程的基础时,添加触发器。 |
|
||||
| STOPSIGNAL | 设置发送给容器以退出的系统调用信号。 |
|
||||
| HEALTHCHECK | 定义周期性检查容器健康状态的命令。 |
|
||||
| SHELL | 覆盖Docker中默认的shell,用于RUN、CMD和ENTRYPOINT。 |
|
||||
|
||||
#### COPY
|
||||
|
||||
@ -747,15 +644,6 @@ Build Cache 12 0 0B 0B
|
||||
|
||||
执行 **docker system prune -a** 命令之后,Docker 占用的磁盘空间减少了很多
|
||||
|
||||
```shell
|
||||
du -sh /var/lib/docker/containers/* | sort -rh | head -5
|
||||
cd /var/lib/docker/containers/eb52fa7d62ce52ab7a6153636a0ec89c7c8dce6f1a94dc86b2fbf0702368e82
|
||||
|
||||
truncate -s 0 *-json.log
|
||||
```
|
||||
|
||||
|
||||
|
||||
## 手动清理 Docker 镜像/容器/数据卷
|
||||
|
||||
对于旧版的 Docker(版本 1.13 之前),是没有 docker system 命令的,因此需要进行手动清理。这里给出几个常用的命令
|
||||
@ -874,7 +762,7 @@ redis-server /usr/local/etc/redis/redis.conf
|
||||
# 如报错
|
||||
mkdir -p /usr/redis/bin
|
||||
# 测试连接
|
||||
redis-cli -a <master-password>
|
||||
redis-cli -a <master-password>
|
||||
```
|
||||
|
||||
redis-slave1
|
||||
@ -946,8 +834,7 @@ docker images
|
||||
```shell
|
||||
cd /usr/local
|
||||
mkdir jenkins_home
|
||||
docker run -d -uroot -p 8889:8080 -p 50000:50000 --name jenkins -v /usr/bin/docker:/usr/bin/docker -v /var/run/docker.sock:/var/run/docker.sock -v /etc/sysconfig/docker:/etc/sysconfig/docker -v /usr/local/jenkins_home:/var/jenkins_home -v /etc/localtime:/etc/localtime
|
||||
-u root jenkins/jenkins
|
||||
docker run -d -uroot -p 8889:8080 -p 50000:50000 --name jenkins -v /usr/bin/docker:/usr/bin/docker -v /var/run/docker.sock:/var/run/docker.sock -v /etc/sysconfig/docker:/etc/sysconfig/docker -v /usr/local/jenkins_home:/var/jenkins_home -v /etc/localtime:/etc/localtime jenkins/jenkins
|
||||
```
|
||||
|
||||
启动后查看日志
|
||||
@ -1050,7 +937,7 @@ docker run -d -p 15432:5432 --name postgres16 --restart=always -v /usr/local/doc
|
||||
## Docker 安装 Timescaledb
|
||||
|
||||
```shell
|
||||
docker run -d -p 15433:5432 --name timescaledb-pg16 --restart=always -v /usr/local/docker/timescaledb-pg16/pgdata/data:/var/lib/postgresql/data -v /etc/localtime:/etc/localtime:ro -e POSTGRES_PASSWORD=Wyd210213 -e TZ=Asia/Shanghai timescale/timescaledb:latest-pg16
|
||||
docker run -d -p 15433:5432 --name timescaledb-pg16 --restart=always -v /usr/local/docker/timescaledb-pg16/pgdata/data:/var/lib/postgresql/data -e POSTGRES_PASSWORD=Wyd210213 timescale/timescaledb:latest-pg16
|
||||
```
|
||||
|
||||
|
||||
@ -1077,7 +964,7 @@ docker run \
|
||||
|
||||
```shell
|
||||
mkdir -p /usr/local/docker/mysql57
|
||||
# 宿主机创建配置文件目录映射到容器
|
||||
# 宿主机创建配置文件目录映射到容器
|
||||
mkdir -p /usr/local/docker/mysql57/conf #(需要在此目录下创建"conf.d"、"mysql.conf.d"两个目录)
|
||||
mkdir -p /usr/local/docker/mysql57/conf/conf.d # (建议在此目录创建my.cnf文件并进行相关MySQL配置)
|
||||
mkdir -p /usr/local/docker/mysql57/conf/mysql.conf.d
|
||||
@ -1106,14 +993,14 @@ mysql -uroot -p
|
||||
# 查看 /etc/mysql/my.cnf 文件权限
|
||||
ls -l /etc/mysql/my.cnf
|
||||
# 如果看到以下输出
|
||||
# -rwxrwxrwx 1 root root 1234 Jan 1 00:00 /etc/mysql/my.cnf
|
||||
# -rwxrwxrwx 1 root root 1234 Jan 1 00:00 /etc/mysql/my.cnf
|
||||
# 那么说明该配置文件确实是对所有人开放了读、写和执行权利。
|
||||
# 接着我们需要修改这个文件的权限,使其只有root用户有读写权,其他用户只有读的权限:
|
||||
chmod 644 /etc/mysql/my.cnf
|
||||
# 再次使用 ls -l命令查看'/etc/mysql/my.cnf'的权限
|
||||
ls -l /etc/mysql/my.cnf
|
||||
# 看到以下输出,则修改成功
|
||||
# -rw-r--r-- 1 root root 1234 Jan 1 00:00 /etc/mysql/my.cnf
|
||||
# -rw-r--r-- 1 root root 1234 Jan 1 00:00 /etc/mysql/my.cnf
|
||||
```
|
||||
|
||||
## Docker 安装 Redis 7
|
||||
@ -1467,7 +1354,7 @@ docker run -p 9000:9000 -p 9001:9001 \
|
||||
-v /usr/local/docker/minio/config:/root/.minio \
|
||||
minio/minio server \
|
||||
/data \
|
||||
--console-address ":9001"
|
||||
--console-address ":9001"
|
||||
|
||||
```
|
||||
|
||||
@ -1476,7 +1363,7 @@ minio/minio server \
|
||||
```shell
|
||||
docker run -d -p 8080:8080 --name tomcat9 \
|
||||
-v /usr/local/docker/tomcat9/webapps:/usr/local/tomcat/webapps \
|
||||
-v /usr/local/docker/tomcat9/logs:/usr/local/tomcat/logs \
|
||||
-v /usr/local/docker/tomcat9/logs/:/usr/local/tomcat/logs \
|
||||
tomcat:9.0.41-jdk8-corretto
|
||||
```
|
||||
|
||||
|
||||
@ -90,14 +90,6 @@ git config --global credential.helper wincred
|
||||
|
||||
## 储藏 (Stash)
|
||||
|
||||
```shell
|
||||
git stash
|
||||
|
||||
git stash list
|
||||
```
|
||||
|
||||
|
||||
|
||||
## SSH提交
|
||||
|
||||
1. SSH 秘钥默认储存在账户的主目录下的 ~/.ssh 目录
|
||||
@ -122,23 +114,23 @@ git stash list
|
||||
> id_rsa.pub是公钥
|
||||
|
||||
5. SourceTree配置
|
||||

|
||||

|
||||
启动 **PuTTY Key Generator**
|
||||
|
||||
6. 依次点击
|
||||

|
||||

|
||||
|
||||
7. PPKfile version 选择 2
|
||||

|
||||

|
||||
|
||||
8. 选择之前生成的id_rsa
|
||||

|
||||

|
||||
|
||||
9. 出现如下,选择 **Save private key** 保存秘钥
|
||||

|
||||

|
||||
|
||||
10. 保存到 ~/.ssh 目录即可
|
||||

|
||||

|
||||
|
||||
11. 在 **Sourcetree** 中 **工具** -> **选项** 中选择刚刚保存的 ppk文件即可
|
||||
|
||||
@ -152,115 +144,7 @@ git stash list
|
||||
ssh-keygen -c -C "new_comment" -f ssh_key_path
|
||||
```
|
||||
|
||||
## 还原变更
|
||||
|
||||
```shell
|
||||
# 指定文件或目录
|
||||
git checkout -- <filename or directory>
|
||||
```
|
||||
|
||||
## 撤回(重置)本地仓库提交
|
||||
|
||||
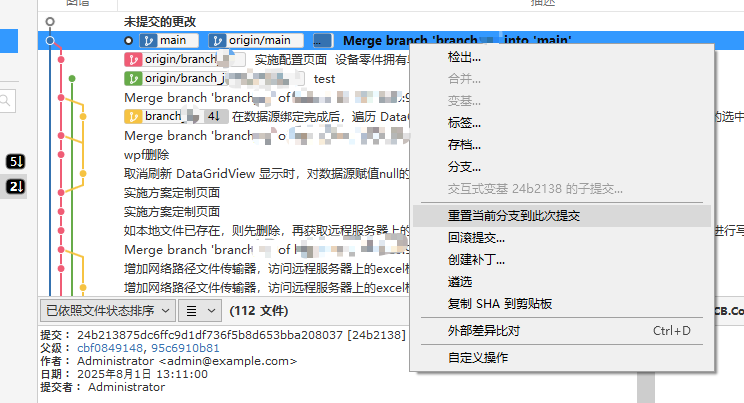
若想把已经提交到本地仓库的提交再撤回到本地,通常有几种情况和对应的命令。最常用的是 `git reset`。
|
||||
|
||||
`git reset` 命令可以用来将当前分支的 `HEAD` 指针移动到指定的提交,并根据不同的模式来处理**暂存区**和**工作目录**。
|
||||
|
||||
- ### 1. `git reset --soft <commit>`
|
||||
|
||||
|
||||
|
||||
- **作用:** 将 `HEAD` 指针移动到指定的 `<commit>`,但**保留**工作目录和暂存区的内容。这意味着你的文件会回到该 `<commit>` 时的状态,但是你当前的修改和暂存的修改都会保留。
|
||||
|
||||
- **适用场景:** 你提交了一个 commit,但是发现提交信息写错了,或者少提交了一些文件。你可以用 `--soft` 回退到上一个 commit,然后修改文件,重新提交。
|
||||
|
||||
- **示例:**
|
||||
|
||||
```Bash
|
||||
git reset --soft HEAD~1
|
||||
```
|
||||
|
||||
这会将 `HEAD` 回退到上一个提交(`HEAD~1` 表示上一个提交)。
|
||||
|
||||
- ### 2. `git reset --mixed <commit>` (默认模式)
|
||||
|
||||
|
||||
|
||||
- **作用:** 将 `HEAD` 指针移动到指定的 `<commit>`,并**清空**暂存区,但**保留**工作目录的内容。这意味着你的文件会回到该 `<commit>` 时的状态,你当前的修改会保留在工作目录中(未暂存)。
|
||||
|
||||
- **适用场景:** 你提交了一个 commit,但是发现这个 commit 的内容不对,想撤销提交,并重新暂存和提交。
|
||||
|
||||
- **示例:**
|
||||
|
||||
```Bash
|
||||
git reset HEAD~1
|
||||
# 或者 git reset --mixed HEAD~1
|
||||
```
|
||||
|
||||
这会将 `HEAD` 回退到上一个提交,并将暂存区清空,但保留文件在工作目录。
|
||||
|
||||
|
||||
|
||||
- ### 3. `git reset --hard <commit>`
|
||||
|
||||
|
||||
|
||||
- **作用:** 将 `HEAD` 指针移动到指定的 `<commit>`,并**清空**暂存区和**丢弃**工作目录的所有修改。这意味着你的仓库会完全回到该 `<commit>` 时的状态,所有在该 `<commit>` 之后的修改都会丢失,**这是最危险的操作**。
|
||||
|
||||
- **适用场景:** 你想完全放弃当前分支上的所有最新修改和提交,回到之前的某个干净的状态。
|
||||
|
||||
- **示例:**
|
||||
|
||||
```Bash
|
||||
git reset --hard HEAD~1
|
||||
```
|
||||
|
||||
这会将 `HEAD` 回退到上一个提交,并丢弃所有工作目录和暂存区的修改。
|
||||
|
||||
|
||||
|
||||
## 如何找到 `<commit>` 的 ID?
|
||||
|
||||
|
||||
|
||||
你可以使用 `git log` 命令来查看提交历史,并找到你想要回退到的提交的哈希值(commit ID)。
|
||||
|
||||
Bash
|
||||
|
||||
```
|
||||
git log
|
||||
```
|
||||
|
||||
`git log` 会显示类似这样的信息:
|
||||
|
||||
```
|
||||
commit abcdef1234567890abcdef1234567890abcdef (HEAD -> master)
|
||||
Author: Your Name <your.email@example.com>
|
||||
Date: Fri Aug 1 13:20:00 2025 +0800
|
||||
|
||||
最新的提交
|
||||
|
||||
commit fedcba0987654321fedcba0987654321fedcba (origin/master)
|
||||
Author: Another Name <another.email@example.com>
|
||||
Date: Thu Jul 31 10:00:00 2025 +0800
|
||||
|
||||
之前的提交
|
||||
```
|
||||
|
||||
你可以复制 `commit` 后面的哈希值(例如 `fedcba0987654321...`)来替换上面的 `<commit>`。
|
||||
|
||||
## git 如何关闭commit时的语法检测 ---husky
|
||||
|
||||
1 报错提示
|
||||
git commit提交时报错如下:
|
||||
|
||||
husky+>+pre-commit+(node+v14.18.2)
|
||||
|
||||
2 解决方案
|
||||
1:卸载husky。只要把项目的package.json文件中devDependencies节点下的husky库删掉,然后重新npm i 一次即可。或者直接在项目根目录下执行npm uninstall husky --save也可以,再次提交,自动化测试功能就屏蔽掉
|
||||
|
||||
2:进入项目的.git文件夹(文件夹默认隐藏,可先设置显示或者命令ls查找),再进入hooks文件夹,删除pre-commit文件,重新git commit -m ‘xxx’ git push即可
|
||||
|
||||
3:将git commit -m “XXX” 改为 git commit --no-verify -m “xxx”
|
||||
|
||||
# github
|
||||
|
||||
@ -305,10 +189,10 @@ git config --global https.proxy 'http://127.0.0.1:代理的port'
|
||||
5. 右侧下拉框 **Generate new token (classic)**
|
||||
|
||||
6. 按以下配置
|
||||

|
||||

|
||||
|
||||
7. 得到 token
|
||||

|
||||

|
||||
|
||||
8. 修改现有项目的url
|
||||
```shell
|
||||
@ -317,71 +201,3 @@ git config --global https.proxy 'http://127.0.0.1:代理的port'
|
||||
|
||||
|
||||
|
||||
# Gitea
|
||||
|
||||
## 备份
|
||||
|
||||
数据库备份至postgresql
|
||||
|
||||
```shell
|
||||
docker exec -u git -it -w /tmp gitea bash -c '/app/gitea/gitea dump --database postgres --config /data/gitea/conf/app.ini'
|
||||
```
|
||||
|
||||
# Sourcetree
|
||||
|
||||
这里主要介绍两种最常用的场景,对应 `git reset --soft` 和 `git reset --hard` 的效果。
|
||||
|
||||
## 撤回(重置)本地仓库提交
|
||||
|
||||
### 1. 撤销最近一次提交(保留修改以便重新提交)
|
||||
|
||||
|
||||
|
||||
这类似于 `git reset --soft HEAD~1` 或 `git reset --mixed HEAD~1` 的效果,目的是撤销提交,但保留你的文件修改。
|
||||
|
||||
1. **打开日志/历史记录:** 在 SourceTree 界面的左侧,找到你的仓库,然后点击顶部的“日志/历史”或“历史记录”选项卡。
|
||||
|
||||
2. **定位要撤销的提交:** 在提交历史列表中,找到你想撤销的**前一个**提交(也就是你希望回退到的那个提交)。
|
||||
|
||||
3. **右键点击并选择:** 右键点击该提交。
|
||||
|
||||
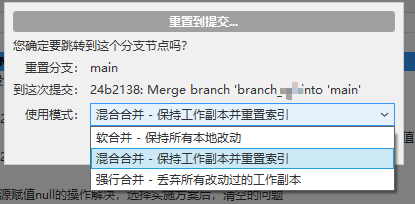
4. **选择“将当前分支重置到此提交”:** 在弹出的菜单中选择 **“将当前分支重置到此提交”** (Reset current branch to this commit)。
|
||||
|
||||
|
||||
5. **选择重置模式:** 此时会出现一个弹窗,让你选择重置模式:
|
||||
|
||||
- **Soft(软重置)**:勾选这个选项。它会将 `HEAD` 指针移动到选定的提交,**保留**工作目录和暂存区的内容。这意味着你的修改还在,只是不再是提交的一部分。
|
||||
- **Mixed(混合重置)**:这是默认选项。它会将 `HEAD` 指针移动到选定的提交,**清空**暂存区,但**保留**工作目录的内容。
|
||||
- **注意:** 如果你只想撤销提交,并打算修改后重新提交,通常选择 **Soft** 或 **Mixed** 都可以,根据你是否希望文件保留在暂存区。对于“撤回本地仓库提交”这个需求,通常是希望保留修改以便重新操作。
|
||||
|
||||
|
||||
|
||||
6. **确认:** 点击“确定”或“Reset”按钮。
|
||||
|
||||
完成这些步骤后,你会发现最新的那个提交消失了,而你工作目录中的文件依然保留了修改内容,你可以重新暂存并提交。
|
||||
|
||||
------
|
||||
|
||||
|
||||
|
||||
### 2. 彻底撤销最近一次提交(丢弃所有修改)
|
||||
|
||||
|
||||
|
||||
这类似于 `git reset --hard HEAD~1` 的效果,会完全丢弃最近提交的所有修改。**请务必谨慎使用此选项,因为它会丢失数据!**
|
||||
|
||||
1. **打开日志/历史记录:** 同样,在 SourceTree 中打开“日志/历史”选项卡。
|
||||
2. **定位要撤销的提交:** 找到你想撤销的**前一个**提交。
|
||||
3. **右键点击并选择:** 右键点击该提交。
|
||||
4. **选择“将当前分支重置到此提交”:** 在弹出的菜单中选择 **“将当前分支重置到此提交”** (Reset current branch to this commit)。
|
||||
5. **选择重置模式:** 在弹窗中,选择 **“Hard(硬重置)”**。
|
||||
6. **确认:** 点击“确定”或“Reset”按钮。SourceTree 还会再次弹出警告,提醒你这将丢失数据,请确认。
|
||||
|
||||
执行此操作后,你的仓库状态会完全回溯到选定的提交,所有后续的修改和提交都将消失。
|
||||
|
||||
------
|
||||
|
||||
|
||||
|
||||
- **未推送的提交:** 上述操作主要用于**尚未推送到远程仓库**的本地提交。如果你已经将提交推送到远程,使用 `git reset` 会导致本地和远程历史不一致,从而引发问题。对于已推送的提交,通常应该使用 **“逆转提交”(Revert Commit)**,它会创建一个新的提交来撤销之前的修改,而不是改写历史。
|
||||
- **Revert(逆转)操作:** 如果你希望逆转某个已推送的提交,可以在 SourceTree 中右键点击该提交,然后选择 **“逆转提交 <哈希值>”** (Revert commit <hash>)。这会创建一个新的提交来撤销该提交的修改,并且不会改变历史,是更安全的选择。
|
||||
|
||||
|
Before Width: | Height: | Size: 131 KiB |
|
Before Width: | Height: | Size: 48 KiB |
|
Before Width: | Height: | Size: 6.8 KiB |
|
Before Width: | Height: | Size: 29 KiB |
|
Before Width: | Height: | Size: 38 KiB |
|
Before Width: | Height: | Size: 44 KiB |
|
Before Width: | Height: | Size: 36 KiB |
|
Before Width: | Height: | Size: 34 KiB |
@ -52,52 +52,6 @@ hexo new [layout] <title>
|
||||
|
||||
新建一篇文章。如果没有设置 `layout` 的话,默认使用 [_config.yml](https://hexo.io/zh-cn/docs/configuration) 中的 `default_layout` 参数代替。如果标题包含空格的话,请使用引号括起来。
|
||||
|
||||
## 图片上传
|
||||
|
||||
### 本地目录
|
||||
|
||||
**先将 _config.yml 文件中的 post_asset_folder 选项设为 true**
|
||||
|
||||
该操作的目的就是在使用`hexo new xxx`指令新建md文档博文时,在相同路径下同步创建一个`xxx`文件夹,而`xxx`文件夹就是用来存放新建md文档里的图片的
|
||||
|
||||

|
||||
|
||||
就像这样,新建的md文档和其对于的同名文件夹都在/source/_posts路径下
|
||||
|
||||
但如果你习惯不用hexo new xxx指令创建新md文档,而是直接打开typora写然后保存到/source/_posts下,这个时候你就需要自己手动创建一个**同名的文件夹**才可以。
|
||||
|
||||
#### 解决图片路径问题
|
||||
|
||||
typora的图片插入的语法我是一般不会用的,大多数时候就是复制粘贴图片到md文档里面。这个时候我们再慢慢修改路径到上面我们创建的文件夹下面就太麻烦了。
|
||||
|
||||
我们可以通过以下设置来舒舒服服按照简单粗暴的复制粘贴插入图片:
|
||||
|
||||
**打开typora,点击文件,点击偏好设置,点击图像**
|
||||
|
||||

|
||||
|
||||
第一个,将图片复制到指定路径./$(filename)的效果就是:**我们粘贴图片到md文档的时候,typora会自动把图片再复制一份到我们上面创建的同名文件夹下**
|
||||
|
||||
这样的好处还有一点,就是也不用我们自己创建同名文件夹了,typora会自己帮我们创建(有的话就复制到这里面)(**但 _config.yml文件中的post_asset_folder选项还是得设为 true,这是必须的**)
|
||||
|
||||
效果就像这样:
|
||||
|
||||

|
||||
|
||||
#### 解决md文档转换到html文档路径不一样的问题
|
||||
|
||||
转换需要用到**hexo-asset-img**插件
|
||||
|
||||
在博客的源码文件夹下启动命令行,下载插件hexo-asset-img:
|
||||
|
||||
```shell
|
||||
yarn add hexo-asset-img
|
||||
```
|
||||
|
||||
是**hexo-asset-img**,**不是**其他文章里写的**hexo-asset-image**,这也是我之前用了不好使的原因
|
||||
|
||||
# Butterfly 主题
|
||||
|
||||
## 鼠标样式修改
|
||||
|
||||
1. 在\themes\butterfly\source\css路径下创建一个mouse.css文件,在文件中添加如下代码:
|
||||
@ -125,43 +79,3 @@ yarn add hexo-asset-img
|
||||
|
||||
|
||||
3. 重新部署,即可看到效果
|
||||
|
||||
## 增加网站备案信息
|
||||
|
||||
找到`themes/butterfly/layout/includes/footer.pug`文件
|
||||
|
||||
在文件 `if theme.footer.copyright`中增加
|
||||
|
||||
```pug
|
||||
br
|
||||
center
|
||||
| ICP备案号:
|
||||
a(href="https://beian.miit.gov.cn" target="_blank") 辽ICP备2025052969号-1
|
||||
```
|
||||
|
||||
完整如下:
|
||||
|
||||
```pug
|
||||
#footer-wrap
|
||||
if theme.footer.owner.enable
|
||||
- var now = new Date()
|
||||
- var nowYear = now.getFullYear()
|
||||
if theme.footer.owner.since && theme.footer.owner.since != nowYear
|
||||
.copyright!= `©${theme.footer.owner.since} - ${nowYear} By ${config.author}`
|
||||
else
|
||||
.copyright!= `©${nowYear} By ${config.author}`
|
||||
if theme.footer.copyright
|
||||
.framework-info
|
||||
span= _p('footer.framework') + ' '
|
||||
a(href='https://hexo.io')= 'Hexo'
|
||||
span.footer-separator |
|
||||
span= _p('footer.theme') + ' '
|
||||
a(href='https://github.com/jerryc127/hexo-theme-butterfly')= 'Butterfly'
|
||||
br
|
||||
center
|
||||
| ICP备案号:
|
||||
a(href="https://beian.miit.gov.cn" target="_blank") 辽ICP备2025052969号-1
|
||||
if theme.footer.custom_text
|
||||
.footer_custom_text!=`${theme.footer.custom_text}`
|
||||
```
|
||||
|
||||
|
||||
|
Before Width: | Height: | Size: 62 KiB |
|
Before Width: | Height: | Size: 65 KiB |
|
Before Width: | Height: | Size: 30 KiB |
@ -257,247 +257,3 @@ docker images
|
||||
docker run --name xiaodaerpnetcore -p 7274:80 -d xiaodaerp/netcore
|
||||
```
|
||||
|
||||
# Jenkins环境配置
|
||||
|
||||
## Docker容器内安装NVM
|
||||
|
||||
首先以bash命令行交互形式进入容器
|
||||
|
||||
```shell
|
||||
docker exec -it jenkins /bin/bash
|
||||
```
|
||||
|
||||
下载并执行nvm-sh脚本
|
||||
|
||||
```shell
|
||||
curl -o- https://raw.githubusercontent.com/nvm-sh/nvm/v0.40.3/install.sh | bash
|
||||
```
|
||||
|
||||
执行完成,需应用环境变量
|
||||
|
||||
```shell
|
||||
source ~/.bashrc
|
||||
```
|
||||
|
||||
全局安装pnpm
|
||||
|
||||
```shell
|
||||
npm install -g pnpm
|
||||
```
|
||||
|
||||
设置源
|
||||
|
||||
```shell
|
||||
pnpm config set registry https://registry.npmmirror.com
|
||||
```
|
||||
|
||||
查看nodejs位置
|
||||
|
||||
```shell
|
||||
npm prefix -g
|
||||
```
|
||||
|
||||
## Docker容器内安装JDK
|
||||
|
||||
首先下载好需要的jdk包
|
||||
|
||||
复制到容器内用户目录下
|
||||
|
||||
```shell
|
||||
docker cp docker cp ~/OpenJDK21U-jdk_aarch64_linux_hotspot_21.0.8_9.tar.gz jenkins:/root
|
||||
```
|
||||
|
||||
以交互模式进入到容器内
|
||||
|
||||
```shell
|
||||
docker exec -it jenkins /bin/bash
|
||||
```
|
||||
|
||||
解压压缩包
|
||||
|
||||
```shell
|
||||
cd ~
|
||||
tar -zxvf OpenJDK21U-jdk_aarch64_linux_hotspot_21.0.8_9.tar.gz
|
||||
```
|
||||
|
||||
# Jenkins Pipeline(流水线)
|
||||
|
||||
```shell
|
||||
pipeline {
|
||||
agent any
|
||||
|
||||
tools {
|
||||
nodejs 'NodeJS 22.17.0'
|
||||
}
|
||||
|
||||
environment {
|
||||
GIT_URL = 'http://192.168.6.20:9980/line-group/dify-conversation.git'
|
||||
BRANCH_NAME = 'erp-conversation'
|
||||
}
|
||||
|
||||
stages {
|
||||
stage('Preparation') {
|
||||
steps {
|
||||
// 清理工作空间
|
||||
// deleteDir()
|
||||
|
||||
// 拉取代码
|
||||
git branch: "${BRANCH_NAME}",
|
||||
url: "${GIT_URL}",
|
||||
credentialsId: '118322d7-1666-4f0b-b48b-349dcead864c',
|
||||
changelog: true,
|
||||
poll: false
|
||||
}
|
||||
}
|
||||
|
||||
stage('Setup Environment') {
|
||||
steps {
|
||||
sh '''
|
||||
node --version
|
||||
pnpm --version
|
||||
'''
|
||||
}
|
||||
}
|
||||
|
||||
stage('Intall Dependencies') {
|
||||
steps {
|
||||
sh '''
|
||||
# 清理缓存
|
||||
pnpm store prune || true
|
||||
|
||||
# 安装依赖
|
||||
pnpm install --frozen-lockfile
|
||||
|
||||
# 检查依赖
|
||||
pnpm list --depth 0
|
||||
'''
|
||||
}
|
||||
}
|
||||
|
||||
stage('Build Production') {
|
||||
steps {
|
||||
sh '''
|
||||
# 清理旧构建
|
||||
rm -rf .next || true
|
||||
|
||||
# 生产环境构建
|
||||
pnpm run build
|
||||
|
||||
# 验证构建结果
|
||||
if [ -d ".next" ]; then
|
||||
echo "构建成功,文件列表:"
|
||||
ls -la .next/
|
||||
echo "总文件数:$(find dist -type f | wc -l)"
|
||||
else
|
||||
echo "构建失败,.next目录不存在"
|
||||
exit 1
|
||||
fi
|
||||
'''
|
||||
}
|
||||
|
||||
post {
|
||||
success {
|
||||
archiveArtifacts artifacts: '.next/**/*', fingerprint: true
|
||||
}
|
||||
}
|
||||
}
|
||||
|
||||
stage('Quality Check') {
|
||||
steps {
|
||||
sh '''
|
||||
# 代码检查
|
||||
pnpm run lint --no-fix || echo "代码检查完成"
|
||||
|
||||
# 类型检查
|
||||
pnpm run type-check || echo "类型检查完成"
|
||||
'''
|
||||
}
|
||||
}
|
||||
}
|
||||
|
||||
post {
|
||||
cleanup {
|
||||
cleanWs()
|
||||
}
|
||||
success {
|
||||
echo 'Pipeline completed successfully!'
|
||||
}
|
||||
failure {
|
||||
echo 'Pipeline failed!'
|
||||
}
|
||||
}
|
||||
}
|
||||
```
|
||||
|
||||
# Jenkins Node(节点)
|
||||
|
||||
## 创建 Windows 服务
|
||||
|
||||
使用 **WinSW (Windows Service Wrapper)**
|
||||
|
||||
### 1. 下载 WinSW
|
||||
|
||||
- 请访问 WinSW 的官方发布页面: https://github.com/winsw/winsw/releases
|
||||
- 下载最新的 `.exe` 文件。鉴于是 Windows 服务器,请下载 **`WinSW-x64.exe`**。(如果系统是 32 位的,才下载 `WinSW-x86.exe`)。
|
||||
|
||||
### 2. 准备文件
|
||||
|
||||
1. 将下载的 `WinSW-x64.exe` 文件复制到工作目录:`D:\common_components\jenkins-agent`。
|
||||
2. **(关键)重命名:** 在该目录中,将 `WinSW-x64.exe` 重命名为 `jenkins-agent-admin.exe`。(这个名字可以自定,但 `.xml` 必须同名)
|
||||
3. 确保从 Jenkins 下载的 `agent.jar` 文件也在此目录中。
|
||||
|
||||
现在,`D:\common_components\jenkins-agent` 文件夹中**至少**应该有这两个文件:
|
||||
|
||||
- `jenkins-agent-admin.exe`
|
||||
- `agent.jar`
|
||||
|
||||
### 3. 创建 XML 配置文件
|
||||
|
||||
1. 在**同一目录** (`D:\common_components\jenkins-agent`) 中,创建一个**新的文本文件**。
|
||||
|
||||
2. 将这个新文件重命名为 **`jenkins-agent-admin.xml`**。(**注意:** 它的名字必须和 `.exe` 文件的名字完全一样,只是扩展名不同)。
|
||||
|
||||
3. 用记事本或任何文本编辑器打开 `jenkins-agent-admin.xml`,然后将**以下所有内容**完整地复制并粘贴进去:
|
||||
```xml
|
||||
<service>
|
||||
<id>jenkins-agent-admin</id>
|
||||
|
||||
<name>Jenkins Agent (Admin)</name>
|
||||
|
||||
<description>此服务以管理员权限运行 Jenkins JNLP 代理。</description>
|
||||
|
||||
<executable>java</executable>
|
||||
|
||||
<arguments>-jar "%BASE%\agent.jar" -jnlpUrl http://192.168.6.1:23123/computer/windows%2Dadmin%2Dagent/jenkins-agent.jnlp -secret *********84158aed83c119f8f53b579db8a315a4e9bda61687cbdd088e***7 -workDir "D:\common_components\jenkins-agent"</arguments>
|
||||
|
||||
<workingdirectory>D:\common_components\jenkins-agent</workingdirectory>
|
||||
|
||||
<log mode="rotate"/>
|
||||
</service>
|
||||
```
|
||||
|
||||
### 4. 安装服务
|
||||
|
||||
1. 再次打开一个**管理员**命令提示符 (cmd)。
|
||||
|
||||
2. `cd` 到工作目录:
|
||||
|
||||
```cmd
|
||||
D:
|
||||
cd D:\common_components\jenkins-agent
|
||||
```
|
||||
|
||||
3. 运行重命名的 `.exe` 文件,并附带 `install` 命令:
|
||||
```cmd
|
||||
jenkins-agent-admin.exe install
|
||||
```
|
||||
|
||||
### 5. 设置登录帐户
|
||||
|
||||
这是**必须**的步骤,和之前一样:
|
||||
|
||||
1. 打开 "服务" (`services.msc`)。
|
||||
2. 找到新安装的服务,名字是 **"Jenkins Agent (Admin)"**(这是在 `.xml` 中设置的)。
|
||||
3. 右键点击 -> **"属性"** -> **"登录"** 选项卡。
|
||||
4. 选择 **"此帐户"**,并输入**Windows 管理员用户名和密码**。
|
||||
5. 点击 "应用" -> "确定"
|
||||
|
||||
@ -1,12 +1,13 @@
|
||||
---
|
||||
title: Linux
|
||||
date: 2021-04-07 16:04:58
|
||||
author: 文永达
|
||||
top_img: https://gcore.jsdelivr.net/gh/volantis-x/cdn-wallpaper/abstract/00E0F0ED-9F1C-407A-9AA6-545649D919F4.jpeg
|
||||
top_img:https://gcore.jsdelivr.net/gh/volantis-x/cdn-wallpaper/abstract/00E0F0ED-9F1C-407A-9AA6-545649D919F4.jpeg
|
||||
|
||||
---
|
||||
# Linux
|
||||
|
||||
---
|
||||
|
||||
## 简介
|
||||
|
||||
> 在linux系统中,没有盘符的概念。
|
||||
@ -140,10 +141,6 @@ tar -zxvf:解压(最常用)
|
||||
tar -zxvf wwwroot.tar.gz
|
||||
```
|
||||
|
||||
tar.gz 和 tgz 的区别
|
||||
|
||||
tar.gz 和 tgz 是两种常见的压缩文件格式,它们在本质上是相同的,只是文件扩展名不同。两者都是通过 tar 命令将多个文件打包成一个文件,然后再使用 gzip 压缩工具进行压缩。
|
||||
|
||||
### 系统服务:
|
||||
|
||||
systemstl:操作系统服务。
|
||||
@ -443,110 +440,6 @@ chmod u-w /etc/sudoers
|
||||
|
||||
这样普通用户就可以使用sudo了.
|
||||
|
||||
### 修改目录权限
|
||||
|
||||
**查看当前目录权限**
|
||||
|
||||
```bash
|
||||
sudo ls -ld /OLAP
|
||||
```
|
||||
|
||||
输出实例:
|
||||
|
||||
`drwxr-xr-x 5 root root 4096 Aug 5 08:27 /OLAP`
|
||||
|
||||
**修改目录权限**
|
||||
|
||||
使当前用户(假设为 `user`)能够对 `/OLAP`目录进行读写操作,可以将目录权限修改为`775`(即`rwxrwxr-x`):
|
||||
|
||||
```bash
|
||||
sudo chmod 775 /OLAP
|
||||
```
|
||||
|
||||
这样,目录的所有者和所属组的用户都可以读写该目录,其他用户则由读取和执行权限。
|
||||
|
||||
**将当前用户加入目录所属组**
|
||||
|
||||
如果目录所属组是`root`,可以将当前用户`user`加入`root`组(不推荐,因为`root`组权限过高):
|
||||
|
||||
```bash
|
||||
sudo usermod -aG root user
|
||||
```
|
||||
|
||||
然后,重新登录或重启系统以使组变更生效。
|
||||
|
||||
### 更改目录的所有者
|
||||
|
||||
**查看当前目录的所有者**
|
||||
|
||||
查看`/OLAP`目录的当前所有者:
|
||||
|
||||
```bash
|
||||
sudo ls -ld /OLAP
|
||||
```
|
||||
|
||||
**更改目录的所有者**
|
||||
|
||||
将`/OLAP`目录的所有者更改为当前用户(假设为`user`):
|
||||
|
||||
```bash
|
||||
sudo chown user:user /OLAP
|
||||
```
|
||||
|
||||
这样,当前用户将拥有对该目录的完全控制权。
|
||||
|
||||
### 使用 ACL(访问控制列表)
|
||||
|
||||
> ACL 提供了更细粒度的权限控制,允许为特定用户或组设置特定权限。
|
||||
|
||||
**安装 ACL 工具**
|
||||
|
||||
在某些系统中,ACL 工具可能未默认安装,可以通过以下命令安装:
|
||||
|
||||
```bash
|
||||
sudo apt install acl -y
|
||||
sudo dnf insyall acl -y
|
||||
```
|
||||
|
||||
**设置 ACL 权限**
|
||||
|
||||
为当前用户(假设为`user`)设置读写权限:
|
||||
|
||||
```bash
|
||||
sudo setfacl -m u:user:rwx /OLAP
|
||||
```
|
||||
|
||||
这样,`user`用户将获得对`/OLAP`目录的读写权限,而不会影响其他用户的权限。
|
||||
|
||||
**验证 ACL 权限**
|
||||
|
||||
查看当前目录的 ACL 权限:
|
||||
|
||||
```bash
|
||||
getfacl /OLAP
|
||||
```
|
||||
|
||||
输出实例:
|
||||
```
|
||||
getfacl: Removing leading '/' from absolute path names
|
||||
# file: OLAP
|
||||
# owner: user
|
||||
# group: user
|
||||
user::rwx
|
||||
group::r-x
|
||||
other::r-x
|
||||
```
|
||||
|
||||
### 更改目录的默认权限(可选)
|
||||
|
||||
如果要将新创建的文件和子目录自动继承特定权限,可以设置默认 ACL:
|
||||
|
||||
```bash
|
||||
sudo setfacl -dm u:user:rwx /OLAP
|
||||
```
|
||||
|
||||
这样,新创建的文件和子目录将自动继承 `user` 用户的读写权限。
|
||||
|
||||
## Shell 脚本
|
||||
|
||||
### 为什么大多数 shell 脚本都包含 #! /bin/bash 在 shell 脚本的开头?
|
||||
@ -1235,287 +1128,6 @@ xfs_growfs /dev/rl/root
|
||||
|
||||

|
||||
|
||||
## 转换分区格式
|
||||
|
||||
### Microsoft 基本数据 -> Linux 文件系统
|
||||
|
||||
```shell
|
||||
fdisk -l
|
||||
...
|
||||
Disk /dev/sdb:2.18 TiB,2400476553216 字节,4688430768 个扇区
|
||||
磁盘型号:DL2400MM0159
|
||||
单元:扇区 / 1 * 512 = 512 字节
|
||||
扇区大小(逻辑/物理):512 字节 / 4096 字节
|
||||
I/O 大小(最小/最佳):4096 字节 / 4096 字节
|
||||
磁盘标签类型:gpt
|
||||
磁盘标识符:6C271C0A-2A82-416E-8A0F-A49EF6D9BA33
|
||||
设备 起点 末尾 扇区 大小 类型
|
||||
/dev/sdb1 2048 4688429055 4688427008 2.2T Microsoft 基本数据
|
||||
...
|
||||
```
|
||||
|
||||
通过查看都为 Microsoft 基本数据 硬盘类型,需要转换成Linux系统能够识别的 Linux 文件系统
|
||||
先将 /dev/sdb 进行转换
|
||||
|
||||
```shell
|
||||
fdisk /dev/sdb
|
||||
# 输入 t 命令 代表转换分区类型
|
||||
t
|
||||
# 20 代表 Linux file system
|
||||
20
|
||||
# 输入 w 命令 代表改动由内存写入到硬盘中
|
||||
```
|
||||
|
||||
手动挂载硬盘
|
||||
|
||||
```shell
|
||||
mkdir /sdb
|
||||
mount -t ext3 /dev/sdb1 /sdb
|
||||
```
|
||||
|
||||
没有报错后,可查看磁盘情况
|
||||
|
||||
```shell
|
||||
df -Th
|
||||
devtmpfs devtmpfs 4.0M 0 4.0M 0% /dev
|
||||
tmpfs tmpfs 16G 0 16G 0% /dev/shm
|
||||
tmpfs tmpfs 6.2G 19M 6.2G 1% /run
|
||||
efivarfs efivarfs 304K 129K 171K 43% /sys/firmware/efi/efivars
|
||||
/dev/mapper/almalinux-root xfs 382G 16G 367G 5% /
|
||||
/dev/sda2 xfs 960M 416M 545M 44% /boot
|
||||
/dev/sda1 vfat 200M 7.1M 193M 4% /boot/efi
|
||||
tmpfs tmpfs 3.1G 100K 3.1G 1% /run/user/0
|
||||
/dev/sdb1 ext3 2.2T 72G 2.0T 4% /sdb
|
||||
```
|
||||
|
||||
看到已经挂载上了,也可以访问了
|
||||
|
||||
系统重启后,挂载会失效,需再改动 /etc/fstab 文件,让其自动挂载
|
||||
|
||||
需查看要挂载的硬盘的UUID,以device方式去挂载,会导致重启后发生盘符交换问题
|
||||
|
||||
查看硬盘的UUID,通过 `blkid`查看
|
||||
|
||||
```shell
|
||||
blkid /dev/sdb1
|
||||
/dev/sdb1: UUID="7d592b46-68dc-41c2-bdb3-7ee410f0bb33" TYPE="ext4" PARTUUID="cc75a3e5-bbfa-4abb-a749-241183f41510"
|
||||
```
|
||||
|
||||
然后修改 /etc/fstab 文件,添加到对应硬盘前即可
|
||||
|
||||
```shell
|
||||
vim /etc/fstab
|
||||
#
|
||||
# /etc/fstab
|
||||
# Created by anaconda on Fri May 16 02:20:43 2025
|
||||
#
|
||||
# Accessible filesystems, by reference, are maintained under '/dev/disk/'.
|
||||
# See man pages fstab(5), findfs(8), mount(8) and/or blkid(8) for more info.
|
||||
#
|
||||
# After editing this file, run 'systemctl daemon-reload' to update systemd
|
||||
# units generated from this file.
|
||||
#
|
||||
/dev/mapper/almalinux-root / xfs defaults 0 0
|
||||
UUID=d99ec15b-05d5-4311-b5c7-497945d4805d /boot xfs defaults 0 0
|
||||
UUID=0EAB-5879 /boot/efi vfat umask=0077,shortname=winnt 0 2
|
||||
/dev/mapper/almalinux-swap none swap defaults 0 0
|
||||
# 此处追加下面硬盘信息
|
||||
UUID=7d592b46-68dc-41c2-bdb3-7ee410f0bb33 /sdb ext3 defaults 0 0
|
||||
```
|
||||
|
||||
修改 /etc/fstab 文件后,需系统重载配置,才可应用
|
||||
|
||||
```shell
|
||||
systemctl daemon-reload
|
||||
```
|
||||
|
||||
### ext3 升级 ext4
|
||||
|
||||
确认当前文件系统类型
|
||||
|
||||
```shell
|
||||
df -Th | grep /dev/sdb1
|
||||
/dev/sdb1 ext3 2.2T 60G 2.0T 3% /sdb
|
||||
```
|
||||
|
||||
卸载目标分区(⚠️ 注意:不能对正在使用的根分区操作)
|
||||
|
||||
```shell
|
||||
umount /dev/sdb1
|
||||
```
|
||||
|
||||
检查并修复文件系统
|
||||
|
||||
```shell
|
||||
e2fsck -f /dev/sdb1
|
||||
|
||||
e2fsck 1.46.5 (30-Dec-2021)
|
||||
第 1 步:检查inode、块和大小
|
||||
第 2 步:检查目录结构
|
||||
第 3 步:检查目录连接性
|
||||
第 4 步:检查引用计数
|
||||
第 5 步:检查组概要信息
|
||||
/dev/sdb1:26748/146513920 文件(15.5% 为非连续的), 24877668/586053376 块
|
||||
```
|
||||
|
||||
确保文件系统无错误。
|
||||
|
||||
将 ext3 转换为 ext4
|
||||
|
||||
```shell
|
||||
tune2fs -O has_journal,extent,huge_file,flex_bg,uninit_bg,dir_nlink,extra_isize /dev/sdb1
|
||||
tune2fs 1.46.5 (30-Dec-2021)
|
||||
```
|
||||
|
||||
查看转换是否成功
|
||||
|
||||
```shell
|
||||
dumpe2fs -h /dev/sdb1 | grep features
|
||||
dumpe2fs 1.46.5 (30-Dec-2021)
|
||||
Filesystem features: has_journal ext_attr resize_inode dir_index filetype extent flex_bg sparse_super large_file huge_file uninit_bg dir_nlink extra_isize
|
||||
Journal features: journal_incompat_revoke
|
||||
```
|
||||
|
||||
确认输出中包含你刚刚添加的特性,例如:
|
||||
|
||||
extent
|
||||
huge_file
|
||||
flex_bg
|
||||
uninit_bg
|
||||
dir_nlink
|
||||
extra_isize
|
||||
如果有这些关键字,说明已经成功启用了这些功能,也就是成功转换成ext4。
|
||||
|
||||
再次检查文件系统
|
||||
|
||||
```shell
|
||||
e2fsck -f /dev/sdb1
|
||||
```
|
||||
|
||||
挂载并验证文件系统类型
|
||||
|
||||
```shell
|
||||
mount -t ext4 /dev/sdb1 /sdb
|
||||
df -Th | grep /dev/sdb1
|
||||
/dev/sdb1 ext4 2.2T 60G 2.0T 3% /sdb
|
||||
```
|
||||
|
||||
修改 /etc/fstab 文件
|
||||
|
||||
```shell
|
||||
/dev/mapper/almalinux-root / xfs defaults 0 0
|
||||
UUID=d99ec15b-05d5-4311-b5c7-497945d4805d /boot xfs defaults 0 0
|
||||
UUID=0EAB-5879 /boot/efi vfat umask=0077,shortname=winnt 0 2
|
||||
/dev/mapper/almalinux-swap none swap defaults 0 0
|
||||
/dev/sdb1 /sdb ext4 defaults 0 0
|
||||
```
|
||||
|
||||
保存并重载配置
|
||||
|
||||
```shell
|
||||
systemctl daemon-reload
|
||||
```
|
||||
|
||||
## 挂载卷
|
||||
|
||||
### Windows 网络共享位置
|
||||
|
||||
首先创建本地的挂载目录,一般在`/mnt`下
|
||||
|
||||
这里以 `/mnt/wdshare`为例
|
||||
|
||||
```shell
|
||||
mkdir -p /mnt/wdshare/
|
||||
```
|
||||
|
||||
安装`cifs-utils`
|
||||
|
||||
```shell
|
||||
dnf install -y cifs-utils
|
||||
```
|
||||
|
||||
进行挂载
|
||||
|
||||
```shell
|
||||
mount -t cifs -o username=user,password=backup //192.168.0.1/备份 /mnt/wdshare/
|
||||
```
|
||||
|
||||
以上为暂时挂载,还需要永久挂载,避免系统重启后挂载丢失
|
||||
|
||||
编辑`/etc/fstab`配置文件,在最后一行添加以下配置
|
||||
|
||||
```shell
|
||||
//192.168.0.1/备份 /mnt/wdshare/ cifs username=user,password=backup 0 0
|
||||
```
|
||||
|
||||
### NTFS 分区
|
||||
|
||||
#### 可读可写
|
||||
|
||||
**识别NTFS分区**
|
||||
|
||||
```shell
|
||||
sudo parted -l
|
||||
```
|
||||
|
||||

|
||||
|
||||
**创建挂载点**:使用*mkdir*命令创建一个挂载点
|
||||
|
||||
```shell
|
||||
sudo mkdir /mnt/ntfs1
|
||||
```
|
||||
|
||||
**安装依赖**:更新包仓库并安装*fuse*和*ntfs-3g*
|
||||
|
||||
```shell
|
||||
sudo apt update
|
||||
sudo apt install fuse -y
|
||||
sudo apt install ntfs-3g -y
|
||||
```
|
||||
|
||||
**挂载分区**:使用*mount*命令挂载分区
|
||||
|
||||
```shell
|
||||
sudo mount -t ntfs-3g /dev/sda1 /mnt/ntfs1/
|
||||
```
|
||||
|
||||
> 其中 /dev/sda1 就是由上述命令的 sudo parted -l 得来的,Disk /dev/sda: 1000GB ,这行标识出了 设备的路径,Disk Flags: 及下述表格的列 Number 则标识出了具体的 设备号,也可通过这个命令进行验证 `sudo blkid /dev/sda1`
|
||||
>
|
||||
> 
|
||||
>
|
||||
> 可以看到 `TYPE="ntfs"`字样
|
||||
|
||||
**验证挂载**:使用*df*命令检查所有文件系统的详细信息,验证分区是否成功挂载
|
||||
|
||||
```shell
|
||||
df -Th
|
||||
```
|
||||
|
||||

|
||||
|
||||
可以看到最后一行的就是刚刚挂载上的设备卷
|
||||
|
||||
这个只是临时挂载,还需要编辑`/etc/fstab`配置文件,防止系统重启后,还需再手动挂载
|
||||
|
||||
```shell
|
||||
sudo vim /etc/fstab
|
||||
```
|
||||
|
||||
在最后一行下面添加这一行
|
||||
|
||||
```shell
|
||||
/dev/sda1 /mnt/ntfs1 fuseblk defaults 0 0
|
||||
```
|
||||
|
||||
`:wq`保存好,使用以下命令使修改生效
|
||||
|
||||
```shell
|
||||
sudo systemctl daemon-reload
|
||||
```
|
||||
|
||||
|
||||
|
||||
## 分配Swap
|
||||
|
||||
查看分区大小
|
||||
@ -2244,71 +1856,7 @@ lsusb -v 查看系统中usb设备的详细信息
|
||||
lsusb -v
|
||||
```
|
||||
|
||||
## 安装新字体
|
||||
|
||||
### 查看已安装的字体
|
||||
|
||||
```shell
|
||||
fc-list
|
||||
```
|
||||
|
||||
### 下载字体文件
|
||||
|
||||
```shell
|
||||
git clone https://gitee.com/mirrors/nerd-fonts.git --depth 1
|
||||
```
|
||||
|
||||
### 导航到 `/usr/share/fonts` 目录
|
||||
|
||||
如果没有,就创建一个
|
||||
|
||||
```shell
|
||||
cd /usr/share/fonts
|
||||
#or
|
||||
sudo mkdir /usr/share/fonts
|
||||
```
|
||||
|
||||
### 复制字体
|
||||
|
||||
使用以下命令将下载好的字体文件(ttf、otf 等)复制到新创建的 `fonts` 目录中:
|
||||
|
||||
```shell
|
||||
sudo cp -r ~/nerd-fonts/patched-fonts/Hack /usr/share/fonts
|
||||
```
|
||||
|
||||
### 更新字体缓存
|
||||
|
||||
```shell
|
||||
sudo fc-cache -f -v
|
||||
```
|
||||
|
||||
### 为特定用户安装字体
|
||||
|
||||
#### 导航到`.fonts`目录
|
||||
|
||||
如果没有,就创建一个
|
||||
|
||||
```shell
|
||||
mkdir ~/.fonts
|
||||
```
|
||||
|
||||
#### 复制字体
|
||||
|
||||
使用以下命令将下载好的字体文件(ttf、otf等)复制到新创建的 `.fonts` 目录中:
|
||||
|
||||
```shell
|
||||
cp -r ~/nerd-fonts/patched-fonts/Hack ~/.fonts
|
||||
```
|
||||
|
||||
#### 更新字体缓存
|
||||
|
||||
为用户特定的字体更新字体缓存:
|
||||
|
||||
```shell
|
||||
fc-cache -f -v
|
||||
```
|
||||
|
||||
字体安装完成后,同样可以通过 `fc-list` 命令验证新字体是否成功安装。
|
||||
|
||||
## Windows Linux子系统
|
||||
|
||||
@ -2318,19 +1866,6 @@ fc-cache -f -v
|
||||
|
||||
#### 安装
|
||||
|
||||
进入控制面板中的 程序和功能 页面
|
||||
|
||||
用组合键 Win + R 启动运行窗口 `appwiz.cpl` 回车
|
||||
|
||||
启用或关闭 Windows 功能,勾选适用于 Linux 的 Windows 子系统
|
||||
|
||||

|
||||
|
||||
也可解决安装发行版时的报错问题
|
||||
|
||||
由于未安装所需的特性,无法启动操作。
|
||||
错误代码: Wsl/InstallDistro/Service/RegisterDistro/CreateVm/HCS/HCS_E_SERVICE_NOT_AVAILABLE
|
||||
|
||||
```powershell
|
||||
wsl --install
|
||||
```
|
||||
@ -2347,45 +1882,6 @@ wsl --install -d <Distribution Name>
|
||||
|
||||
/mnt目录下是Windows系统的挂载盘,可直接访问Windows磁盘文件
|
||||
|
||||
#### 迁移
|
||||
|
||||
```powershell
|
||||
wsl --manage Ubuntu-24.04 --move d:\ubuntu
|
||||
```
|
||||
|
||||
#### 导出
|
||||
|
||||
**查看当前 WSL 分发版**
|
||||
|
||||
```powershell
|
||||
wsl -l
|
||||
```
|
||||
|
||||
输出示例:
|
||||
|
||||
```powershell
|
||||
适用于 Linux 的 Windows 子系统分发:
|
||||
archlinux (默认值)
|
||||
```
|
||||
|
||||
**停止运行中的 WSL**
|
||||
|
||||
```powershell
|
||||
wsl --terminate archlinux
|
||||
```
|
||||
|
||||
**导出镜像**
|
||||
|
||||
使用 *wsl --export* 命令将分发版导出为 *.tar* 文件:
|
||||
|
||||
```powershell
|
||||
wsl --export archlinux E:\Backup\archlinux.tar
|
||||
```
|
||||
|
||||
#### 导入
|
||||
|
||||
|
||||
|
||||
#### 通过FinalShell连接WSL2
|
||||
|
||||
##### 方式1
|
||||
@ -2694,16 +2190,6 @@ dnf install neofetch
|
||||
neofetch
|
||||
```
|
||||
|
||||
## 安装 Fastfetch
|
||||
|
||||
```bash
|
||||
dnf update -y
|
||||
wget https://github.com/fastfetch-cli/fastfetch/releases/download/2.49.0/fastfetch-linux-amd64.rpm -O fastfetch.rpm
|
||||
dnf install -y fastfetch.rpm
|
||||
```
|
||||
|
||||
|
||||
|
||||
## 安装 Screenfetch
|
||||
|
||||
```shell
|
||||
@ -2921,88 +2407,7 @@ git clone --depth=1 https://github.com/romkatv/powerlevel10k.git ${ZSH_CUSTOM:-$
|
||||
git clone --depth=1 https://gitee.com/romkatv/powerlevel10k.git ${ZSH_CUSTOM:-$HOME/.oh-my-zsh/custom}/themes/powerlevel10k
|
||||
```
|
||||
|
||||
在 `~/.zshrc` 设置 `ZSH_THEME="powerlevel10k/powerlevel10k"`。接下来,终端会自动引导你配置 `powerlevel10k`,若已配置可输入`p10k configure`重新进行配置引导。
|
||||
|
||||
若是安装的AlmaLinux minimal系统,需先通过`dnf`安装 `"Development Tools"`,再执行`source ~/.zshrc`
|
||||
|
||||
```bash
|
||||
dnf groupinstall "Development Tools" -y
|
||||
```
|
||||
|
||||
#### robbyrussell
|
||||
|
||||
显示路径每一级的首字母和最后一级目录的全名
|
||||
|
||||
默认主题只显示路径最后一级名字,其他的一些主题可能显示完整路径,但那太长了。我只发现主题 fishy 是这样显示的,这也和 fish 命令行相同。
|
||||
|
||||
配置
|
||||
|
||||
```shell
|
||||
vim ~/.oh-my-zsh/themes/robbyrussell.zsh-theme
|
||||
```
|
||||
|
||||
添加一个函数
|
||||
|
||||
```shell
|
||||
_fishy_collapsed_wd() {
|
||||
local i pwd
|
||||
pwd=("${(s:/:)PWD/#$HOME/~}")
|
||||
if (( $#pwd > 1 )); then
|
||||
for i in {1..$(($#pwd-1))}; do
|
||||
if [[ "$pwd[$i]" = .* ]]; then
|
||||
pwd[$i]="${${pwd[$i]}[1,2]}"
|
||||
else
|
||||
pwd[$i]="${${pwd[$i]}[1]}"
|
||||
fi
|
||||
done
|
||||
fi
|
||||
echo "${(j:/:)pwd}"
|
||||
}
|
||||
```
|
||||
|
||||
在 PROMPT 那一行,把表示目录的 `%c` (其他主题可能是 `%C`,`%~` ,`%2` 等)改成 `$(_fishy_collapsed_wd)`,重启 zsh 即可。
|
||||
|
||||
显示用户
|
||||
|
||||
在 PROMPT 前适当加上 `%{$fg_bold[blue]%}${USER}` 即可。左边的是在设置颜色。
|
||||
|
||||
显示上一条命令返回值
|
||||
|
||||
这个默认主题,当返回值为 0 时箭头为绿色,非 0 时为红色,我想让他非 0 时显示返回值。
|
||||
|
||||
解决方案:PROMPT 适当位置加上 `%?`,记得不要写成 `$?` 因为后者只显示第一个数字(好像是这样,我没仔细查过)。
|
||||
|
||||
最终配置
|
||||
|
||||
```shell
|
||||
if [ `id -u` -eq 0 ];then
|
||||
PROMPT="%(?:%{$fg_bold[red]%}root %{$fg_bold[green]%}➜ :%{$fg_bold[red]%}root %{$fg_bold[red]%}%? ➜ )"
|
||||
else
|
||||
PROMPT="%(?:%{$fg_bold[blue]%}${USER} %{$fg_bold[green]%}➜ :%{$fg_bold[blue]%}${USER} %{$fg_bold[red]%}%? ➜ )"
|
||||
fi
|
||||
|
||||
_fishy_collapsed_wd() {
|
||||
local i pwd
|
||||
pwd=("${(s:/:)PWD/#$HOME/~}")
|
||||
if (( $#pwd > 1 )); then
|
||||
for i in {1..$(($#pwd-1))}; do
|
||||
if [[ "$pwd[$i]" = .* ]]; then
|
||||
pwd[$i]="${${pwd[$i]}[1,2]}"
|
||||
else
|
||||
pwd[$i]="${${pwd[$i]}[1]}"
|
||||
fi
|
||||
done
|
||||
fi
|
||||
echo "${(j:/:)pwd}"
|
||||
}
|
||||
PROMPT+=' %{$fg[yellow]%}$(_fishy_collapsed_wd)%{$reset_color%} $(git_prompt_info)'
|
||||
|
||||
|
||||
ZSH_THEME_GIT_PROMPT_PREFIX="%{$fg[blue]%}git:(%{$fg[yellow]%}"
|
||||
ZSH_THEME_GIT_PROMPT_SUFFIX="%{$reset_color%} "
|
||||
ZSH_THEME_GIT_PROMPT_DIRTY="%{$fg[blue]%}) %{$fg[yellow]%}✗"
|
||||
ZSH_THEME_GIT_PROMPT_CLEAN="%{$fg[blue]%})"
|
||||
```
|
||||
在 `~/.zshrc` 设置 `ZSH_THEME="powerlevel10k/powerlevel10k"`。接下来,终端会自动引导你配置 `powerlevel10k`。
|
||||
|
||||
### 插件
|
||||
|
||||
@ -3089,7 +2494,7 @@ Are you sure you want to remove Oh My Zsh? [y/N] Y
|
||||
upgrade_oh_my_zsh
|
||||
```
|
||||
|
||||
### 安装Nerd Fonts
|
||||
安装Nerd Fonts
|
||||
|
||||
```shell
|
||||
unzip nerd-fonts.zip
|
||||
@ -3177,10 +2582,6 @@ path = /root/mysql_bakup
|
||||
read only = yes
|
||||
```
|
||||
|
||||
### 命令
|
||||
|
||||
|
||||
|
||||
## 安装 Jenkins
|
||||
|
||||
安装 Java
|
||||
@ -3232,8 +2633,6 @@ sudo systemctl status jenkins
|
||||
|
||||
### 修改端口
|
||||
|
||||
修改为想要的端口
|
||||
|
||||
```shell
|
||||
# 进入目录
|
||||
cd /usr/lib/systemd/system
|
||||
@ -3241,11 +2640,8 @@ vim jenkins.service
|
||||
# 或者
|
||||
vim /usr/lib/systemd/system/jenkins.service
|
||||
|
||||
# Port to listen on for HTTP requests. Set to -1 to disable.
|
||||
# To be able to listen on privileged ports (port numbers less than 1024),
|
||||
# add the CAP_NET_BIND_SERVICE capability to the AmbientCapabilities
|
||||
# directive below.
|
||||
Environment="JENKINS_PORT=16060"
|
||||
# 修改为想要的端口
|
||||
Environment="JENKINS_PORT=8889"
|
||||
|
||||
# 重新加载配置文件
|
||||
systemctl daemon-reload
|
||||
@ -3254,8 +2650,6 @@ systemctl daemon-reload
|
||||
|
||||
### 修改用户及用户组
|
||||
|
||||
修改为root
|
||||
|
||||
```shell
|
||||
# 进入目录
|
||||
cd /usr/lib/systemd/system
|
||||
@ -3263,11 +2657,7 @@ vim jenkins.service
|
||||
# 或者
|
||||
vim /usr/lib/systemd/system/jenkins.service
|
||||
|
||||
|
||||
# Unix account that runs the Jenkins daemon
|
||||
# Be careful when you change this, as you need to update the permissions of
|
||||
# $JENKINS_HOME, $JENKINS_LOG, and (if you have already run Jenkins)
|
||||
# $JENKINS_WEBROOT.
|
||||
# 修改为root
|
||||
User=root
|
||||
Group=root
|
||||
|
||||
@ -3277,8 +2667,6 @@ systemctl daemon-reload
|
||||
|
||||
### 解决Jenkins部分汉化、汉化不全有效办法
|
||||
|
||||
添加 -Duser.language=C.UTF-8
|
||||
|
||||
```shell
|
||||
# 进入目录
|
||||
cd /usr/lib/systemd/system
|
||||
@ -3286,106 +2674,10 @@ vim jenkins.service
|
||||
# 或者
|
||||
vim /usr/lib/systemd/system/jenkins.service
|
||||
|
||||
# Arguments for the Jenkins JVM
|
||||
# 添加 -Duser.language=C.UTF-8
|
||||
Environment="JAVA_OPTS=-Djava.awt.headless=true -Duser.language=C.UTF-8"
|
||||
|
||||
# 重新加载配置文件
|
||||
systemctl daemon-reload
|
||||
```
|
||||
|
||||
### 解决 Jenkins 无法拉取TLS 1.0的老旧SVN项目
|
||||
|
||||
主要是Java JDK禁用了TLS 1.0协议,需修改`java.security`配置文件进行开启
|
||||
|
||||
首先找到启动Jenkins的Java JDK的目录,找到`conf/`
|
||||
|
||||
使用`vim`进行编辑查看,可以看到如下有 TLSv1, TLSv1.1,3DES_EDE_CBC,编辑将其删除
|
||||
|
||||
```yaml
|
||||
# Example:
|
||||
# jdk.tls.disabledAlgorithms=MD5, SSLv3, DSA, RSA keySize < 2048, \
|
||||
# rsa_pkcs1_sha1, secp224r1
|
||||
jdk.tls.disabledAlgorithms=SSLv3, TLSv1, TLSv1.1, DTLSv1.0, RC4, DES, \
|
||||
MD5withRSA, DH keySize < 1024, EC keySize < 224, 3DES_EDE_CBC, anon, NULL, \
|
||||
ECDH
|
||||
|
||||
```
|
||||
|
||||
`:wq`保存即可。
|
||||
|
||||
### 升级
|
||||
|
||||
#### AlmaLinux
|
||||
|
||||
升级前请先备份上述 `jenkins.service` 配置文件
|
||||
|
||||
```bash
|
||||
cp -r /usr/lib/systemd/system/jenkins.service /usr/lib/systemd/system/jenkins.service.bak
|
||||
```
|
||||
|
||||
使用dnf包管理器进行升级
|
||||
|
||||
```bash
|
||||
dnf upgrade jenkins
|
||||
```
|
||||
|
||||
## 安装 Certbot
|
||||
|
||||
**Certbot** 是由 **Electronic Frontier Foundation (EFF)** 提供的一个开源命令行工具,用于自动化从 Let’s Encrypt 获取和管理 SSL 证书。Certbot 会自动为你处理证书申请、安装和续期等过程。,用于自动化整个 SSL 证书的管理流程。它可以做以下几件事:
|
||||
|
||||
- **申请证书**:使用 ACME 协议从 Let’s Encrypt 获取证书。
|
||||
- **验证域名所有权**:通过 HTTP-01 或 DNS-01 验证确保你拥有该域名。
|
||||
- **安装证书**:将证书自动安装到你的 Web 服务器,并配置相关的加密参数。
|
||||
- **续期证书**:定期自动续期证书,避免证书过期。
|
||||
|
||||
Certbot 的核心工作是通过 **ACME 协议**(自动证书管理环境)与 Let’s Encrypt 通信。ACME 是一套标准协议,用于自动化证书申请、验证和安装的过程。Certbot 使用 ACME 协议与 Let’s Encrypt 进行通信,确保你的网站能够通过安全的 HTTPS 连接。
|
||||
|
||||
推荐使用 Linux 的 snap 包管理工具安装Certbot
|
||||
|
||||
首先需要安装 snap 包管理工具
|
||||
|
||||
> [Installing snap on Rocky Linux | Snapcraft documentation参考官网](https://snapcraft.io/docs/installing-snap-on-rocky)
|
||||
|
||||
### AlmaLinux 安装 snapd
|
||||
|
||||
AlmaLinux OS的快照包可以在Enterprise Linux Extra Packages(EPEL)存储库中找到。使用以下命令将EPEL存储库添加到AlmaLinux OS系统:
|
||||
|
||||
```shell
|
||||
dnf install epel-release
|
||||
dnf upgrade
|
||||
```
|
||||
|
||||
将EPEL存储库添加到AlmaLinux OS安装中后,只需安装Snapd包(以root/或sudo身份):
|
||||
|
||||
```shell
|
||||
dnf install snapd
|
||||
```
|
||||
|
||||
安装后,需要启用管理主快照通信插座的systemd单元:
|
||||
|
||||
```shell
|
||||
systemctl enable --now snapd.socket
|
||||
```
|
||||
|
||||
要启用经典snap支持,请输入以下内容以在`/var/lib/snapd/snap`和`/snap`之间创建符号链接:
|
||||
|
||||
```shell
|
||||
ln -s /var/lib/snapd/snap /snap
|
||||
```
|
||||
|
||||
退出并再次重新登录或重新启动系统以确保快照的路径正确更新。
|
||||
Snap现已安装完毕,即可运行!
|
||||
|
||||
支持snap后可以使用如下命令安装Certbot
|
||||
|
||||
```shell
|
||||
snap install --classic certbot
|
||||
```
|
||||
|
||||
创建一个符号链接,确保可以执行certbot命令(相当于快捷方式)
|
||||
|
||||
```shell
|
||||
ln -s /snap/bin/certbot /usr/bin/certbot
|
||||
```
|
||||
|
||||
### 范
|
||||
|
||||
@ -1,14 +0,0 @@
|
||||
---
|
||||
title: Maven
|
||||
date: 2025-11-06 10:15:58
|
||||
tags:
|
||||
---
|
||||
|
||||
# 命令
|
||||
|
||||
## mvn package
|
||||
|
||||
|
||||
|
||||
## mvn install
|
||||
|
||||
@ -969,43 +969,3 @@ Maven下载依赖
|
||||
|
||||
仅用于分表。仅DATE、DATETIME类型。
|
||||
一年之中第几天%分表数。tbpartitions不能超过366。
|
||||
|
||||
# MySQL 查询语句
|
||||
|
||||
## 查询语句中字段别名取表中的comment
|
||||
|
||||
在 MySQL 中,字段的 comment 并不存储在数据行里,而是放在 **information_schema.COLUMNS** 中。
|
||||
因此可以通过把 **column_comment** 查出来,再拼成 **SELECT 语句的别名**,实现“用表中字段的 comment 做别名”的效果。
|
||||
|
||||
一次性查出某张表所有列,并把 comment 作为别名:
|
||||
|
||||
```mysql
|
||||
-- 示例:表名 mydb.mytable
|
||||
SELECT CONCAT(
|
||||
'SELECT ',
|
||||
GROUP_CONCAT(
|
||||
CONCAT('`', COLUMN_NAME, '` AS `', REPLACE(COLUMN_COMMENT, '`', ''), '`')
|
||||
ORDER BY ORDINAL_POSITION
|
||||
),
|
||||
' FROM mytable;'
|
||||
) AS sql_text
|
||||
FROM information_schema.COLUMNS
|
||||
WHERE TABLE_SCHEMA = 'mydb'
|
||||
AND TABLE_NAME = 'mytable';
|
||||
```
|
||||
|
||||
执行后得到一条 SQL,例如:
|
||||
|
||||
```mysql
|
||||
SELECT id AS 主键, name AS 用户名, age AS 年龄 FROM mytable;
|
||||
```
|
||||
|
||||
**拼 SQL 时丢列**
|
||||
上一段拼接脚本里 `GROUP_CONCAT` 有 **长度限制**(默认 1024 字节)。
|
||||
如果表列很多,会被截断导致看起来“少字段”。
|
||||
解决方法:
|
||||
|
||||
```mysql
|
||||
SET SESSION group_concat_max_len = 1000000; -- 临时放大
|
||||
```
|
||||
|
||||
|
||||
@ -6,6 +6,8 @@ author: 文永达
|
||||
|
||||
# Mybatis
|
||||
|
||||
---
|
||||
|
||||
|
||||
|
||||
## Maven引入Mybatis
|
||||
|
||||
@ -1,58 +0,0 @@
|
||||
---
|
||||
title: .NET
|
||||
date: 2025-07-22 10:32:51
|
||||
tags:
|
||||
---
|
||||
|
||||
# Nuget包管理器
|
||||
|
||||
## 无法联网的情况下导入包
|
||||
|
||||
### 使用本地文件夹作为 NuGet 源
|
||||
|
||||
#### 步骤 1:准备本地 NuGet 包
|
||||
|
||||
你需要提前从能联网的机器上下载所需的 `.nupkg` 文件。
|
||||
|
||||
使用命令行下载:
|
||||
|
||||
```powershell
|
||||
.\nuget.exe install MathNet.Numerics -OutputDirectory D:\NuGetOfflinePackages -Version 5.0.0
|
||||
```
|
||||
|
||||
这会下载包及其依赖到 `D:\NuGetOfflinePackages` 目录。
|
||||
|
||||
> ⚠️ 注意:有些包有多个依赖项,需要把所有 `.nupkg` 都拷贝过来。
|
||||
|
||||
#### 步骤 2:将包复制到离线机器的某个目录
|
||||
|
||||
比如:
|
||||
|
||||
```
|
||||
D:\NuGetOfflinePackages\
|
||||
├── Newtonsoft.Json.13.0.3.nupkg
|
||||
├── System.Net.Http.4.3.4.nupkg
|
||||
└── ...
|
||||
```
|
||||
|
||||
#### 步骤 3:配置 Visual Studio 使用本地包源
|
||||
|
||||
1. 打开 Visual Studio。
|
||||
|
||||
2. 进入:**工具 (Tools) → NuGet 包管理器 → 程序包管理器设置** 。
|
||||
|
||||
3. 左侧选择 **NuGet 包管理器 → 程序包源** 。
|
||||
|
||||
4. 点击
|
||||
|
||||
\+
|
||||
|
||||
添加新的源:
|
||||
|
||||
- 名称:比如 `Local Packages`
|
||||
- 源:填写你的文件夹路径,如 `D:\NuGetOfflinePackages`
|
||||
|
||||
5. 点击 **更新** ,然后确定。
|
||||
|
||||
✅ 完成后,在“管理 NuGet 包”时就可以看到并安装本地包了。
|
||||
|
||||
@ -286,74 +286,6 @@ export NLS_LANG="AMERICAN_AMERICA.AL32UTF8"
|
||||
|
||||
### 登录
|
||||
|
||||
#### 使用操作系统认证
|
||||
|
||||
适用于以管理员身份登录数据库:
|
||||
|
||||
```bash
|
||||
sqlplus / as sysdba
|
||||
```
|
||||
|
||||
- */* 表示操作系统认证。
|
||||
- *as sysdba* 用于以管理员权限登录。
|
||||
|
||||
#### 使用用户名和密码登录
|
||||
|
||||
通过提供用户名、密码和数据库连接信息:
|
||||
|
||||
```bash
|
||||
sqlplus username/password@hostname:port/SID
|
||||
```
|
||||
|
||||
**示例:**
|
||||
|
||||
```bash
|
||||
sqlplus scott/tiger@192.168.1.100:1521/orcl
|
||||
```
|
||||
|
||||
- *hostname* 是数据库主机名或 IP 地址。
|
||||
- *port* 是监听端口,默认是 *1521*。
|
||||
- *SID* 是数据库实例名。
|
||||
|
||||
如果已配置 TNS,则可以简化为:
|
||||
|
||||
```bash
|
||||
sqlplus username/password@TNSNAME
|
||||
```
|
||||
|
||||
#### 无日志模式登录
|
||||
|
||||
先启动 SQL*Plus,再手动连接数据库:
|
||||
|
||||
```bash
|
||||
sqlplus /nolog
|
||||
```
|
||||
|
||||
然后使用以下命令连接:
|
||||
|
||||
```bash
|
||||
conn username/password@hostname:port/SID
|
||||
```
|
||||
|
||||
**优点:** 避免直接暴露用户名和密码。
|
||||
|
||||
#### 直接交互式登录
|
||||
|
||||
直接输入 *sqlplus*,按提示输入用户名和密码:
|
||||
|
||||
```bash
|
||||
sqlplus
|
||||
```
|
||||
|
||||
**示例:**
|
||||
|
||||
```
|
||||
请输入用户名: scott
|
||||
输入口令: tiger
|
||||
```
|
||||
|
||||
|
||||
|
||||
```shell
|
||||
# 以oracle账号登录
|
||||
su oracle
|
||||
@ -372,7 +304,7 @@ alter user sys identified by 123456;
|
||||
|
||||
## CDB 和 PDB
|
||||
|
||||

|
||||

|
||||
|
||||
- CDB :容器数据库,名称为 CDB$ROOT。其作用就是系统数据库,sys账号等以及Common User(公共用户)都保存在里面。同时它可以管理PDB数据库
|
||||
|
||||
|
||||
@ -1,265 +0,0 @@
|
||||
---
|
||||
title: Podman
|
||||
date: 2025-11-26 13:38:42
|
||||
tags:
|
||||
|
||||
---
|
||||
|
||||
# Podman命令
|
||||
|
||||
Podman 是一个无守护进程(Daemonless)的容器引擎,它在大致功能上与 Docker 兼容。这意味着**大多数 Docker 命令你可以直接把 `docker` 换成 `podman` 来使用**。
|
||||
|
||||
---
|
||||
|
||||
## 基础与别名 (Tips)
|
||||
|
||||
如果你习惯了 Docker,可以直接在 Shell 中设置别名,这样你就不用改变肌肉记忆了:
|
||||
|
||||
```bash
|
||||
alias docker=podman
|
||||
```
|
||||
|
||||
## 容器生命周期管理 (Container Lifecycle)
|
||||
|
||||
这些命令用于创建、启动、停止和删除容器。
|
||||
|
||||
- 运行容器 (最常用)
|
||||
```bash
|
||||
# -d: 后台运行, -p: 端口映射, --name: 指定名称
|
||||
podman run -d --name my-nginx -p 8080:80 nginx:latest
|
||||
```
|
||||
|
||||
- 查看容器列表
|
||||
```bash
|
||||
podman ps # 仅查看正在运行的容器
|
||||
podman ps -a # 查看所有容器(包括已停止的)
|
||||
```
|
||||
|
||||
- 启动/停止/重启
|
||||
```bash
|
||||
podman start <容器ID或名称>
|
||||
podman stop <容器ID或名称>
|
||||
podman restart <容器ID或名称>
|
||||
```
|
||||
|
||||
- 进入容器内部
|
||||
```bash
|
||||
#以交互模式进入容器的 bash/sh
|
||||
podman exec -it <容器ID或名称> /bin/bash
|
||||
```
|
||||
|
||||
- 删除容器
|
||||
```bash
|
||||
podman rm <容器ID或名称>
|
||||
podman rm -f <容器ID或名称> # 强制删除正在运行的容器
|
||||
```
|
||||
|
||||
- 查看日志
|
||||
```bash
|
||||
podman logs -f <容器ID或名称> # -f 实时跟踪日志输出
|
||||
```
|
||||
|
||||
## 镜像管理 (Image Management)
|
||||
|
||||
- 拉取镜像
|
||||
```bash
|
||||
podman pull <镜像名>
|
||||
# 例如: podman pull docker.io/library/alpine:latest
|
||||
```
|
||||
|
||||
- 查看本地镜像
|
||||
```bash
|
||||
podman images
|
||||
```
|
||||
|
||||
- 删除镜像
|
||||
```bash
|
||||
podman rmi <镜像ID或名称>
|
||||
```
|
||||
|
||||
- 构建镜像
|
||||
```bash
|
||||
# 在当前目录根据 Dockerfile 构建
|
||||
podman build -t my-app:v1 .
|
||||
```
|
||||
|
||||
- 给镜像打标签 (Tag)
|
||||
```bash
|
||||
podman tag <源镜像ID> <新名称>:<标签>
|
||||
```
|
||||
|
||||
## Pod 管理 (Podman 特色)
|
||||
|
||||
Podman 的一大特色是支持 **Pod**(类似于 Kubernetes 的 Pod 概念),即一个 Pod 里可以包含多个共享网络和存储的容器。
|
||||
|
||||
- 创建一个空 Pod
|
||||
```bash
|
||||
# 创建一个带有端口映射的 Pod
|
||||
podman pod create --name my-pod -p 8080:80
|
||||
```
|
||||
|
||||
- 在 Pod 中运行容器
|
||||
```bash
|
||||
# 将容器加入到上面创建的 pod 中
|
||||
podman run -d --pod my-pod --name container-in-pod nginx
|
||||
```
|
||||
|
||||
- 查看 Pod 列表
|
||||
```bash
|
||||
podman pod ps
|
||||
```
|
||||
|
||||
- 停止/删除 Pod
|
||||
```bash
|
||||
podman pod stop <Pod名称>
|
||||
podman pod rm <Pod名称>
|
||||
```
|
||||
|
||||
## 高级功能与系统集成 (Advanced)
|
||||
|
||||
这是 Podman 最强大的地方,特别适合运维管理。
|
||||
|
||||
- **生成 Systemd 配置文件** (非常实用) Podman 可以直接生成 systemd unit 文件,让普通用户也能通过 `systemctl` 管理容器自启。
|
||||
|
||||
```bash
|
||||
# 为正在运行的容器生成 service 文件
|
||||
podman generate systemd --name <容器名称> --files --new
|
||||
```
|
||||
|
||||
- **Kubernetes 互操作性**
|
||||
|
||||
- **导出 YAML:** 将现有容器导出为 K8s 的 YAML 定义。
|
||||
|
||||
```bash
|
||||
podman generate kube <容器或Pod名称> > my-pod.yaml
|
||||
```
|
||||
|
||||
- **运行 YAML:** 直接在 Podman 中运行 K8s 的 YAML 文件。
|
||||
|
||||
```bash
|
||||
podman play kube my-pod.yaml
|
||||
```
|
||||
|
||||
- 清理系统
|
||||
```bash
|
||||
# 删除所有停止的容器、未使用的网络和悬空的镜像
|
||||
podman system prune
|
||||
```
|
||||
|
||||
- 查看系统信息
|
||||
```bash
|
||||
podman info # 查看详细的存储、运行环境信息
|
||||
podman version # 查看版本
|
||||
```
|
||||
|
||||
|
||||
# Podman换源
|
||||
|
||||
> Podman 是一个无守护进程的容器引擎,用于在 Linux 系统上开发、管理和运行 OCI 容器。与 Docker 类似,Podman 也支持配置镜像源来加速容器镜像的拉取。
|
||||
|
||||
## Linux 系统配置
|
||||
|
||||
### 方法一:全局配置(推荐)
|
||||
|
||||
创建或编辑 Podman 的全局配置文件:
|
||||
|
||||
```shell
|
||||
sudo mkdir -p /etc/containers
|
||||
sudo tee /etc/containers/registries.conf <<-'EOF'
|
||||
unqualified-search-registries = ["docker.io"]
|
||||
[[registry]]
|
||||
prefix = "docker.io"
|
||||
location = "docker.io"
|
||||
[[registry.mirror]]
|
||||
location = "docker.1ms.run"
|
||||
[[registry.mirror]]
|
||||
location = "docker.1panel.live"
|
||||
[[registry.mirror]]
|
||||
location = "docker.m.ixdev.cn"
|
||||
[[registry.mirror]]
|
||||
location = "hub.rat.dev"
|
||||
[[registry.mirror]]
|
||||
location = "docker.xuanyuan.me"
|
||||
[[registry.mirror]]
|
||||
location = "dockerproxy.net"
|
||||
[[registry.mirror]]
|
||||
location = "docker-registry.nmqu.com"
|
||||
[[registry.mirror]]
|
||||
location = "hub.amingg.com"
|
||||
[[registry.mirror]]
|
||||
location = "docker.amingg.com"
|
||||
[[registry.mirror]]
|
||||
location = "docker.hlmirror.com"
|
||||
[[registry.mirror]]
|
||||
location = "hub1.nat.tf"
|
||||
[[registry.mirror]]
|
||||
location = "hub2.nat.tf"
|
||||
[[registry.mirror]]
|
||||
location = "hub3.nat.tf"
|
||||
[[registry.mirror]]
|
||||
location = "hub4.nat.tf"
|
||||
[[registry.mirror]]
|
||||
location = "docker.m.daocloud.io"
|
||||
[[registry.mirror]]
|
||||
location = "docker.kejilion.pro"
|
||||
[[registry.mirror]]
|
||||
location = "hub.1panel.dev"
|
||||
[[registry.mirror]]
|
||||
location = "docker.apiba.cn"
|
||||
[[registry.mirror]]
|
||||
location = "proxy.vvvv.ee"
|
||||
EOF
|
||||
```
|
||||
|
||||
### 方法二:用户级配置
|
||||
|
||||
为当前用户创建配置文件:
|
||||
|
||||
```shell
|
||||
mkdir -p ~/.config/containers
|
||||
tee ~/.config/containers/registries.conf <<-'EOF'
|
||||
unqualified-search-registries = ["docker.io"]
|
||||
[[registry]]
|
||||
prefix = "docker.io"
|
||||
location = "docker.io"
|
||||
[[registry.mirror]]
|
||||
location = "docker.1ms.run"
|
||||
[[registry.mirror]]
|
||||
location = "docker.1panel.live"
|
||||
[[registry.mirror]]
|
||||
location = "docker.m.ixdev.cn"
|
||||
[[registry.mirror]]
|
||||
location = "hub.rat.dev"
|
||||
[[registry.mirror]]
|
||||
location = "docker.xuanyuan.me"
|
||||
[[registry.mirror]]
|
||||
location = "dockerproxy.net"
|
||||
[[registry.mirror]]
|
||||
location = "docker-registry.nmqu.com"
|
||||
[[registry.mirror]]
|
||||
location = "hub.amingg.com"
|
||||
[[registry.mirror]]
|
||||
location = "docker.amingg.com"
|
||||
[[registry.mirror]]
|
||||
location = "docker.hlmirror.com"
|
||||
[[registry.mirror]]
|
||||
location = "hub1.nat.tf"
|
||||
[[registry.mirror]]
|
||||
location = "hub2.nat.tf"
|
||||
[[registry.mirror]]
|
||||
location = "hub3.nat.tf"
|
||||
[[registry.mirror]]
|
||||
location = "hub4.nat.tf"
|
||||
[[registry.mirror]]
|
||||
location = "docker.m.daocloud.io"
|
||||
[[registry.mirror]]
|
||||
location = "docker.kejilion.pro"
|
||||
[[registry.mirror]]
|
||||
location = "hub.1panel.dev"
|
||||
[[registry.mirror]]
|
||||
location = "docker.apiba.cn"
|
||||
[[registry.mirror]]
|
||||
location = "proxy.vvvv.ee"
|
||||
EOF
|
||||
```
|
||||
|
||||
@ -4,90 +4,6 @@ date: 2023-10-07 11:25:08
|
||||
tags:
|
||||
---
|
||||
|
||||
# PowerShell 7 使用 Oh My Posh 来美化命令行
|
||||
|
||||
## 安装 PowerShell 7
|
||||
|
||||
`PowerShell 7` 指的不是系统自带的 `powershell` ,而是新下载的(微软官方出品),当然这个教程也适用于系统自带的 `powershell`
|
||||
|
||||
微软官方文档地址:https://docs.microsoft.com/en-us/powershell/scripting/install/installing-powershell-on-windows?view=powershell-7.2
|
||||
下载地址:https://github.com/PowerShell/PowerShell/releases
|
||||
或者可通过 Winget 方式下载安装
|
||||
|
||||
```powershell
|
||||
winget search --id Microsoft.PowerShell
|
||||
```
|
||||
|
||||
Output
|
||||
|
||||
```powershell
|
||||
Name Id Version Source
|
||||
---------------------------------------------------------------
|
||||
PowerShell Microsoft.PowerShell 7.5.4.0 winget
|
||||
PowerShell Preview Microsoft.PowerShell.Preview 7.6.0.5 winget
|
||||
```
|
||||
|
||||
使用 `--id` 参数安装 PowerShell 或 PowerShell 预览版
|
||||
|
||||
```powershell
|
||||
winget install --id Microsoft.PowerShell --source winget
|
||||
```
|
||||
|
||||
```powershell
|
||||
winget install --id Microsoft.PowerShell.Preview --source winget
|
||||
```
|
||||
|
||||
## 安装 Oh My Posh
|
||||
|
||||
官方文档地址:https://ohmyposh.dev/
|
||||
|
||||
最好在管理员模式下运行 `powershell`
|
||||
|
||||
下载安装,在 `powershell` 命令行中输入
|
||||
|
||||
```powershell
|
||||
winget install oh-my-posh
|
||||
```
|
||||
|
||||
在 `powershell` 命令行中输入下面命令,打开 `$Profile` 进行设置,如果系统提示不存文件,是否创建,请点击创建
|
||||
|
||||
```powershell
|
||||
notepad $Profile
|
||||
```
|
||||
|
||||
将以下命令添加到 `$Profile` 文件中
|
||||
|
||||
```powershell
|
||||
oh-my-posh init pwsh | Invoke-Expression
|
||||
```
|
||||
|
||||
应用修改,则直接在命令行中执行 `. $Profile` ,如果出现错误等问题,请尝试关闭所有 `powershell` 命令窗口,重新打开,一般都会正常显示
|
||||
|
||||
### 配置环境变量
|
||||
|
||||
配置 `POSH_THEMES_PATH` 环境变量,最好配置成系统级别的,路径在 `C:\Users\<当前登录用户>\AppData\Local\Programs\oh-my-posh\themes` 下面。
|
||||
|
||||
### 更改主题
|
||||
|
||||
在 `powerShell` 命令行中输入 `Get-ChildItem $env:POSH_THEMES_PATH` 来获取所有的已安装主题
|
||||
|
||||
**预览主题(官方推荐方式):** 由于在终端里一次性渲染所有主题会很卡,官方建议直接去网页上看截图,然后记住名字即可。
|
||||
|
||||
- **[Oh My Posh 官方主题预览页 (Themes)](https://ohmyposh.dev/docs/themes)**
|
||||
|
||||
编辑 `$Profile` 文件
|
||||
|
||||
```powershell
|
||||
notepad $Profile
|
||||
```
|
||||
|
||||
把 `oh-my-posh init pwsh ...` 的部分後面加上 `--config "$env:POSH_THEMES_PATH/{主題名稱}.omp.json"`。
|
||||
将其内部文字改为:
|
||||
|
||||
```powershell
|
||||
oh-my-posh init pwsh --config "$env:POSH_THEMES_PATH/dracula.omp.json" | Invoke-Expression
|
||||
```
|
||||
|
||||
# 文件
|
||||
|
||||
## 新建文件
|
||||
@ -117,10 +33,6 @@ Set-Content my.ini -value ""
|
||||
New-Item data -ItemType Directory
|
||||
```
|
||||
|
||||
# 目录
|
||||
|
||||
|
||||
|
||||
# 做 sudo 命令
|
||||
|
||||
在Windows系统上sudo对应的就是管理员权限了。
|
||||
@ -148,152 +60,3 @@ set-alias -name sudo -value _sudo
|
||||
```text
|
||||
set-ExecutionPolicy RemoteSigned
|
||||
```
|
||||
|
||||
# 实用脚本
|
||||
|
||||
## 自动延长VS社区版过期时间
|
||||
|
||||
> 该脚本作用为 自动检查VS社区版是否在一天内过期,如是则自动延长30天
|
||||
>
|
||||
> 需事先从Github上Clone开源项目[beatcracker/VSCELicense: PowerShell module to get and set Visual Studio Community Edition license expiration date in registry (github.com)](https://github.com/beatcracker/VSCELicense)
|
||||
>
|
||||
> 然后放置在指定目录,并解除脚本执行限制,以管理员身份执行如下命令:
|
||||
>
|
||||
> ```powershell
|
||||
> Set-ExecutionPolicy RemoteSigned
|
||||
> ```
|
||||
>
|
||||
> 输入 A 即可
|
||||
|
||||
```powershell
|
||||
# 加载 VSCELicense 模块
|
||||
try {
|
||||
Import-Module -Name 'C:\VSCELicense\VSCELicense.psd1' -ErrorAction Stop
|
||||
} catch {
|
||||
Write-Error "无法加载模块 'C:\VSCELicense\VSCELicense.psd1',请确认路径是否正确。错误信息: $_"
|
||||
exit 1
|
||||
}
|
||||
|
||||
|
||||
# 获取许可证信息
|
||||
try {
|
||||
$output = Get-VSCELicenseExpirationDate -ErrorAction Stop | Out-String
|
||||
} catch {
|
||||
Write-Error "执行 Get-VSCELicenseExpirationDate 时出错: $_"
|
||||
exit 1
|
||||
}
|
||||
|
||||
# 使用正则表达式提取版本号和过期日期
|
||||
$version = $null
|
||||
$expDateStr = $null
|
||||
|
||||
if ($output -match '(?m)^\s*(\d{4})\s+(\d{2}/\d{2}/\d{4}\s+\d{2}:\d{2}:\d{2})') {
|
||||
$version = $matches[1].Trim()
|
||||
$expDateStr = $matches[2].Trim()
|
||||
Write-Host "找到版本: $version"
|
||||
Write-Host "过期日期: $expDateStr"
|
||||
} else {
|
||||
Write-Error "无法从输出中找到版本和过期日期"
|
||||
exit 1
|
||||
}
|
||||
|
||||
# 将过期日期字符串解析为 DateTime 对象
|
||||
try {
|
||||
$expirationDate = [datetime]::ParseExact($expDateStr, 'dd/MM/yyyy HH:mm:ss', $null)
|
||||
} catch {
|
||||
Write-Error "日期格式解析失败: $expDateStr. 错误: $_"
|
||||
exit 1
|
||||
}
|
||||
|
||||
# 获取当前时间并设置阈值
|
||||
$currentTime = Get-Date
|
||||
$threshold = $currentTime.AddDays(1)
|
||||
|
||||
Write-Host "当前时间: $currentTime"
|
||||
Write-Host "过期时间: $expirationDate"
|
||||
Write-Host "阈值时间(当前时间 + 1天): $threshold"
|
||||
|
||||
# 判断是否在1天内过期 -le 表示小于等于 想起了 Mybatis-Plus 条件构造器中的 le
|
||||
if ($expirationDate -le $threshold) {
|
||||
Write-Host "许可证即将过期,正在执行 Set-VSCELicenseExpirationDate 命令..."
|
||||
try {
|
||||
Set-VSCELicenseExpirationDate -Version $version -ErrorAction Stop
|
||||
Write-Host "Set-VSCELicenseExpirationDate 命令执行成功。"
|
||||
} catch {
|
||||
Write-Error "执行 Set-VSCELicenseExpirationDate 时出错: $_"
|
||||
exit 1
|
||||
}
|
||||
} else {
|
||||
Write-Host "许可证未在一天内过期,无需操作。"
|
||||
}
|
||||
```
|
||||
|
||||
输出如下:
|
||||
|
||||

|
||||
|
||||
可结合任务计划程序进行使用,免去手动执行的烦恼
|
||||
|
||||

|
||||
|
||||
### 🧩 步骤 1:打开任务计划程序
|
||||
|
||||
1. 按下 `Win + R`,输入 `taskschd.msc`,回车。
|
||||
2. 在左侧的“任务计划程序库”中,右键选择“创建任务”。
|
||||
|
||||
### 🧩 步骤 2:设置任务基本信息
|
||||
|
||||
- 常规
|
||||
|
||||
选项卡:
|
||||
|
||||
- 名称:例如 `Check-VS-LicenseExpiration`
|
||||
- 描述(可选):每天早上 7 点检查许可证过期状态
|
||||
- 勾选“不管用户是否登录都要运行”
|
||||
- 勾选“使用最高权限”
|
||||
|
||||

|
||||
|
||||
### 🧩 步骤 3:设置触发器
|
||||
|
||||
1. 切换到 **触发器** 选项卡。
|
||||
2. 点击 **新建** 。
|
||||
3. 设置:
|
||||
- 开始时间:`07:00:00`
|
||||
- 每天
|
||||
- 勾选“启用此触发器”
|
||||
4. 点击 **确定** 。
|
||||
|
||||

|
||||
|
||||
### 🧩 步骤 4:设置操作
|
||||
|
||||
1. 切换到 **操作** 选项卡。
|
||||
2. 点击 **新建** 。
|
||||
3. 设置:
|
||||
- 操作:`启动程序`
|
||||
- 程序/脚本:`powershell.exe`
|
||||
- 参数(可选):`-ExecutionPolicy RemoteSigned -File "C:\VSCELicense\Check-VS-LicenseExpiration.ps1`
|
||||
- 起始于(可选):`C:\VSCELicense`(确保路径正确)
|
||||
|
||||
> ✅ **说明** :
|
||||
>
|
||||
> - `-ExecutionPolicy RemoteSigned`:允许本地脚本运行,避免执行策略限制。
|
||||
> - `"C:\VSCELicense\Check-VS-LicenseExpiration.ps1"`:替换为你实际的脚本路径。
|
||||
> - 如果脚本路径包含空格,请用双引号包裹。
|
||||
|
||||
### 🧩 步骤 5:设置条件(可选)
|
||||
|
||||
1. 切换到 **条件** 选项卡。
|
||||
2. 可以取消勾选“只有在计算机使用交流电源时才启动此任务”,确保任务在任何电源模式下都能运行。
|
||||
|
||||
### 🧩 步骤 6:设置设置(可选)
|
||||
|
||||
1. 切换到 **设置** 选项卡。
|
||||
2. 勾选“如果任务失败,按以下频率重新启动”并设置时间间隔(如每 1 分钟)。
|
||||
3. 勾选“如果任务运行时间超过以下时间,则停止任务”并设置合理时间(如 1 小时)。
|
||||
|
||||
### 🧩 步骤 7:保存任务
|
||||
|
||||
1. 点击 **确定** 。
|
||||
2. 如果弹出用户账户控制(UAC)提示,输入管理员凭据确认。
|
||||
|
||||
|
Before Width: | Height: | Size: 14 KiB |
|
Before Width: | Height: | Size: 30 KiB |
|
Before Width: | Height: | Size: 16 KiB |
|
Before Width: | Height: | Size: 40 KiB |
@ -1,5 +0,0 @@
|
||||
---
|
||||
title: Pug
|
||||
date: 2025-05-19 13:20:34
|
||||
tags:
|
||||
---
|
||||
@ -4,76 +4,5 @@ date: 2025-03-10 14:26:30
|
||||
tags:
|
||||
---
|
||||
|
||||
# pip
|
||||
# Python
|
||||
|
||||
## 查看版本
|
||||
|
||||
```shell
|
||||
pip --version
|
||||
```
|
||||
|
||||
## 使用Pip安装Github上的软件包
|
||||
|
||||
接下来,使用以下命令来安装Github上的软件包:
|
||||
|
||||
```python
|
||||
pip install git+https://github.com/username/repository.git
|
||||
```
|
||||
|
||||
## 升级和卸载软件包
|
||||
|
||||
要升级软件包,可以使用以下命令:
|
||||
|
||||
```python
|
||||
pip install --upgrade package_name
|
||||
```
|
||||
|
||||
其中,`package_name`是你要升级的软件包的名称。Pip会自动检查版本并安装最新的软件包。
|
||||
|
||||
如果你想卸载已安装的软件包,可以使用以下命令:
|
||||
|
||||
```python
|
||||
pip uninstall package_name
|
||||
```
|
||||
|
||||
Pip会询问你是否确定卸载软件包,并删除相关的文件。
|
||||
|
||||
# Python __name__
|
||||
|
||||
首先需要了解 __name__ 是属于 python 中的内置类属性,就是它会天生就存在于一个 python 程序中,代表对应程序名称
|
||||
|
||||
```python
|
||||
import requests
|
||||
class requests(object):
|
||||
def __init__(self,url):
|
||||
self.url=url
|
||||
self.result=self.getHTMLText(self.url)
|
||||
def getHTMLText(url):
|
||||
try:
|
||||
r=requests.get(url,timeout=30)
|
||||
r.raise_for_status()
|
||||
r.encoding=r.apparent_encoding
|
||||
return r.text
|
||||
except:
|
||||
return "This is a error."
|
||||
print(__name__)
|
||||
```
|
||||
|
||||
结果:
|
||||
|
||||
```shell
|
||||
__main__
|
||||
Process finished with exit code 0
|
||||
```
|
||||
|
||||
当这个 pcRequests.py 作为模块被调用时,则它的 __name__ 就是它自己的名字:
|
||||
|
||||
```python
|
||||
import pcRequestspcRequestsc=pcRequestsc.__name__
|
||||
```
|
||||
|
||||
结果:
|
||||
|
||||
```shell
|
||||
'pcRequests'
|
||||
```
|
||||
|
||||
@ -1,606 +0,0 @@
|
||||
---
|
||||
title: React
|
||||
date: 2025-07-23 15:56:46
|
||||
tags:
|
||||
---
|
||||
|
||||
# Vue 转 React 指南
|
||||
|
||||
## JSX
|
||||
|
||||
先介绍 React 唯一的一个语法糖:JSX。
|
||||
|
||||
理解 JSX 语法并不困难,简单记住一句话,遇到 `{}` 符号内部解析为 JS 代码,遇到成对的 `<>` 符号内部解析为 HTML 代码。
|
||||
|
||||
当你写下这个 React 组件时:
|
||||
|
||||
```jsx
|
||||
import React from 'react';
|
||||
|
||||
function MyComponent(props) {
|
||||
return <div>{props.hello}</div>
|
||||
}
|
||||
```
|
||||
|
||||
最终会被自动工具翻译成:
|
||||
|
||||
```jsx
|
||||
import React from 'react';
|
||||
|
||||
function MyComponent(props) {
|
||||
return React.createElement('div', null, props.hello);
|
||||
}
|
||||
```
|
||||
|
||||
React 就是通过这个小小语法糖,实现在 JS 里面写 HTML,可能有小伙伴会说 HTML 与 JS 分离不是更好吗?责职分明,混合只会更乱。但当你体验到代码自动提示,自动检查,以及调试时精确定位到一行代码的好处时,就清楚 React 和 Vue 的差距了。
|
||||
|
||||
## 文本插值
|
||||
|
||||
**vue种采用双括号**
|
||||
|
||||
```vue
|
||||
<span>Message: {{ msg }}</span>
|
||||
```
|
||||
|
||||
**react采用单括号**
|
||||
|
||||
```jsx
|
||||
function MyComponent(props) {
|
||||
let msg = 'XXX'
|
||||
return <div>{ msg }</div>
|
||||
}
|
||||
```
|
||||
|
||||
## Attribute 绑定
|
||||
|
||||
**vue中 想要响应式地绑定一个 attribute,应该使用 `v-bind` 指令**
|
||||
|
||||
```vue
|
||||
<div v-bind:id="dynamicId"></div>
|
||||
<div :id="dynamicId"></div>
|
||||
```
|
||||
|
||||
**react中,使用单引号,或者使用单括号包裹表示动态绑定**
|
||||
|
||||
```jsx
|
||||
function App () {
|
||||
let tmpID = '12'
|
||||
return (
|
||||
<div className='App'>
|
||||
<div id='12'>id</div>
|
||||
<div id={tmpID}>id</div>
|
||||
</div>
|
||||
);
|
||||
}
|
||||
```
|
||||
|
||||
动态绑定多值:
|
||||
|
||||
```jsx
|
||||
function App () {
|
||||
let tmpObject = {
|
||||
id: 13,
|
||||
className: 'wrapper'
|
||||
}
|
||||
return (
|
||||
<div className='App'>
|
||||
<div {...tmpObject}>id</div>
|
||||
</div>
|
||||
);
|
||||
}
|
||||
|
||||
即:
|
||||
|
||||
<div id="13" class="wrapper">id</div>
|
||||
```
|
||||
|
||||
## 参数 Arguments
|
||||
|
||||
**某些指令会需要一个“参数”,Vue在指令名后通过一个冒号隔开做标识。例如用 `v-bind` 指令**
|
||||
|
||||
```vue
|
||||
<a v-bind:href="url"> ... </a>
|
||||
|
||||
<!-- 简写 -->
|
||||
<a :href="url"> ... </a>
|
||||
```
|
||||
|
||||
**React中则没有指令一说,而是采用如下方式:**
|
||||
|
||||
```jsx
|
||||
// href跳转
|
||||
function App () {
|
||||
let tmpURL = 'https://www.XXXXXXXX'
|
||||
return (
|
||||
<div className='App'>
|
||||
<a href={tmpURL}></a>
|
||||
</div>
|
||||
);
|
||||
}
|
||||
```
|
||||
|
||||
## 使用 JS 表达式
|
||||
|
||||
**React 遇到 `{}` 符号内部解析为 JS 代码**
|
||||
|
||||
```jsx
|
||||
function App () {
|
||||
let tmpString = '--';
|
||||
return (
|
||||
<div className='App'>
|
||||
<div >{1 + 1}</div>
|
||||
<div >{'a' + 'b'}</div>
|
||||
<div >{`1${tmpString}1`}</div>
|
||||
</div>
|
||||
);
|
||||
}
|
||||
```
|
||||
|
||||
即:
|
||||
|
||||
```html
|
||||
<div>2</div>
|
||||
<div>ab</div>
|
||||
<div>1--1</div>
|
||||
```
|
||||
|
||||
## 事件处理
|
||||
|
||||
**Vue中绑定事件处理:**
|
||||
|
||||
```vue
|
||||
<!-- `greet` 是上面定义过的方法名 -->
|
||||
<button @click="greet">Greet</button>
|
||||
```
|
||||
|
||||
**React可以通过在组件中声明 事件处理 函数来响应事件**
|
||||
|
||||
React中点击事件使用小驼峰形式:onClick
|
||||
|
||||
在标签上写函数:
|
||||
|
||||
```jsx
|
||||
function App () {
|
||||
return (
|
||||
<div className='App'>
|
||||
<div onClick={() => alert('点击出现弹框')}>按钮</div>
|
||||
</div>
|
||||
);
|
||||
}
|
||||
```
|
||||
|
||||
提前声明函数:
|
||||
|
||||
```jsx
|
||||
function App () {
|
||||
function myFun () {
|
||||
alert('点击出现弹框')
|
||||
}
|
||||
return (
|
||||
<div className='App'>
|
||||
<div onClick={myFun}>按钮</div>
|
||||
</div>
|
||||
);
|
||||
}
|
||||
```
|
||||
|
||||
注意,`onClick={handleClick}` 的结尾没有小括号!不要 **调用** 事件处理函数:你只需 **传递给事件** 即可。当用户点击按钮时,React 会调用你的事件处理函数。
|
||||
|
||||
函数传参:
|
||||
|
||||
```jsx
|
||||
function App () {
|
||||
function myFun (str) {
|
||||
alert(str)
|
||||
}
|
||||
return (
|
||||
<div className='App'>
|
||||
<div onClick={() => myFun('点击出现弹框')}>按钮</div>
|
||||
</div>
|
||||
);
|
||||
}
|
||||
```
|
||||
|
||||
## 动态参数
|
||||
|
||||
**Vue在指令参数上也可以使用一个 JavaScript 表达式,需要包含在一对方括号内:**
|
||||
|
||||
```vue
|
||||
<a v-bind:[attributeName]="url"> ... </a>
|
||||
|
||||
<!-- 简写 -->
|
||||
<a :[attributeName]="url"> ... </a>
|
||||
```
|
||||
|
||||
举例来说,如果你的组件实例有一个数据属性 `attributeName`,其值为 `"href"`,那么这个绑定就等价于 `v-bind:href`。
|
||||
|
||||
**React 也可以通过动态参数绑定**
|
||||
|
||||
```jsx
|
||||
function App () {
|
||||
const obj = {
|
||||
onClick: () => alert('点击出现弹框'),
|
||||
// ...还可以写更多事件
|
||||
}
|
||||
return (
|
||||
<div className='App'>
|
||||
<div {...obj}>按钮</div>
|
||||
</div>
|
||||
);
|
||||
}
|
||||
```
|
||||
|
||||
## 修饰符 Modifiers
|
||||
|
||||
vue 修饰符是以点开头的特殊后缀
|
||||
|
||||
表明指令需要以一些特殊的方式被绑定。例如 `.prevent` 修饰符会告知 `v-on` 指令对触发的事件调用 `event.preventDefault()`:
|
||||
|
||||
```vue
|
||||
<form @submit.prevent="onSubmit">...</form>
|
||||
```
|
||||
|
||||
React 则是依靠于JS基础
|
||||
|
||||
```jsx
|
||||
function App () {
|
||||
function onSubmit(e){
|
||||
e.preventDefault();
|
||||
e.stopPropagation();
|
||||
}
|
||||
return (
|
||||
<div className='App'>
|
||||
<form onSubmit={onSubmit}>
|
||||
<button type='submit'></button>
|
||||
</form>
|
||||
</div>
|
||||
);
|
||||
}
|
||||
```
|
||||
|
||||
## 响应式
|
||||
|
||||
**为了实现视图更新,VUE中响应式是一个重要的概念**
|
||||
|
||||
**而 React 中并没有响应式这个概念,要实现视图更新,需要在 React 引入 `useState`**
|
||||
|
||||
通常,你会希望你的组件 “记住” 一些信息并展示出来。例如,也许你想计算一个按钮被点击的次数。要做到这一点,你需要在你的组件中添加 **state**。
|
||||
|
||||
首先,从 React 引入 `useState`:
|
||||
|
||||
```jsx
|
||||
import { useState } from 'react';
|
||||
```
|
||||
|
||||
现在你可以在你的组件中声明一个 **state 变量**:
|
||||
|
||||
```jsx
|
||||
function MyButton() {
|
||||
const [count, setCount] = useState(0);
|
||||
// ...
|
||||
```
|
||||
|
||||
你将从 `useState` 中获得两样东西:当前的 state(`count`),以及用于更新它的函数(`setCount`)。你可以给它们起任何名字,但按照惯例,需要像这样 `[something, setSomething]` 为它们命名。
|
||||
|
||||
第一次显示按钮时,`count` 的值为 `0`,因为你把 `0` 传给了 `useState()`。当你想改变 state 时,调用 `setCount()` 并将新的值传递给它。点击该按钮计数器将递增:
|
||||
|
||||
```jsx
|
||||
function MyButton() {
|
||||
const [count, setCount] = useState(0);
|
||||
function handleClick() {
|
||||
setCount(count + 1);
|
||||
}
|
||||
|
||||
return (
|
||||
<button onClick={handleClick}>
|
||||
Clicked {count} times
|
||||
</button>
|
||||
);
|
||||
}
|
||||
```
|
||||
|
||||
React 将再次调用你的组件函数。这次,`count` 会变成 `1`。接着,变成 `2`。以此类推。
|
||||
|
||||
如果你多次渲染同一个组件,每个组件都会拥有自己的 state。你可以尝试点击不同的按钮:
|
||||
|
||||
## 计算属性
|
||||
|
||||
Vue中使用 computed 来实现计算属性(缓存计算的结果)
|
||||
|
||||
**React 在组件的顶层调用 `useMemo` 来缓存每次重新渲染都需要计算的结果**
|
||||
|
||||
```jsx
|
||||
import { useState } from 'react';
|
||||
import { useMemo } from 'react';
|
||||
|
||||
function App () {
|
||||
const [user] = useState({ firstname: 'a', lastname: 'b' })
|
||||
|
||||
const fullname = useMemo(() => {
|
||||
return user.firstname + user.lastname;
|
||||
}, [user.firstname, user.lastname])
|
||||
|
||||
return (
|
||||
<div className='App'>
|
||||
{fullname}
|
||||
</div>
|
||||
);
|
||||
}
|
||||
```
|
||||
|
||||
**useMemo(calculateValue, dependencies)**
|
||||
|
||||
参数
|
||||
|
||||
- `calculateValue`:要缓存计算值的函数。它应该是一个没有任何参数的纯函数,并且可以返回任意类型。React 将会在首次渲染时调用该函数;在之后的渲染中,如果 `dependencies` 没有发生变化,React 将直接返回相同值。否则,将会再次调用 `calculateValue` 并返回最新结果,然后缓存该结果以便下次重复使用。
|
||||
- `dependencies`:所有在 `calculateValue` 函数中使用的响应式变量组成的数组。响应式变量包括 props、state 和所有你直接在组件中定义的变量和函数。如果你在代码检查工具中 [配置了 React](https://react.docschina.org/learn/editor-setup#linting),它将会确保每一个响应式数据都被正确地定义为依赖项。依赖项数组的长度必须是固定的并且必须写成 `[dep1, dep2, dep3]` 这种形式。React 使用 [`Object.is`](https://developer.mozilla.org/zh-CN/docs/Web/JavaScript/Reference/Global_Objects/Object/is) 将每个依赖项与其之前的值进行比较。
|
||||
|
||||
## 绑定 HTML class
|
||||
|
||||
数据绑定的一个常见需求场景是操纵元素的 CSS class 列表和内联样式。因为 `class` 和 `style` 都是 attribute
|
||||
|
||||
Vue中可以给 `:class` (`v-bind:class` 的缩写) 传递一个对象来动态切换 class:
|
||||
|
||||
```vue
|
||||
<div :class="{ active: isActive }"></div>
|
||||
```
|
||||
|
||||
上面的语法表示 `active` 是否存在取决于数据属性 `isActive` 的真假值。
|
||||
|
||||
React实现方式基于js语法,其实有多种实现方式,列举三元运算符方式如下:
|
||||
|
||||
```jsx
|
||||
function App () {
|
||||
let showColor = false
|
||||
return (
|
||||
// 现有box-show、box-hide两个class样式
|
||||
<div className={showColor ? 'box-show' : 'box-hide'}></div>
|
||||
);
|
||||
}
|
||||
```
|
||||
|
||||
## 语法糖转换
|
||||
|
||||
习惯 Vue 的同学都知道很多语法糖,比如 `v-if`、`v-for`、`v-bind`、`v-on` 等,相比 Vue,React 只有一个语法糖,那就是 jsx/tsx。`v-if` 这些功能在 React 上都是通过原生 javascript 实现的,慢慢你会发现,其实你学的不是 React,而是 Javascipt,React 赋予你通过 js 完整控制组件的能力,这部分明显比 Vue 的语法糖更加灵活,糖太多容易引来虫子(Bug)
|
||||
|
||||
条件渲染
|
||||
|
||||
vue 中写法是这样:
|
||||
|
||||
```vue
|
||||
<div>
|
||||
<h1 v-if="ishow">Vue is awesome!</h1>
|
||||
<h1 v-else>else</h1>
|
||||
</div>
|
||||
```
|
||||
|
||||
在 React 函数组件中,只需使用 js 三目运算符语法即可完成条件渲染的功能。或者使用 && 逻辑,记住下面一句话就能过理解了:
|
||||
|
||||
> 遇到 `{}` 符号内部解析为 JS 代码,遇到成对的 `<>` 符号内部解析为 HTML 代码
|
||||
|
||||
```jsx
|
||||
function App () {
|
||||
const ishow = false
|
||||
return (
|
||||
<div>
|
||||
{ishow ? <div>awesome</div> : <div>else</div>}
|
||||
{ishow && <h1>React!</h1>}
|
||||
</div>
|
||||
);
|
||||
}
|
||||
```
|
||||
|
||||
## 列表渲染
|
||||
|
||||
Vue中通过v-for进行列表渲染
|
||||
|
||||
**React 通过 js 的数组语法 map,将数据对象映射为 DOM 对象**。只需学会 js,无需记住各种指令,如果要做列表过滤,直接使用 `items.filter(...).map(...)` 链式调用即可,语法上更加灵活,如果为了提高渲染性能,使用 useMemo 进行优化即可,类似 Vue 的 computed。
|
||||
|
||||
```jsx
|
||||
function App () {
|
||||
const arr = [{ message: 'react' }, { message: 'JS' }]
|
||||
return (
|
||||
<div>
|
||||
{arr.map((items, index) => <li key={index}>{items.message}</li>)}
|
||||
</div >
|
||||
);
|
||||
}
|
||||
```
|
||||
|
||||
## 侦听器
|
||||
|
||||
Vue中使用 watch监听数据变化,触发回调
|
||||
|
||||
React中可以使用 useEffect 实现
|
||||
|
||||
```jsx
|
||||
function App () {
|
||||
const [user, setUser] = useState({
|
||||
firstname: 'a',
|
||||
lastname: 'b'
|
||||
})
|
||||
useEffect(() => {
|
||||
console.log("1111")
|
||||
}, [user.firstname])
|
||||
return (
|
||||
<div>
|
||||
<button onClick={() => setUser({ ...user, firstname: 'a2' })}></button>
|
||||
</div >
|
||||
);
|
||||
}
|
||||
```
|
||||
|
||||
|
||||
|
||||
# 父子组件传递事件
|
||||
|
||||
## 子组件是模态框,确定按钮需要增加loading状态
|
||||
|
||||
### **子组件:增加 `confirmLoading` 状态并优化 `handleOk` 方法**
|
||||
|
||||
```tsx
|
||||
import React, { useState } from 'react';
|
||||
import { Modal, Checkbox, Input, message } from 'antd';
|
||||
import { useTranslation } from 'react-i18next'
|
||||
|
||||
const { TextArea } = Input;
|
||||
|
||||
interface FeedbackModalProps {
|
||||
open: boolean;
|
||||
onOk: (selectedOption: number | null, feedbackText: string) => Promise<void>;
|
||||
onCancel: () => void;
|
||||
}
|
||||
|
||||
const FeedbackModal: React.FC<FeedbackModalProps> = ({ open, onOk, onCancel }) => {
|
||||
const [selectedOption, setSelectedOption] = useState<number | null>(null);
|
||||
const [feedbackText, setFeedbackText] = useState<string>('');
|
||||
const { t } = useTranslation()
|
||||
const [confirmLoading, setConfirmLoading] = useState(false);
|
||||
|
||||
const handleOk = async () => {
|
||||
if (!feedbackText) {
|
||||
message.warning('请填写反馈建议');
|
||||
return;
|
||||
}
|
||||
setConfirmLoading(true)
|
||||
try {
|
||||
await onOk(selectedOption, feedbackText);
|
||||
} finally {
|
||||
setConfirmLoading(false)
|
||||
}
|
||||
|
||||
};
|
||||
|
||||
return (
|
||||
<Modal
|
||||
title="反馈"
|
||||
open={open}
|
||||
onOk={handleOk}
|
||||
onCancel={onCancel}
|
||||
okText={`${t('common.operation.confirm')}`}
|
||||
cancelText={`${t('common.operation.cancel')}`}
|
||||
confirmLoading={confirmLoading}
|
||||
>
|
||||
{/* <div>
|
||||
<Checkbox
|
||||
checked={selectedOption === 0}
|
||||
onChange={() => setSelectedOption(0)}
|
||||
>
|
||||
新增
|
||||
</Checkbox>
|
||||
<Checkbox
|
||||
checked={selectedOption === 1}
|
||||
onChange={() => setSelectedOption(1)}
|
||||
>
|
||||
修改
|
||||
</Checkbox>
|
||||
</div> */}
|
||||
<TextArea
|
||||
rows={4}
|
||||
placeholder="请输入您的反馈建议"
|
||||
value={feedbackText}
|
||||
onChange={(e) => setFeedbackText(e.target.value)}
|
||||
/>
|
||||
</Modal>
|
||||
);
|
||||
};
|
||||
|
||||
export default FeedbackModal;
|
||||
|
||||
```
|
||||
|
||||
### **父组件:确保 `handleFeedbackSubmit` 返回 Promise**
|
||||
|
||||
```tsx
|
||||
const handleFeedbackSubmit = useCallback(
|
||||
async (selectedOption: number | null, feedbackText: string) => {
|
||||
console.log(currentMessageId);
|
||||
console.log(currentFeedback);
|
||||
|
||||
try {
|
||||
// 构造请求参数
|
||||
const requestBody = {
|
||||
operationType: currentFeedback!.rating, // 0 或 1
|
||||
feedbackText, // 用户反馈建议
|
||||
conversationId: currentConversationId, // 会话 ID
|
||||
messageId: currentMessageId, // 消息 ID
|
||||
username: getCookieValue('username'), // 用户名
|
||||
};
|
||||
|
||||
// 调用 Java 接口
|
||||
const javaResponse = await fetch(
|
||||
`/dev-api/api/conversation/feedback`,
|
||||
{
|
||||
method: "POST",
|
||||
headers: {
|
||||
"Content-Type": "application/json",
|
||||
},
|
||||
body: JSON.stringify(requestBody),
|
||||
}
|
||||
);
|
||||
|
||||
// 调用原有的 updateFeedback 函数
|
||||
await updateFeedback(
|
||||
{
|
||||
url: `/messages/${currentMessageId}/feedbacks`,
|
||||
body: { rating: currentFeedback!.rating },
|
||||
},
|
||||
// isInstalledApp,
|
||||
// appId
|
||||
);
|
||||
|
||||
// 显示成功通知
|
||||
notify({ type: "success", message: t("common.api.success") });
|
||||
|
||||
if (resolveFeedback) {
|
||||
resolveFeedback(true); // 用户取消了反馈
|
||||
setResolveFeedback(null);
|
||||
}
|
||||
|
||||
// 关闭对话框
|
||||
setIsFeedbackModalVisible(false);
|
||||
} catch (error) {
|
||||
console.error("Error:", error);
|
||||
notify({ type: "error", message: t("common.api.failed") });
|
||||
} finally {
|
||||
setIsSubmittingNow(false);
|
||||
}
|
||||
},
|
||||
[
|
||||
currentMessageId,
|
||||
currentFeedback,
|
||||
currentConversationId,
|
||||
isInstalledApp,
|
||||
appId,
|
||||
notify,
|
||||
t,
|
||||
]
|
||||
);
|
||||
```
|
||||
|
||||
父组件调用子组件部分
|
||||
|
||||
```tsx
|
||||
<FeedbackModal
|
||||
open={isFeedbackModalVisible}
|
||||
onOk={handleFeedbackSubmit}
|
||||
onCancel={() => {
|
||||
if (resolveFeedback) {
|
||||
resolveFeedback(false); // 用户取消了反馈
|
||||
setResolveFeedback(null);
|
||||
}
|
||||
setIsFeedbackModalVisible(false)
|
||||
}}
|
||||
/>
|
||||
```
|
||||
|
||||
### **关键点说明**
|
||||
|
||||
1. **子组件内部管理加载状态**
|
||||
通过 `useState` 创建 `isLoading` 状态,并在 `handleOk` 中控制其值。点击按钮时,`isLoading` 变为 `true`,请求结束后变为 `false`。
|
||||
2. **`okButtonProps` 绑定加载状态**
|
||||
Ant Design 的 `Modal` 组件支持通过 `okButtonProps` 自定义按钮属性,这里将 `loading` 绑定到 `isLoading` 状态。
|
||||
3. **`onOk` 作为异步函数传递**
|
||||
父组件的 `handleFeedbackSubmit` 是 `async` 函数,返回 Promise。子组件通过 `await onOk()` 确保加载状态在请求结束后更新。
|
||||
4. **错误处理不影响加载状态**
|
||||
使用 `try...finally` 确保无论请求成功或失败,`isLoading` 都会被重置。
|
||||
@ -46,7 +46,7 @@ top_img: https://gcore.jsdelivr.net/gh/volantis-x/cdn-wallpaper/abstract/B951AE1
|
||||
|
||||
## 设置引用图片存储路径
|
||||
|
||||

|
||||

|
||||
|
||||
## Typora添加右键新建Markdown文件
|
||||
|
||||
@ -98,7 +98,7 @@ Windows Registry Editor Version 5.00
|
||||
|
||||
删除多余的文件(尤其是有一个什么Markdown File),只保留如下的两项。然后关闭注册表,即可修复bug
|
||||
|
||||

|
||||

|
||||
|
||||
|
||||
|
||||
@ -125,9 +125,9 @@ Windows Registry Editor Version 5.00
|
||||
```
|
||||
|
||||
|
||||

|
||||

|
||||
|
||||

|
||||

|
||||
|
||||
## 上传图片至Minio
|
||||
|
||||
@ -191,18 +191,4 @@ picgo upload /path/to/your/image.png
|
||||
|
||||
### Typora设置
|
||||
|
||||

|
||||
|
||||
## 主题
|
||||
|
||||
### typora-gitbook-theme
|
||||
|
||||
https://github.com/h16nning/typora-gitbook-theme
|
||||
|
||||
### typora-ladder-theme
|
||||
|
||||
https://github.com/guangzhengli/typora-ladder-theme
|
||||
|
||||
### Mdmdt
|
||||
|
||||
[cayxc/Mdmdt: Typora极简文档主题Mdmdt,包含亮色和暗色两种主题,是深度定制的个性化Typora主题;Typora minimalist document theme Mdmdt. Featuring both light and dark themes, it is a deeply customized personalized Typora theme.](https://github.com/cayxc/Mdmdt)
|
||||

|
||||
|
||||
|
Before Width: | Height: | Size: 42 KiB |
|
Before Width: | Height: | Size: 69 KiB |
|
Before Width: | Height: | Size: 147 KiB |
|
Before Width: | Height: | Size: 63 KiB |
|
Before Width: | Height: | Size: 3.3 KiB |
@ -69,12 +69,10 @@ vim 的各种工作模式可以通过不同的键进行切换,用户统一使
|
||||
|
||||
在底线命令模式中,基本的命令有(已经省略了冒号):
|
||||
|
||||
- :w 保存文件
|
||||
- :q 退出 Vim 编辑器
|
||||
- :wq 保存文件并退出 Vim 编辑器
|
||||
- :q! 强制退出 Vim 编辑器,不保存修改
|
||||
- :set nu 开启行号
|
||||
- :set nonu 关闭行号
|
||||
- :w: 保存文件
|
||||
- :q: 退出 Vim 编辑器
|
||||
- :wq: 保存文件并退出 Vim 编辑器
|
||||
- :q!: 强制退出 Vim 编辑器,不保存修改
|
||||
|
||||
按`ESC`键可随时退出底线命令模式。
|
||||
|
||||
@ -185,20 +183,4 @@ vim 的各种工作模式可以通过不同的键进行切换,用户统一使
|
||||
</thead>
|
||||
</table>
|
||||
</center>
|
||||
# Vim配置文件
|
||||
|
||||
## 当前用户配置文件(~/.vimrc)
|
||||
|
||||
若在当前用户目录下没有`.vimrc`,则手动新建即可
|
||||
|
||||
```bash
|
||||
vim ~/.vimrc
|
||||
```
|
||||
|
||||
其中可添加如命令模式中的命令,比如`set nu`,之后再打开vim则默认开启行号
|
||||
|
||||
```
|
||||
set nu
|
||||
```
|
||||
|
||||
`:wq`保存退出后,需使用`source ~/.vimrc`使改动生效
|
||||
|
||||
@ -4,44 +4,12 @@ date: 2025-04-16 15:18:28
|
||||
tags:
|
||||
---
|
||||
|
||||
# 快捷键
|
||||
|
||||
## 多行编辑:Alt+Click
|
||||
|
||||
|
||||
|
||||
# 插件
|
||||
|
||||
## Remote - SSH
|
||||
|
||||
### 配置远程连接Linux密码免登录
|
||||
|
||||
首先使用 `PuTTY Key Generator`生成ppk
|
||||
|
||||

|
||||
|
||||
出现进度条,在框内摇晃鼠标,直到进度条满,就可以看到生成的公钥了,私钥是需要保存到本地的,最好保存到`~/.ssh`目录下
|
||||
|
||||

|
||||
|
||||

|
||||
|
||||

|
||||
|
||||
框内是生成的公钥,可以保存到本地,也可以直接复制到要连接的Linux服务器上的`~/.ssh/authorized_keys`文件内
|
||||
|
||||

|
||||
|
||||
因为刚刚保存的私钥是`ppk`格式的,如果是SSH连接用,需要转换一下,`PuTTY Key Generator`同样有这个功能
|
||||
|
||||
如果是刚生成好的,可以直接点击上方工具栏 Conversions -> Export OpenSSH Key 然后保存到`~/.ssh`目录下。
|
||||
|
||||

|
||||
|
||||
如果是要打开以前生成的密钥,File -> Load private Key。然后再重复上述 Conversions -> Export OpenSSH Key 步骤即可。
|
||||
|
||||

|
||||
|
||||
编辑配置文件,一般位于`~/.ssh/config`
|
||||
|
||||
```shell
|
||||
@ -62,7 +30,7 @@ vim ~/.ssh/authorized_keys
|
||||
|
||||
将秘钥对应的公钥复制上去
|
||||
|
||||

|
||||

|
||||
|
||||
保存即可
|
||||
|
||||
@ -76,41 +44,39 @@ vim /etc/ssh/sshd_config
|
||||
PubkeyAuthentication yes
|
||||
|
||||
# :wq 保存
|
||||
# 重启sshd服务 AlmaLinux 下
|
||||
# 重启sshd服务
|
||||
systemctl restart sshd
|
||||
# ubuntu 下
|
||||
sudo systemctl restart ssh
|
||||
```
|
||||
|
||||
Windows `~/.ssh` 目录属性中 安全 -> 高级
|
||||
|
||||

|
||||

|
||||
|
||||
需 停用继承,我这里已经停用
|
||||
|
||||

|
||||

|
||||
|
||||
然后点击 添加,选择主体
|
||||
|
||||

|
||||

|
||||
|
||||
选择高级
|
||||
|
||||

|
||||

|
||||
|
||||
点击 立即查找
|
||||
|
||||

|
||||

|
||||
|
||||
选择 Administrator 和 SYSTEM
|
||||
|
||||

|
||||

|
||||
|
||||

|
||||

|
||||
|
||||
点击两次 确定后,将 基本权限改为 完全控制
|
||||
|
||||

|
||||

|
||||
|
||||
再次点击确定
|
||||
|
||||
|
||||
|
Before Width: | Height: | Size: 61 KiB |
|
Before Width: | Height: | Size: 31 KiB |
|
Before Width: | Height: | Size: 38 KiB |
|
Before Width: | Height: | Size: 31 KiB |
|
Before Width: | Height: | Size: 15 KiB |
|
Before Width: | Height: | Size: 41 KiB |
|
Before Width: | Height: | Size: 43 KiB |
|
Before Width: | Height: | Size: 43 KiB |
|
Before Width: | Height: | Size: 31 KiB |
@ -1832,10 +1832,6 @@ yarn build
|
||||
yarn remove pte-ui
|
||||
# 安装依赖
|
||||
yarn add pte-ui@2.1.54
|
||||
# 查看缓存路径
|
||||
yarn cache dir
|
||||
# 修改缓存路径
|
||||
yarn config set cache-folder "E:\\Yarn\\Cache"
|
||||
|
||||
|
||||
```
|
||||
@ -1865,25 +1861,6 @@ yarn
|
||||
| npm install [package]@[version] | yarn add [package]@[version] | 安装指定版本的包 |
|
||||
| npm rebuild | yarn install --force | 重新下载所有包 |
|
||||
|
||||
##
|
||||
|
||||
## pnpm包管理器
|
||||
|
||||
```shell
|
||||
# 查看缓存存储位置
|
||||
pnpm store path
|
||||
# 设置缓存存储位置
|
||||
pnpm config set store-dir <new path>
|
||||
# 修改全局源
|
||||
pnpm config set registry https://registry.npmmirror.com
|
||||
# 修改项目源
|
||||
pnpm config set registry https://registry.npmmirror.com --save
|
||||
# 查看当前设置的源
|
||||
pnpm config get registry
|
||||
```
|
||||
|
||||
|
||||
|
||||
## 快速删除 node_modules
|
||||
|
||||
利用 npm 包 rimraf 快速删除 `node_modules` 文件夹
|
||||
@ -1902,51 +1879,6 @@ rimraf node_modules
|
||||
|
||||
|
||||
|
||||
# NVM
|
||||
|
||||
> nvm(Node Version Manager)是一个非常有用的工具,可以让您在同一台机器上安装和管理多个 Node.js 版本。
|
||||
>
|
||||
> [nvm-sh/nvm: Node Version Manager - POSIX-compliant bash script to manage multiple active node.js versions (github.com)](https://github.com/nvm-sh/nvm?tab=readme-ov-file#installing-and-updating)
|
||||
|
||||
**nvm 常用命令:**
|
||||
|
||||
```shell
|
||||
# 查看 nvm 版本
|
||||
nvm --version
|
||||
|
||||
# 列出所有可安装的 Node.js 版本
|
||||
nvm list-remote
|
||||
# Windows 上使用
|
||||
nvm list available
|
||||
|
||||
# 安装最新的 LTS 版本
|
||||
nvm install --lts
|
||||
|
||||
# 安装特定版本
|
||||
nvm install 18.17.0
|
||||
nvm install 16.20.1
|
||||
|
||||
# 列出已安装的版本
|
||||
nvm list
|
||||
# 或
|
||||
nvm ls
|
||||
|
||||
# 切换到特定版本
|
||||
nvm use 18.17.0
|
||||
|
||||
# 设置默认版本
|
||||
nvm alias default 18.17.0
|
||||
|
||||
# 查看当前使用的版本
|
||||
nvm current
|
||||
|
||||
# 卸载特定版本
|
||||
nvm uninstall 16.20.1
|
||||
|
||||
# 查看当前使用的npm的目录
|
||||
npm prefix -g
|
||||
```
|
||||
|
||||
# npx
|
||||
|
||||
npm大家都知道,是node的包管理器,npx虽然也见过,但似乎较少用过,那npx到底是什么呢?
|
||||
|
||||
@ -1,135 +0,0 @@
|
||||
---
|
||||
title: Windows Server
|
||||
date: 2025-07-21 10:53:55
|
||||
tags:
|
||||
---
|
||||
|
||||
# Web Deploy 部署任务失败解决方案
|
||||
|
||||
## 报错信息:
|
||||
|
||||
```shell
|
||||
C:\Program Files\dotnet\sdk\9.0.302\Sdks\Microsoft.NET.Sdk.Publish\targets\PublishTargets\Microsoft.NET.Sdk.Publish.MSDeploy.targets(140,5): 错误 : Web 部署任务失败。
|
||||
((2025/7/21 10:43:25)在远程计算机上处理请求时出错。)
|
||||
(2025/7/21 10:43:25)在远程计算机上处理请求时出错。
|
||||
无法执行此操作。请与服务器管理员联系,检查授权和委派设置。
|
||||
```
|
||||
|
||||
## 解决方法:
|
||||
|
||||
计算机管理
|
||||
|
||||

|
||||
|
||||

|
||||
|
||||
之后打开服务,找到Web 部署代理服务,重新启动一下
|
||||
|
||||

|
||||
|
||||
# IIS(Internet Information Services)
|
||||
|
||||
## 优化回收策略
|
||||
|
||||

|
||||
|
||||
- 回收 > 固定时间间隔(分钟)
|
||||
|
||||
一个时间段,超过该时间段,应用程序池将回收。值为 0 ,则应用程序池不会按固定间隔回收
|
||||
|
||||
默认值:1740分钟,29小时
|
||||
|
||||
优化设置:改为0 。因为无法避免在高峰期发生回收。同时设置“回收 > 特定时间”
|
||||
|
||||
- 回收 > 特定时间
|
||||
|
||||
应用程序池进行回收的一组特定的本地时间(24小时制)
|
||||
|
||||
优化设置:固定在低峰期时回收。eg:设定为 04:00 、15:30 等
|
||||
|
||||
另外,也可以使用windows计划任务实现iis站点每周六晚定时回收
|
||||
|
||||
- 进程模型 > 闲置超时(分钟)
|
||||
|
||||
一个时间段,设定工作进程允许保持闲置状态的最大时间间隔,超过该时间就会自动关闭。
|
||||
|
||||
优化设置:改为0,避免内存信息频繁被回收清空。同时设置“回收 > 特定时间”
|
||||
|
||||
- 进程模型 > 空闲超时操作
|
||||
|
||||
默认是“Terminate”(另一个选项是“Suspend”)。
|
||||
|
||||
Terminate 表示一旦超时就终止服务,并回收工作进程的缓冲区的内存;
|
||||
|
||||
Suspend 则悬停等待,暂不回收缓冲区内存。
|
||||
|
||||
# Windows 运行命令
|
||||
|
||||
## 进入Windows 设置
|
||||
|
||||
```cmd
|
||||
ms-settings:
|
||||
```
|
||||
|
||||
## 远程桌面连接
|
||||
|
||||
```cmd
|
||||
mstsc
|
||||
```
|
||||
|
||||
### 本地组策略编辑器
|
||||
|
||||
```cmd
|
||||
gpedit.msc
|
||||
```
|
||||
|
||||
## 服务
|
||||
|
||||
```cmd
|
||||
services.msc
|
||||
```
|
||||
|
||||
## 设备管理器
|
||||
|
||||
```cmd
|
||||
devmgmt.msc
|
||||
```
|
||||
|
||||
## 控制面板
|
||||
|
||||
```cmd
|
||||
control
|
||||
```
|
||||
|
||||
## 注册表编辑器
|
||||
|
||||
```cmd
|
||||
regedit
|
||||
```
|
||||
|
||||
# PowerShell
|
||||
|
||||
## 激活工具命令
|
||||
|
||||
```powershell
|
||||
irm https://massgrave.dev/get | iex
|
||||
```
|
||||
|
||||
# CMD
|
||||
|
||||
## 7zip
|
||||
|
||||
### 解压压缩包内的部分文件或目录到指定目录下
|
||||
|
||||
```cmd
|
||||
"C:\Users\yun\AppData\Local\Microsoft\WindowsApps\7z.exe" x "D:\source\source.7z" -o"D:" "source\repos\ruoyi-ai\*"
|
||||
```
|
||||
|
||||
**详细解释:**
|
||||
|
||||
- `"C:\Users\yun\AppData\Local\Microsoft\WindowsApps\7z.exe"`: 这是 7-Zip 可执行文件的完整路径。
|
||||
- `x`: 解压命令,会保留压缩包内的目录结构。
|
||||
- `"D:\source\source.7z"`: 要解压的源压缩包的完整路径。
|
||||
- `-o"D:"`: 这是指定**目标解压目录**。所有从压缩包中解压出来的内容都会放到这个目录下。
|
||||
- **注意:** `-o` 后面直接跟目标文件夹的完整路径,不带 `*`。
|
||||
- `"source\repos\ruoyi-ai\*"`: 这是**压缩包内部想要解压的目录名称**。请确保这个名称与压缩包内的实际目录名完全一致(大小写敏感)。
|
||||
|
Before Width: | Height: | Size: 145 KiB |
|
Before Width: | Height: | Size: 141 KiB |
|
Before Width: | Height: | Size: 127 KiB |
@ -1,5 +0,0 @@
|
||||
---
|
||||
title: lucky
|
||||
date: 2025-04-07 16:04:58
|
||||
tags:
|
||||
---
|
||||
@ -1,338 +0,0 @@
|
||||
---
|
||||
title: macOS
|
||||
date: 2025-09-26 22:54:01
|
||||
tags:
|
||||
---
|
||||
|
||||
# 环境配置
|
||||
|
||||
## Homebrew
|
||||
|
||||
> 官网:https://brew.sh/
|
||||
|
||||
### 介绍
|
||||
|
||||
Homebrew 就像 Mac 的智能软件管家。
|
||||
|
||||
- 你可以用它安装需要的软件(比如 Python、MySQL),它会自动下载、安装、配置,甚至帮你处理依赖(比如装 A 需要先装 B)。
|
||||
- 卸载时,它会把软件和相关文件清理干净,不留垃圾。
|
||||
- 支持下载命令行工具(如`git`)和图形应用(如`chrome`)
|
||||
|
||||
### 安装
|
||||
|
||||
安装前需开启魔法,防止拉取失败。
|
||||
|
||||
```shell
|
||||
/bin/bash -c "$(curl -fsSL https://raw.githubusercontent.com/Homebrew/install/HEAD/install.sh)"
|
||||
```
|
||||
|
||||
### 常见命令
|
||||
|
||||
| 操作类型 | 命令 | 功能说明 |
|
||||
| -------- | ----------------------------- | ------------------------------ |
|
||||
| 安装 | brew install [package name] | 安装软件(自动处理依赖) |
|
||||
| 卸载 | brew uninstall [package name] | 彻底卸载软件(并自动清理依赖) |
|
||||
| 更新 | brew update | 更新 Homebrew 本体 |
|
||||
| | brew update [package name] | 更新指定软件 |
|
||||
| | brew upgrade | 更新所有已安装软件 |
|
||||
| 查询 | brew info [package name] | 查看指定软件详细信息 |
|
||||
| | brew list | 列出所有已安装软件 |
|
||||
| 清理 | brew cleanup -n | 预览可清理的旧版本 |
|
||||
| | brew cleanup [package name] | 清理指定软件的旧版本 |
|
||||
|
||||
### 高阶技巧
|
||||
|
||||
#### 服务管理系统(类似 Linux 的 systemd)
|
||||
|
||||
```shell
|
||||
brew services start mysql # 启动 MySQL 服务
|
||||
brew services stop redis # 停止 Redis 服务
|
||||
brew services list # 查看所有服务状态
|
||||
```
|
||||
|
||||
#### 精准版本控制
|
||||
|
||||
```shell
|
||||
brew install python@3.9 # 安装指定 Python 版本为 3.9
|
||||
brew pin python@3.9 # 锁定版本防止误升级
|
||||
brew unpin python@3.9 # 解除锁定
|
||||
```
|
||||
|
||||
### 卸载
|
||||
|
||||
```shell
|
||||
# 卸载脚本(谨慎执行!)
|
||||
/bin/bash -c "$(curl -fsSL <https://raw.githubusercontent.com/Homebrew/install/master/uninstall.sh>)"
|
||||
```
|
||||
|
||||
### 目录结构解析
|
||||
|
||||
`Homebrew`在下载软件后,会将数据放在以下目录中
|
||||
|
||||
| **路径** | **作用** |
|
||||
| ---------------------- | ---------------------------- |
|
||||
| `/opt/homebrew` | ARM 芯片主目录(M1/M2 专用) |
|
||||
| `/usr/local` | Intel 芯片主目录 |
|
||||
| `/opt/homebrew/Cellar` | 所有安装的软件本体 |
|
||||
|
||||
## oh my zsh
|
||||
|
||||
通过下载脚本安装命令
|
||||
|
||||
```shell
|
||||
sh -c "$(curl -fsSL https://gitee.com/pocmon/ohmyzsh/raw/master/tools/install.sh)"
|
||||
```
|
||||
|
||||
剩余安装过程跟 `Linux`中的保持一致。
|
||||
|
||||
## nvm
|
||||
|
||||
### 通过 Homebrew 安装
|
||||
|
||||
```shell
|
||||
brew install nvm
|
||||
```
|
||||
|
||||
这种方式需要手动配置环境变量。
|
||||
|
||||
`zsh`下编辑 `~/.zshrc`环境变量配置文件,文件末尾添加以下内容。
|
||||
|
||||
```ini
|
||||
export NVM_DIR="$HOME/.nvm"
|
||||
[ -s "/opt/homebrew/opt/nvm/nvm.sh" ] && \. "/opt/homebrew/opt/nvm/nvm.sh"
|
||||
[ -s "/opt/homebrew/opt/nvm/etc/bash_completion.d/nvm" ] && \. "/opt/homebrew/opt/nvm/etc/bash_completion.d/nvm"
|
||||
```
|
||||
|
||||
`:wq`保存,然后`source ~/.zshrc`即可应用。
|
||||
|
||||
### 安装最新版本 node
|
||||
|
||||
```shell
|
||||
nvm install node
|
||||
```
|
||||
|
||||
安装后会自动`use`。
|
||||
|
||||
## colima
|
||||
|
||||
### 介绍
|
||||
|
||||
colima 是 macOS 上的容器运行时。
|
||||
|
||||
### 安装
|
||||
|
||||
```shell
|
||||
# Homebrew
|
||||
brew install colima
|
||||
```
|
||||
|
||||
启动服务
|
||||
|
||||
```shell
|
||||
brew services start colima
|
||||
```
|
||||
|
||||
启动 colima
|
||||
|
||||
```shell
|
||||
colima start
|
||||
```
|
||||
|
||||
### 卸载
|
||||
|
||||
```shell
|
||||
colima stop
|
||||
```
|
||||
|
||||
```shell
|
||||
colima delete
|
||||
```
|
||||
|
||||
```shell
|
||||
brew uninstall colima
|
||||
```
|
||||
|
||||
```shell
|
||||
rm -rf ~/.colima
|
||||
```
|
||||
|
||||
|
||||
|
||||
### 运行时
|
||||
|
||||
初始启动时,Colima会使用默认为Docker的用户指定的运行时启动。
|
||||
|
||||
#### Docker
|
||||
|
||||
Docker运行时需要Docker客户端。可以使用`Homebrew`安装。
|
||||
|
||||
```shell
|
||||
brew install docker
|
||||
```
|
||||
|
||||
Colima启动之后,您可以使用MacOS上的Docker客户端,没有其他设置。
|
||||
|
||||
若需使用容器编排,就还需要安装`Docker Compose`
|
||||
|
||||
```shell
|
||||
brew install docker-compose
|
||||
```
|
||||
|
||||
创建符号链接
|
||||
|
||||
使 Docker 能够找到 Docker Compose
|
||||
|
||||
```shell
|
||||
mkdir -p ~/.docker/cli-plugins
|
||||
ln -sfn /opt/homebrew/opt/docker-compose/bin/docker-compose ~/.docker/cli-plugins/docker-compose
|
||||
```
|
||||
|
||||
启动`COlima`并指定使用`Docker`运行时。
|
||||
|
||||
```shell
|
||||
colima start --runtime docker
|
||||
```
|
||||
|
||||
### 配置
|
||||
|
||||
#### 镜像源
|
||||
|
||||
停止 Colima
|
||||
|
||||
```shell
|
||||
colima stop
|
||||
```
|
||||
|
||||
编辑 Colima 配置文件
|
||||
|
||||
```shell
|
||||
code ~/.colima/default/colima.yaml
|
||||
```
|
||||
|
||||
在文件中找到 `docker: {}` 这个部分,添加或修改 `registry-mirrors` 字段,如下所示。如果文件里没有 `docker:` 部分,您可以手动在文件末尾添加。
|
||||
|
||||
```yaml
|
||||
# ... colima.yaml 文件中的其他配置 ...
|
||||
|
||||
# 添加或修改 docker 部分
|
||||
docker:
|
||||
registry-mirrors:
|
||||
- https://docker.m.daocloud.io
|
||||
- https://docker.imgdb.de
|
||||
- https://docker-0.unsee.tech
|
||||
- https://docker.hlmirror.com
|
||||
- https://docker.1ms.run
|
||||
- https://cjie.eu.org
|
||||
- https://func.ink
|
||||
- https://lispy.org
|
||||
- https://docker.xiaogenban1993.com
|
||||
|
||||
# 您可以添加多个,按顺序尝试
|
||||
|
||||
# ... colima.yaml 文件中的其他配置 ...
|
||||
```
|
||||
|
||||
修改后保存文件。
|
||||
|
||||
重新启动 Colima
|
||||
|
||||
```shell
|
||||
colima start
|
||||
```
|
||||
|
||||
Colima 在启动时会读取配置,并自动生成虚拟机内的 `/etc/docker/daemon.json` 文件。
|
||||
|
||||
验证配置是否生效
|
||||
|
||||
```shell
|
||||
# 进入 Colima 虚拟机
|
||||
colima ssh
|
||||
|
||||
# 在虚拟机内,执行 docker info 命令并过滤出镜像源信息
|
||||
docker info | grep "Registry Mirrors" -A 2
|
||||
```
|
||||
|
||||
如果看到类似下面的输出,就证明配置成功了:
|
||||
|
||||
```shell
|
||||
Registry Mirrors:
|
||||
https://docker.m.daocloud.io/
|
||||
https://docker.imgdb.de/
|
||||
```
|
||||
|
||||
|
||||
|
||||
## SVN
|
||||
|
||||
### 安装
|
||||
|
||||
```shell
|
||||
brew install svn
|
||||
```
|
||||
|
||||
|
||||
|
||||
# 常用软件
|
||||
|
||||
## iTerm2
|
||||
|
||||
### 安装
|
||||
|
||||
|
||||
|
||||
### 配置
|
||||
|
||||
#### 主题
|
||||
|
||||
在当前用户目录`~`下新建一个专门用于存放配置文件的文件夹,例如 `~/.dotfiles`
|
||||
|
||||
```shell
|
||||
mkdir -p ~/.dotfiles
|
||||
```
|
||||
|
||||
然后新建存放`iTerm2`的配置文件目录,并在其中创建存放主题的目录
|
||||
|
||||
```shell
|
||||
mkdir -p ~/.dotfiles/iTerm-Settings/themes
|
||||
```
|
||||
|
||||
拉取主题文件,例如`dracula`
|
||||
|
||||
```shell
|
||||
git clone https://github.com/dracula/iterm.git ~/.dotfiles/iTerm-Settings/themes/dracula
|
||||
```
|
||||
|
||||
## Visual Studio Code
|
||||
|
||||
### 配置
|
||||
|
||||
#### `Code` 命令
|
||||
|
||||
1. 打开 Visual Studio Code
|
||||
2. 打开命令面板 (Command Palette)
|
||||
使用快捷键 `⌘ + Shift + P` (Command + Shift + P) 来打开命令面板。这是 VS Code 中最核心的功能入口。
|
||||
3. 运行安装命令
|
||||
在弹出的命令面板输入框中,输入 `shell` 或者 `code`,它会自动筛选出相关命令。 找到并选择 **`Shell Command: Install 'code' command in PATH`** 这一项,然后按回车。
|
||||
4. 输入密码授权
|
||||
系统可能会提示您输入当前 Mac 用户的登录密码,因为它需要权限在 `/usr/local/bin/` 目录下创建一个符号链接。按提示输入密码后回车即可。 如果成功,您会看到一个小的确认弹窗。
|
||||
5. 重启终端
|
||||
关闭当前正在使用的所有终端窗口(无论是系统自带的 Terminal 还是 iTerm2),然后重新打开一个新的终端窗口。 这样做是为了让终端重新加载 `PATH` 环境变量,从而识别到新安装的 `code` 命令。
|
||||
|
||||
# 系统设置
|
||||
|
||||
## 键盘
|
||||
|
||||
### 关闭 首字母自动大写 功能
|
||||
|
||||
键盘 > 文字输入 > 输入法(ABC 和 简体拼音)> 编辑 > 关闭 自动大写字词的首字母
|
||||
|
||||
## 隐私与安全性
|
||||
|
||||
### 允许安装任何来源的应用程序
|
||||
|
||||
默认是不显示的,需通过终端,打开任何来源选项的显示
|
||||
|
||||
```shell
|
||||
sudo spctl --master-disable
|
||||
```
|
||||
|
||||
@ -1,638 +0,0 @@
|
||||
---
|
||||
title: ubuntu
|
||||
date: 2025-05-09 09:44:01
|
||||
tags:
|
||||
---
|
||||
|
||||
# Server
|
||||
|
||||
## 安装
|
||||
|
||||
默认选中「Try or Install Ubuntu Server」安装选项,回车(或等待 30 秒后),等待系统镜像自检并进行安装初始化。
|
||||
|
||||

|
||||
|
||||
### 选择语言:English
|
||||
|
||||

|
||||
|
||||
### 键盘默认:English
|
||||
|
||||

|
||||
|
||||
### 安装类型:Ubuntu Server
|
||||
|
||||
选择默认第一个(会自带一些组件,方便使用)
|
||||
|
||||

|
||||
|
||||
### 网络配置
|
||||
|
||||
使用 DHCP 或者 静态IP (建议这里设置好 静态IP,如果选择 DHCP,则在此界面直接选择Done 后即可)
|
||||
|
||||

|
||||
|
||||
静态IP 选择 Edit IPv4
|
||||
|
||||

|
||||
|
||||
然后选择 Manual
|
||||
|
||||

|
||||
|
||||

|
||||
|
||||
### 代理配置
|
||||
|
||||
**Configure proxy配置页面的Proxy address无需配置**
|
||||
|
||||

|
||||
|
||||
### 镜像源配置
|
||||
|
||||
默认清华源
|
||||
|
||||

|
||||
|
||||
### 安装磁盘配置
|
||||
|
||||
**选择安装磁盘,直接回车默认自动分配,需要手动分区的话选择 [custom storage layout]**
|
||||
|
||||

|
||||
|
||||
选择 **custom storage layout**
|
||||
|
||||

|
||||
|
||||

|
||||
|
||||
首先分配swap分区:一般基于物理内存的 2-4倍
|
||||
|
||||

|
||||
|
||||
/boot 分区,一般2G足以
|
||||
|
||||
/ 根分区,分配剩余空间
|
||||
|
||||
|
||||
|
||||
### 设置计算机名及用户名
|
||||
|
||||
|
||||
|
||||
### 是否升级 Ubuntu Pro
|
||||
|
||||
直接默认跳过即可
|
||||
|
||||
|
||||
### 安装 OpenSSH 服务
|
||||
|
||||

|
||||
|
||||
### 选择预置环境
|
||||
|
||||
按需选取,不需要则直接选择 Done 回车继续
|
||||
|
||||

|
||||
|
||||
安装系统中
|
||||
|
||||

|
||||
|
||||
安装完成后重启即可
|
||||
|
||||

|
||||
|
||||
重启完成,进入系统
|
||||
|
||||

|
||||
|
||||
## 配置网络
|
||||
|
||||

|
||||
|
||||
```shell
|
||||
cd /etc/netplan
|
||||
ls
|
||||
# 编辑当前目录下以yaml扩展名的网卡配置文件
|
||||
sudo vim 50-cloud-init.yaml
|
||||
```
|
||||
|
||||
文件内容
|
||||
|
||||
```shell
|
||||
network:
|
||||
version: 2
|
||||
ethernets:
|
||||
enp0s3:
|
||||
dhcp4: true
|
||||
```
|
||||
|
||||
在VirtualBox中工具->网络中 增加仅主机(Host-Only)网络
|
||||
|
||||

|
||||
|
||||
网卡如果要是DHCP就选自动配置网卡,否则手动分配就选手动配置网卡
|
||||
|
||||
如果选DHCP,还需要启动服务器
|
||||
|
||||

|
||||
|
||||
配置好后,在对应虚拟机中,添加好网卡,连接方式选择仅主机(Host-Only)网络,名称选择刚刚在工具中配置的
|
||||
|
||||

|
||||
|
||||
以上修改需要先重启虚拟机
|
||||
|
||||
查看是否生效,需要执行`ip a`命令
|
||||
|
||||
看是否有网卡名称为`enp0s8`
|
||||
|
||||
紧接着回到刚刚在`/etc/netplan`目录,下编辑的网卡配置文件`50-cloud-init.yaml`
|
||||
|
||||
增加`enp0s8`,若是自动分配网络,则直接`dhcp4: true`即可,否则按一下分配`addressed`,手动分配一个根据子网的ipv4地址,并将`dhcp4`设置为`false`
|
||||
|
||||
```shell
|
||||
network:
|
||||
version: 2
|
||||
ethernets:
|
||||
enp0s3:
|
||||
dhcp4: true
|
||||
enp0s8:
|
||||
addresses: [192.168.56.35/24]
|
||||
dhcp4: no
|
||||
|
||||
```
|
||||
|
||||
`:wq`保存后,执行一下命令
|
||||
|
||||
```shell
|
||||
sudo netplan generate
|
||||
sudo netplan apply
|
||||
```
|
||||
|
||||
若不报错,则修改成功,再执行`ip a`查看网卡信息
|
||||
|
||||

|
||||
|
||||
ip地址已经生效,可以在主机里 ping 一下
|
||||
|
||||
## 安装GUI
|
||||
|
||||
默认情况下,Ubuntu Server不包括图形用户界面(GUI)。GUI占用了用于面向服务器的任务的系统资源(内存和处理器)。但是,某些任务和应用程序在GUI环境中更易于管理并且可以更好地工作。
|
||||
|
||||
### 更新存储库和软件包
|
||||
|
||||
首先更新存储库和软件包列表:
|
||||
|
||||
```shell
|
||||
sudo apt-get update && sudo apt-get upgrade
|
||||
```
|
||||
|
||||
这样可以确保正在使用最新的软件更新。
|
||||
|
||||
接下来,安装**tasksel manager**实用程序:
|
||||
|
||||
```shell
|
||||
sudo apt install tasksel
|
||||
```
|
||||
|
||||
> **注意:** **Tasksel**是用于一次安装多个相关软件包的实用程序。有关更多详细信息,请参见[文档](https://help.ubuntu.com/community/Tasksel)。
|
||||
|
||||
### 选择一个显示管理器
|
||||
|
||||
显示管理器是启动显示服务器,启动桌面并管理用户身份验证的应用程序。默认的**GDM3**(与[KDE-Plasma一起使用](https://kde.org/plasma-desktop))是资源密集型显示管理器。如果需要节省系统资源,请考虑使用更浅的显示管理器,例如**SDDM**,**SLiM**或**LightDM**。
|
||||
|
||||
默认情况下,只有一个显示管理器可以管理服务器。仅当配置为管理其他服务器时,它们才能同时运行。本文假定您将使用单个默认显示管理器。
|
||||
|
||||
显示当前使用的显示管理器:
|
||||
|
||||
```shell
|
||||
cat /etc/X11/default-display-manager
|
||||
```
|
||||
|
||||
要安装特定的显示管理器,请使用**apt-get**程序包管理器:
|
||||
|
||||
要安装SLiM:
|
||||
|
||||
```shell
|
||||
sudo apt-get install slim
|
||||
```
|
||||
|
||||
要安装LightDM:
|
||||
|
||||
```shell
|
||||
sudo apt-get install lightdm
|
||||
```
|
||||
|
||||
该**SDDM**显示管理器可从安装**中的tasksel** KDE的安装过程中的菜单。
|
||||
|
||||
切换显示管理器
|
||||
|
||||
```shell
|
||||
sudo dpkg-reconfigure gdm3
|
||||
```
|
||||
|
||||
|
||||
|
||||
### 选择服务器的GUI
|
||||
|
||||
GNOME是大多数Ubuntu安装的默认GUI,并且(宽松地)基于Apple生态系统。
|
||||
|
||||
KDE是另一种流行的GUI,(宽松地)基于Microsoft生态系统。如果要具有常规Ubuntu系统的外观,请选择以下桌面环境之一。
|
||||
|
||||
#### GNOME
|
||||
|
||||
要安装GNOME,请首先启动**taskel**:
|
||||
|
||||
```
|
||||
tasksel
|
||||
```
|
||||
|
||||
将会启动一个彩色界面。使用箭头键向下滚动列表,找到**Ubuntu桌面**。
|
||||
|
||||
使用**空格**键将其选中`ubuntu-desktop`,然后按**Tab**键选择底部的**确定**,然后按**Enter键**。
|
||||
|
||||
> 要使用`ubuntu-desktop`,需事先安装好,通过 sudo apt install -y ubuntu-desktop
|
||||
|
||||
系统将安装软件并重新引导,为您提供由默认显示管理器生成的图形登录屏幕。在我们的例子中是SLiM。
|
||||
|
||||
输入您的**登录凭据**。如果您安装了多个接口,请使用**F1**在GUI之间切换。
|
||||
|
||||
卸载ubuntu-desktop
|
||||
|
||||
```shell
|
||||
sudo apt remove -y --purge ubuntu-desktop
|
||||
sudo apt-get autoremove
|
||||
sudo snap remove thunderbird
|
||||
sudo snap remove gnome-42-2204
|
||||
sudo snap remove firefox
|
||||
sudo snap remove gtk-common-themes
|
||||
sudo apt-get remove gnome-tweak-tool
|
||||
sudo apt-get remove gnome-shell
|
||||
```
|
||||
|
||||
|
||||
|
||||
#### KDE Plasma
|
||||
|
||||
要安装KDE Plasma,请使用以下Linux命令:
|
||||
|
||||
```
|
||||
sudo apt-get install kde-plasma-desktop
|
||||
```
|
||||
|
||||
在安装过程中可能会提示您选择默认显示管理器。使用箭头键进行选择,然后按**Enter**。
|
||||
|
||||
使用以下命令启动KDE Plasma:
|
||||
|
||||
```
|
||||
sudo service display_manager start
|
||||
```
|
||||
|
||||
代替*display_manager,* 输入已安装的显示管理器的名称(例如SLiM,lightDM,SDDM)。输入您的凭据并登录。
|
||||
|
||||
> **注意:**这些传统的Ubuntu Server GUI应用程序需要大量的系统资源。它们可能会影响服务器的功能。如果需要最大程度地利用服务器资源,请考虑下面列出的较轻的GUI应用程序之一。
|
||||
|
||||
#### Mate 服务器核心桌面
|
||||
|
||||
**Mate**是一种流行的轻量级图形界面。通过执行以下命令进行安装:
|
||||
|
||||
```
|
||||
sudo tasksel install ubuntu-mate-core
|
||||
```
|
||||
|
||||
等待taskel完成操作。完成后,使用以下命令启动桌面界面:
|
||||
|
||||
```
|
||||
sudo service display_manager start
|
||||
```
|
||||
|
||||
代替*display_manager,* 输入已安装的显示管理器的名称(例如SLiM,lightDM,SDDM)。系统将提示您登录。
|
||||
|
||||
要退出GUI,请打开命令行并输入:
|
||||
|
||||
```
|
||||
sudo service display_manager stop
|
||||
```
|
||||
|
||||
> **注意**:您可能需要按**Ctrl-Alt-F1**才能返回到服务器的命令行界面。另请注意,此过程会自动安装并使用**lightdm**显示管理器。
|
||||
|
||||
#### Lubuntu核心服务器桌面
|
||||
|
||||
Lubuntu是一个非常轻量级的GUI。如果需要图形界面,但要最大程度地减少对系统内存和处理器的影响,请使用此应用程序。
|
||||
|
||||
要安装Lubuntu,请输入以下内容:
|
||||
|
||||
```
|
||||
sudo tasksel install lubuntu-core
|
||||
```
|
||||
|
||||
或者,您可以使用以下命令从**taskel**菜单安装:
|
||||
|
||||
```
|
||||
tasksel
|
||||
```
|
||||
|
||||
使用箭头键突出显示要使用的Lubuntu GUI。按**空格**键进行选择,然后按**Tab键**至**OK**按钮,然后按**Enter键**。
|
||||
|
||||
使用以下命令启动GUI:
|
||||
|
||||
```
|
||||
sudo service display_manager start
|
||||
```
|
||||
|
||||
通过打开终端窗口并输入以下内容来退出GUI:
|
||||
|
||||
```
|
||||
sudo service display_manager stop
|
||||
```
|
||||
|
||||
#### Xubuntu服务器核心桌面
|
||||
|
||||
Xubuntu是使用Xfce桌面环境的Ubuntu的派生版本。
|
||||
|
||||
通过输入以下命令安装Xubuntu:
|
||||
|
||||
```
|
||||
sudo tasksel install xubuntu-core
|
||||
```
|
||||
|
||||
输入以下命令启动它:
|
||||
|
||||
```
|
||||
sudo service display_manager start
|
||||
```
|
||||
|
||||
#### Xfce桌面
|
||||
|
||||
Xfce桌面环境可以单独使用。它被设计为响应迅速,轻巧且用户友好。
|
||||
|
||||
使用以下命令安装Xfce:
|
||||
|
||||
```
|
||||
sudo apt-get install xfce4 slim
|
||||
```
|
||||
|
||||
输入以下命令启动Xfce:
|
||||
|
||||
```
|
||||
sudo service slim start
|
||||
```
|
||||
|
||||
> **注意:** Xfce GUI仅与SLiM显示管理器兼容。
|
||||
|
||||
### 在GUI之间切换
|
||||
|
||||
如果安装了多个GUI,则可以选择要使用的GUI。启动显示管理器后,将提示您登录。但是,该屏幕还允许您选择要启用的GUI。
|
||||
|
||||
通过按**F1**在GUI之间切换。该界面将在会话(或GUI)之间切换。切换到所选的GUI后登录。
|
||||
|
||||
### 关闭与打开GUI
|
||||
|
||||
#### 关闭
|
||||
|
||||
```shell
|
||||
sudo systemctl set-default multi-user.target
|
||||
sudo reboot
|
||||
```
|
||||
|
||||
#### 打开
|
||||
|
||||
```shell
|
||||
sudo systemctl set-default graphical.target
|
||||
sudo reboot
|
||||
```
|
||||
|
||||
## 远程桌面配置
|
||||
|
||||
### RDP
|
||||
|
||||
Windows 带有一个非常方便的功能,称为远程桌面连接,它使用 RDP 协议远程连接 PC。虽然在建立从 Windows 到 Windows 系统的远程桌面连接时使用起来非常容易,但对于 Linux 系统来说就不一样了。这是因为Linux默认没有安装RDP协议。在这种情况下,我们必须在 Linux 系统上手动执行一些配置来启用 RDP,在本指南中我们知道如何做到这一点。
|
||||
|
||||
什么是XRDP?
|
||||
|
||||
> XRDP 是一个免费的开源程序,是 Microsoft RDP(远程桌面协议)的实现,可通过 GUI 轻松远程访问 Linux 系统。使用 XRDP,可以登录到远程 Linux 计算机并创建一个真实的桌面会话,就像您登录到本地计算机一样。
|
||||
|
||||
#### 执行存储库更新
|
||||
|
||||
```shell
|
||||
sudo apt update
|
||||
```
|
||||
|
||||
#### 在 Ubuntu 24.04.2 LTS 上安装XRDP
|
||||
|
||||
我们知道 Ubuntu 没有像 Windows 操作系统那样安装 RDP,因此,我们需要在我们的 Linux 系统上安装 RDP 的开源实现 XRDP。好在我们不需要添加任何第三方存储库,因为它可以使用系统默认安装。
|
||||
|
||||
```shell
|
||||
sudo apt install xrdp
|
||||
```
|
||||
|
||||
#### 启动并启用 XRDP 服务
|
||||
|
||||
要在系统启动时自动启动并启用 XRDP 服务,请使用给定的命令:
|
||||
|
||||
启动它:
|
||||
|
||||
```shell
|
||||
sudo systemctl start xrdp
|
||||
```
|
||||
|
||||
开机并启用它:
|
||||
|
||||
```shell
|
||||
sudo systemctl enable xrdp
|
||||
```
|
||||
|
||||
检查状态:
|
||||
|
||||
```shell
|
||||
systemctl status xrdp
|
||||
```
|
||||
|
||||
#### 在防火墙中放行3389端口
|
||||
|
||||
要让网络中的其他系统通过 RDP 远程访问 Ubuntu 24.04.2 LTS,请在系统防火墙上放行端口号 3389。
|
||||
|
||||
```shell
|
||||
sudo ufw allow from any to any port 3389 proto tcp
|
||||
```
|
||||
|
||||

|
||||
|
||||
**接下来**,查看你的 Ubuntu 系统的 IP 地址,并在某处记下它。在您的终端上运行:
|
||||
|
||||
```shell
|
||||
ip a
|
||||
```
|
||||
|
||||
#### KDE Plasma解决XRDP无法连接的问题
|
||||
|
||||
> [Installing KDE Plasma and XRDP Service on Remote Ubuntu 22](https://www.vps-mart.com/blog/install-kde-plasma-and-xrdp-service-on-remote-ubuntu)
|
||||
|
||||
通过XRDP登录时启动KDE等离子会话。 CAT命令用于创建具有指定环境变量的.xsessionrc文件。执行这些命令后,将使用指定内容创建或覆盖〜/.xsession和〜/.xsessionRC文件。这些文件通常在X会话启动过程中用于设置环境变量并定义要执行的启动命令或脚本。
|
||||
|
||||
```shell
|
||||
echo "/usr/bin/startplasma-x11" > ~/.xsession
|
||||
D=/usr/share/plasma:/usr/local/share:/usr/share:/var/lib/snapd/desktop
|
||||
C=/etc/xdg/xdg-plasma:/etc/xdg
|
||||
C=${C}:/usr/share/kubuntu-default-settings/kf5-settings
|
||||
cat < ~/.xsessionrc
|
||||
export XDG_SESSION_DESKTOP=KDE
|
||||
export XDG_DATA_DIRS=${D}
|
||||
export XDG_CONFIG_DIRS=${C}
|
||||
EOF
|
||||
```
|
||||
|
||||
重启 XRDP服务
|
||||
|
||||
```shell
|
||||
systemctl restart xrdp
|
||||
```
|
||||
|
||||
## 更换时区
|
||||
|
||||
### 查看当前时区:
|
||||
|
||||
```shell
|
||||
timedatectl
|
||||
```
|
||||
|
||||
类似输出
|
||||
|
||||
```shell
|
||||
Local time: Mon 2025-07-21 01:05:37 UTC
|
||||
Universal time: Mon 2025-07-21 01:05:37 UTC
|
||||
RTC time: Mon 2025-07-21 01:05:37
|
||||
Time zone: Etc/UTC (UTC, +0000)
|
||||
System clock synchronized: yes
|
||||
NTP service: active
|
||||
RTC in local TZ: no
|
||||
|
||||
```
|
||||
|
||||
### 列出所有可用时区:
|
||||
|
||||
```shell
|
||||
timedatectl list-timezones
|
||||
```
|
||||
|
||||
时区太多了,可以使用管道过滤查找你所在的城市,例如:
|
||||
|
||||
```shell
|
||||
timedatectl list-timezones | grep Shanghai
|
||||
```
|
||||
|
||||
输出:
|
||||
```shell
|
||||
Asia/Shanghai
|
||||
```
|
||||
|
||||
### 设置新的时区:
|
||||
|
||||
例如,将时区设置为 **上海(北京时间)** :
|
||||
|
||||
```shell
|
||||
sudo timedatectl set-timezone Asia/Shanghai
|
||||
```
|
||||
|
||||
#### 再次查看时区确认是否更改成功:
|
||||
|
||||
```shell
|
||||
timedatectl
|
||||
```
|
||||
|
||||
## snap包管理器
|
||||
|
||||
> [Linux snap 命令 | 菜鸟教程](https://www.runoob.com/linux/linux-comm-snap.html)
|
||||
|
||||
### 安装snap软件
|
||||
|
||||
```shell
|
||||
sudo snap install hello-world
|
||||
```
|
||||
|
||||
### 卸载snap软件
|
||||
|
||||
```shell
|
||||
sudo snap remove hello-world
|
||||
```
|
||||
|
||||
### 查看已安装的snap软件
|
||||
|
||||
```shell
|
||||
snap list
|
||||
```
|
||||
|
||||
|
||||
|
||||
### 解决snap包管理器下载报错 x509: certificate signed by unknown authority
|
||||
|
||||
#### 代理方式
|
||||
|
||||
```shell
|
||||
sudo snap set system proxy.https="http://127.0.0.1:7890"
|
||||
sudo snap set system proxy.http="http://127.0.0.1:7890"
|
||||
```
|
||||
|
||||
然后可以正常安装:
|
||||
|
||||
```shell
|
||||
sudo snap install hello-world
|
||||
```
|
||||
|
||||
## 禁止自动挂起
|
||||
|
||||
```shell
|
||||
Broadcast message from user@ubuntu-ai-dev-server (Tue 2025-07-22 15:34:31 CST):
|
||||
|
||||
The system will suspend now!
|
||||
```
|
||||
|
||||
### 解决方式
|
||||
|
||||
```shell
|
||||
sudo vim /etc/systemd/logind.conf
|
||||
```
|
||||
|
||||
将里面的
|
||||
|
||||
```shell
|
||||
IdleAction=suspend
|
||||
```
|
||||
|
||||
改为
|
||||
|
||||
```shell
|
||||
IdleAction=ignore
|
||||
```
|
||||
|
||||
# apt包管理器
|
||||
|
||||
## 安装Fastfetch
|
||||
|
||||
**添加 Fastfetch PPA:**
|
||||
|
||||
```Bash
|
||||
sudo add-apt-repository ppa:zhangsongcui3371/fastfetch
|
||||
```
|
||||
|
||||
这条命令会提示并按回车确认添加 PPA。
|
||||
|
||||
**更新软件包列表:** 添加 PPA 后,需要更新软件包列表,以便系统能够识别新添加的软件源。
|
||||
|
||||
```Bash
|
||||
sudo apt update
|
||||
```
|
||||
|
||||
**安装 Fastfetch:** 现在,可以安装 Fastfetch 了:
|
||||
|
||||
```Bash
|
||||
sudo apt install fastfetch
|
||||
```
|
||||
|
||||
**运行 Fastfetch:** 安装完成后,可以在终端中输入 `fastfetch` 来运行它:
|
||||
|
||||
```Bash
|
||||
fastfetch
|
||||
```
|
||||
|
Before Width: | Height: | Size: 7.5 KiB |
|
Before Width: | Height: | Size: 15 KiB |
|
Before Width: | Height: | Size: 18 KiB |
|
Before Width: | Height: | Size: 11 KiB |
|
Before Width: | Height: | Size: 9.6 KiB |
|
Before Width: | Height: | Size: 9.6 KiB |
|
Before Width: | Height: | Size: 10 KiB |
|
Before Width: | Height: | Size: 49 KiB |
|
Before Width: | Height: | Size: 8.8 KiB |
|
Before Width: | Height: | Size: 11 KiB |
|
Before Width: | Height: | Size: 11 KiB |
|
Before Width: | Height: | Size: 9.8 KiB |
|
Before Width: | Height: | Size: 10 KiB |
|
Before Width: | Height: | Size: 13 KiB |
|
Before Width: | Height: | Size: 14 KiB |
|
Before Width: | Height: | Size: 9.0 KiB |
|
Before Width: | Height: | Size: 8.9 KiB |
|
Before Width: | Height: | Size: 7.9 KiB |
|
Before Width: | Height: | Size: 21 KiB |
|
Before Width: | Height: | Size: 21 KiB |
|
Before Width: | Height: | Size: 21 KiB |
|
Before Width: | Height: | Size: 14 KiB |
|
Before Width: | Height: | Size: 14 KiB |
|
Before Width: | Height: | Size: 74 KiB |
|
Before Width: | Height: | Size: 68 KiB |
|
Before Width: | Height: | Size: 47 KiB |
|
Before Width: | Height: | Size: 17 KiB |
|
Before Width: | Height: | Size: 129 KiB |
@ -1,353 +0,0 @@
|
||||
---
|
||||
title: 大数据
|
||||
date: 2025-08-03 22:53:51
|
||||
tags:
|
||||
---
|
||||
|
||||
# Apache Doris
|
||||
|
||||
## 简介
|
||||
|
||||
## 安装
|
||||
|
||||
### Docker Compose 方式
|
||||
|
||||
> [Quick Start - Apache Doris](https://doris.apache.org/docs/dev/gettingStarted/quick-start)
|
||||
|
||||
新建用于Docker Compose 集群编排启动目录`mkdir -p /OLAP/doris`
|
||||
|
||||
```bash
|
||||
mkdir -p /OLAP/doris
|
||||
```
|
||||
|
||||
编写启动脚本`start-doris.sh`
|
||||
|
||||
> https://doris.apache.org/files/start-doris.sh
|
||||
|
||||
```sh
|
||||
#!/bin/bash
|
||||
|
||||
# Default version
|
||||
DORIS_QUICK_START_VERSION="2.1.9"
|
||||
|
||||
# Parse parameters
|
||||
while getopts "v:" opt; do
|
||||
case $opt in
|
||||
v) DORIS_QUICK_START_VERSION="$OPTARG"
|
||||
;;
|
||||
\?) echo "Invalid option: -$OPTARG" >&2
|
||||
exit 1
|
||||
;;
|
||||
esac
|
||||
done
|
||||
|
||||
# Check system type
|
||||
OS_TYPE=$(uname -s)
|
||||
if [[ "$OS_TYPE" != "Linux" && "$OS_TYPE" != "Darwin" ]]; then
|
||||
echo "Error: Unsupported operating system [$OS_TYPE], only Linux and Mac are supported"
|
||||
exit 1
|
||||
fi
|
||||
|
||||
# Check Docker environment
|
||||
if ! command -v docker &> /dev/null; then
|
||||
echo "Error: Docker environment not detected, please install Docker first"
|
||||
exit 1
|
||||
fi
|
||||
|
||||
# Check docker-compose
|
||||
COMPOSE_CMD=""
|
||||
if command -v docker-compose &> /dev/null; then
|
||||
COMPOSE_CMD="docker-compose"
|
||||
elif docker compose version &> /dev/null; then
|
||||
COMPOSE_CMD="docker compose"
|
||||
else
|
||||
echo "Error: docker-compose plugin or docker-compose command is required"
|
||||
exit 1
|
||||
fi
|
||||
|
||||
# Generate docker-compose configuration for corresponding system
|
||||
if [[ "$OS_TYPE" == "Linux" ]]; then
|
||||
cat > docker-compose-doris.yaml <<EOF
|
||||
version: "3"
|
||||
services:
|
||||
fe:
|
||||
image: apache/doris:fe-${DORIS_QUICK_START_VERSION}
|
||||
hostname: fe
|
||||
environment:
|
||||
- FE_SERVERS=fe1:127.0.0.1:9010
|
||||
- FE_ID=1
|
||||
network_mode: host
|
||||
volumes:
|
||||
- /mnt/app/doris/fe/doris-meta/:/opt/apache-doris/fe/doris-meta/
|
||||
- /mnt/app/doris/fe/log/:/opt/apache-doris/fe/log/
|
||||
be:
|
||||
image: apache/doris:be-${DORIS_QUICK_START_VERSION}
|
||||
hostname: be
|
||||
environment:
|
||||
- FE_SERVERS=fe1:127.0.0.1:9010
|
||||
- BE_ADDR=127.0.0.1:9050
|
||||
depends_on:
|
||||
- fe
|
||||
network_mode: host
|
||||
volumes:
|
||||
- /mnt/app/doris/be/storage/:/opt/apache-doris/be/storage/
|
||||
- /mnt/app/doris/be/script/:/docker-entrypoint-initdb.d/
|
||||
EOF
|
||||
else # Mac system
|
||||
cat > docker-compose-doris.yaml <<EOF
|
||||
version: "3"
|
||||
networks:
|
||||
custom_network:
|
||||
driver: bridge
|
||||
ipam:
|
||||
config:
|
||||
- subnet: 172.20.80.0/24
|
||||
|
||||
services:
|
||||
fe:
|
||||
image: apache/doris:fe-${DORIS_QUICK_START_VERSION}
|
||||
hostname: fe
|
||||
ports:
|
||||
- 8030:8030
|
||||
- 9030:9030
|
||||
- 9010:9010
|
||||
environment:
|
||||
- FE_SERVERS=fe1:172.20.80.2:9010
|
||||
- FE_ID=1
|
||||
networks:
|
||||
custom_network:
|
||||
ipv4_address: 172.20.80.2
|
||||
|
||||
be:
|
||||
image: apache/doris:be-${DORIS_QUICK_START_VERSION}
|
||||
hostname: be
|
||||
ports:
|
||||
- 8040:8040
|
||||
- 9050:9050
|
||||
environment:
|
||||
- FE_SERVERS=fe1:172.20.80.2:9010
|
||||
- BE_ADDR=172.20.80.3:9050
|
||||
depends_on:
|
||||
- fe
|
||||
networks:
|
||||
custom_network:
|
||||
ipv4_address: 172.20.80.3
|
||||
EOF
|
||||
fi
|
||||
|
||||
# Start services
|
||||
$COMPOSE_CMD -f docker-compose-doris.yaml up -d
|
||||
|
||||
echo "Doris cluster started successfully, version: ${DORIS_QUICK_START_VERSION}"
|
||||
echo "You can manage the cluster using the following commands:"
|
||||
echo " Stop cluster: $COMPOSE_CMD -f docker-compose-doris.yaml down"
|
||||
echo " View logs: $COMPOSE_CMD -f docker-compose-doris.yaml logs -f"
|
||||
echo " Connect to cluster: mysql -uroot -P9030 -h127.0.0.1"
|
||||
|
||||
# Display connection information based on system type
|
||||
if [[ "$OS_TYPE" == "Linux" ]]; then
|
||||
echo -e "\nAccess FE/BE http ports (8030, 8040) using the following addresses (Linux system):"
|
||||
echo " http://127.0.0.1:8030"
|
||||
echo " http://127.0.0.1:8040"
|
||||
elif [[ "$OS_TYPE" == "Darwin" ]]; then
|
||||
echo -e "\nAccess FE/BE http ports (8030, 8040) using the following addresses (Mac system):"
|
||||
echo " http://docker.for.mac.localhost:8030"
|
||||
echo " http://docker.for.mac.localhost:8040"
|
||||
echo "Note: If access fails, try using 127.0.0.1 address:"
|
||||
echo " http://127.0.0.1:8030"
|
||||
echo " http://127.0.0.1:8040"
|
||||
fi
|
||||
```
|
||||
|
||||
赋予权限
|
||||
|
||||
```bash
|
||||
chmod 755 start-doris.sh
|
||||
```
|
||||
|
||||
启动集群
|
||||
|
||||
```bash
|
||||
./start-doris.sh
|
||||
```
|
||||
|
||||
可以指定启动的版本通过`-v`参数,比如:
|
||||
|
||||
```bash
|
||||
./start-doris.sh -v 2.1.8
|
||||
```
|
||||
|
||||
使用MySQL客户端连接到集群并检查集群状态
|
||||
|
||||
```bash
|
||||
## Check the FE status to ensure that both the Join and Alive columns are true.
|
||||
mysql -uroot -P9030 -h127.0.0.1 -e 'SELECT `host`, `join`, `alive` FROM frontends()'
|
||||
+-----------+------+-------+
|
||||
| host | join | alive |
|
||||
+-----------+------+-------+
|
||||
| 127.0.0.1 | true | true |
|
||||
+-----------+------+-------+
|
||||
|
||||
## Check the BE status to ensure that the Alive column is true.
|
||||
mysql -uroot -P9030 -h127.0.0.1 -e 'SELECT `host`, `alive` FROM backends()'
|
||||
+-----------+-------+
|
||||
| host | alive |
|
||||
+-----------+-------+
|
||||
| 127.0.0.1 | 1 |
|
||||
+-----------+-------+
|
||||
|
||||
```
|
||||
|
||||
|
||||
|
||||
### 配置
|
||||
|
||||
#### Linux系统环境配置(所有节点均需配置)
|
||||
|
||||
##### 调大文件操作配置
|
||||
|
||||
```bash
|
||||
vim /etc/security/limits.conf
|
||||
```
|
||||
|
||||
在文件最后添加下面几行信息(注意 * 也要复制进去)
|
||||
|
||||
```conf
|
||||
* soft nofile 65536
|
||||
* hard nofile 65536
|
||||
* soft nproc 65536
|
||||
* hard nproc 65536
|
||||
```
|
||||
|
||||
可使用以下命令直接追加到配置文件内
|
||||
|
||||
```bash
|
||||
echo "* soft nofile 65536" >> /etc/security/limits.conf
|
||||
echo "* hard nofile 65536" >> /etc/security/limits.conf
|
||||
echo "* soft nproc 65536" >> /etc/security/limits.conf
|
||||
echo "* hard nproc 65536" >> /etc/security/limits.conf
|
||||
```
|
||||
|
||||
保存完成需`reboot`,也可临时生效,免重启
|
||||
|
||||
```bash
|
||||
ulimit -n 65536
|
||||
```
|
||||
|
||||
# Datax
|
||||
|
||||
## MySQL离线同步至Apache Doris
|
||||
|
||||
### 单表同步
|
||||
|
||||
新建配置文件`mysql_2_doris_t_base_material.json`
|
||||
|
||||
```json
|
||||
{
|
||||
"job": {
|
||||
"setting": {
|
||||
"speed": {
|
||||
"channel": 1
|
||||
}
|
||||
},
|
||||
"content": [
|
||||
{
|
||||
"reader": {
|
||||
"name": "mysqlreader",
|
||||
"parameter": {
|
||||
"username": "root",
|
||||
"password": "123456",
|
||||
"column": [
|
||||
"ID", "PID", "CODE", "SHORTCODE", "NAME", "FULLNAME",
|
||||
"ISDETAIL", "CHILDCOUNT", "PYCODE", "LVL", "FLAG", "MODEL",
|
||||
"ISSTANDARD", "AUXCLASSID", "ERPCLSID", "UNITGROUPID", "UNITID",
|
||||
"DEFAULTLOC", "SPID", "QTYDECIMAL", "SECINV", "MTYPE", "MVER",
|
||||
"MATERIAL", "FIRM", "FIRMORDER", "FACEDEAL", "SHAPESIZE",
|
||||
"TECHDESC", "UNITWEIGHT", "MCODE", "MCAT", "COSTITEM",
|
||||
"ORDERRECTOR", "POHIGHPRICE", "POHGHPRCMNYTYPE", "WWHGHPRC",
|
||||
"WWHGHPRCMNYTYPE", "SOLOWPRC", "SOLOWPRCMNYTYPE", "TRACK",
|
||||
"PRICEDECIMAL", "ACCTID", "SALEACCTID", "COSTACCTID",
|
||||
"DEFAULTROUTINGID", "DEFAULTWORKTYPEID", "PRODUCTPRINCIPAL",
|
||||
"PLANNER", "ISBACKFLUSH", "MRPCON", "MRPORDER", "CHARTNUMBER",
|
||||
"INSPECTIONLEVEL", "PROCHKMDE", "WWCHKMDE", "SOCHKMDE",
|
||||
"WTHDRWCHKMDE", "STKCHKMDE", "OTHERCHKMDE", "INSPECTIONPROJECT",
|
||||
"NAMEEN", "MODELEN", "HSNUMBER", "IMPOSTTAXRATE",
|
||||
"CONSUMETAXRATE", "STARTSERVICE", "MAKEFILE", "ISFIX",
|
||||
"TTERMOFSERVICE", "TTERMOFUSEFULTIME", "PRODUCTNO", "PARAMVALUE",
|
||||
"MEMO", "CDATE", "CUSERID", "CSTAFFNAME", "MDATE", "MUSERID",
|
||||
"MSTAFFNAME", "K_ID", "K_PID", "DDATE", "DUSERID", "DSTAFFNAME",
|
||||
"K_CODE", "AMODEL", "K_COSTITEM", "DWGSYMDESC", "SPDESC",
|
||||
"CDRATE", "GWEIGHT", "NWEIGHT", "L", "W", "H", "MSIZE",
|
||||
"K_COST", "BATCHAPPLICANT", "MATSLUGGISHSTATUS",
|
||||
"SLUGGISHEFFECTIVEDATE", "K_AUTO_ID", "FRATE", "K3CLOUDID"
|
||||
],
|
||||
"connection": [
|
||||
{
|
||||
"table": ["t_base_material"],
|
||||
"jdbcUrl": ["jdbc:mysql://192.168.6.35:3306/erp?useSSL=false&serverTimezone=Asia/Shanghai"],
|
||||
"selectedDatabase": "erp"
|
||||
}
|
||||
]
|
||||
}
|
||||
},
|
||||
"writer": {
|
||||
"name": "doriswriter",
|
||||
"parameter": {
|
||||
"loadUrl": ["192.168.6.35:8040"],
|
||||
"username": "root",
|
||||
"password": "",
|
||||
"column": [
|
||||
"ID", "PID", "CODE", "SHORTCODE", "NAME", "FULLNAME",
|
||||
"ISDETAIL", "CHILDCOUNT", "PYCODE", "LVL", "FLAG", "MODEL",
|
||||
"ISSTANDARD", "AUXCLASSID", "ERPCLSID", "UNITGROUPID", "UNITID",
|
||||
"DEFAULTLOC", "SPID", "QTYDECIMAL", "SECINV", "MTYPE", "MVER",
|
||||
"MATERIAL", "FIRM", "FIRMORDER", "FACEDEAL", "SHAPESIZE",
|
||||
"TECHDESC", "UNITWEIGHT", "MCODE", "MCAT", "COSTITEM",
|
||||
"ORDERRECTOR", "POHIGHPRICE", "POHGHPRCMNYTYPE", "WWHGHPRC",
|
||||
"WWHGHPRCMNYTYPE", "SOLOWPRC", "SOLOWPRCMNYTYPE", "TRACK",
|
||||
"PRICEDECIMAL", "ACCTID", "SALEACCTID", "COSTACCTID",
|
||||
"DEFAULTROUTINGID", "DEFAULTWORKTYPEID", "PRODUCTPRINCIPAL",
|
||||
"PLANNER", "ISBACKFLUSH", "MRPCON", "MRPORDER", "CHARTNUMBER",
|
||||
"INSPECTIONLEVEL", "PROCHKMDE", "WWCHKMDE", "SOCHKMDE",
|
||||
"WTHDRWCHKMDE", "STKCHKMDE", "OTHERCHKMDE", "INSPECTIONPROJECT",
|
||||
"NAMEEN", "MODELEN", "HSNUMBER", "IMPOSTTAXRATE",
|
||||
"CONSUMETAXRATE", "STARTSERVICE", "MAKEFILE", "ISFIX",
|
||||
"TTERMOFSERVICE", "TTERMOFUSEFULTIME", "PRODUCTNO", "PARAMVALUE",
|
||||
"MEMO", "CDATE", "CUSERID", "CSTAFFNAME", "MDATE", "MUSERID",
|
||||
"MSTAFFNAME", "K_ID", "K_PID", "DDATE", "DUSERID", "DSTAFFNAME",
|
||||
"K_CODE", "AMODEL", "K_COSTITEM", "DWGSYMDESC", "SPDESC",
|
||||
"CDRATE", "GWEIGHT", "NWEIGHT", "L", "W", "H", "MSIZE",
|
||||
"K_COST", "BATCHAPPLICANT", "MATSLUGGISHSTATUS",
|
||||
"SLUGGISHEFFECTIVEDATE", "K_AUTO_ID", "FRATE", "K3CLOUDID"
|
||||
],
|
||||
"postSql": ["select count(1) from t_base_material"],
|
||||
"preSql": [],
|
||||
"flushInterval":30000,
|
||||
"connection": [
|
||||
{
|
||||
"jdbcUrl": "jdbc:mysql://192.168.6.35:9030/erp",
|
||||
"selectedDatabase": "erp",
|
||||
"table": ["t_base_material"]
|
||||
}
|
||||
],
|
||||
"loadProps": {
|
||||
"format": "json",
|
||||
"strip_outer_array":"true",
|
||||
"line_delimiter": "\\x02"
|
||||
}
|
||||
}
|
||||
}
|
||||
}
|
||||
]
|
||||
}
|
||||
}
|
||||
|
||||
```
|
||||
|
||||
执行任务
|
||||
|
||||
```bash
|
||||
cd datax
|
||||
python ./bin/datax.py mysql_2_doris_t_base_material.json
|
||||
```
|
||||
|
||||
@ -125,85 +125,30 @@ alias ollama='ollama.exe'
|
||||
|
||||
## cuda-toolkit
|
||||
|
||||
### WSL安装
|
||||
|
||||
1. 下载 **CUDA Toolkit Installer**
|
||||
|
||||
### 下载 **CUDA Toolkit Installer**
|
||||
|
||||
#### AlmaLinux
|
||||
|
||||
```shell
|
||||
wget https://developer.download.nvidia.com/compute/cuda/12.8.1/local_installers/cuda-repo-rhel9-12-8-local-12.8.1_570.124.06-1.x86_64.rpm
|
||||
sudo rpm -i cuda-repo-rhel9-12-8-local-12.8.1_570.124.06-1.x86_64.rpm
|
||||
sudo dnf clean all
|
||||
sudo dnf -y install cuda-toolkit-12-8
|
||||
```
|
||||
|
||||
#### Ubuntu
|
||||
|
||||
```shell
|
||||
wget https://developer.download.nvidia.com/compute/cuda/repos/ubuntu2404/x86_64/cuda-ubuntu2404.pin
|
||||
sudo mv cuda-ubuntu2404.pin /etc/apt/preferences.d/cuda-repository-pin-600
|
||||
wget https://developer.download.nvidia.com/compute/cuda/12.9.1/local_installers/cuda-repo-ubuntu2404-12-9-local_12.9.1-575.57.08-1_amd64.deb
|
||||
sudo dpkg -i cuda-repo-ubuntu2404-12-9-local_12.9.1-575.57.08-1_amd64.deb
|
||||
sudo cp /var/cuda-repo-ubuntu2404-12-9-local/cuda-*-keyring.gpg /usr/share/keyrings/
|
||||
sudo apt-get update
|
||||
sudo apt-get -y install cuda-toolkit-12-9
|
||||
```
|
||||
|
||||
### 安装 **Driver Installer**
|
||||
|
||||
#### 专有驱动
|
||||
|
||||
```shell
|
||||
sudo apt-get install -y cuda-drivers
|
||||
```
|
||||
|
||||
安装好后,需重启系统才可应用上。
|
||||
|
||||
```shell
|
||||
sudo reboot
|
||||
```
|
||||
|
||||
### 配置环境变量
|
||||
|
||||
```shell
|
||||
vim ~/.bashrc
|
||||
|
||||
# 文件末尾添加
|
||||
# cuda 10.2
|
||||
export CUDA_HOME=/usr/local/cuda
|
||||
export LD_LIBRARY_PATH=$LD_LIBRARY_PATH:/usr/local/cuda/lib64:/usr/local/cuda/extras/CUPTI/lib64
|
||||
export PATH=$PATH:$CUDA_HOME/bin
|
||||
```
|
||||
|
||||
## NVIDIA Container Toolkit
|
||||
|
||||
### 下载
|
||||
|
||||
#### With `apt`: Ubuntu, Debian
|
||||
|
||||
国内镜像源安装:
|
||||
|
||||
```shell
|
||||
curl -fsSL https://mirrors.ustc.edu.cn/libnvidia-container/gpgkey | sudo gpg --dearmor -o /usr/share/keyrings/nvidia-container-toolkit-keyring.gpg
|
||||
|
||||
curl -s -L https://mirrors.ustc.edu.cn/libnvidia-container/stable/deb/nvidia-container-toolkit.list | \
|
||||
sed 's#deb https://nvidia.github.io#deb [signed-by=/usr/share/keyrings/nvidia-container-toolkit-keyring.gpg] https://mirrors.ustc.edu.cn#g' | \
|
||||
sudo tee /etc/apt/sources.list.d/nvidia-container-toolkit.list
|
||||
|
||||
sudo apt-get update
|
||||
|
||||
sudo apt-get install -y nvidia-container-toolkit
|
||||
|
||||
nvidia-container-cli --version
|
||||
|
||||
sudo systemctl restart docker
|
||||
```
|
||||
```shell
|
||||
wget https://developer.download.nvidia.com/compute/cuda/12.8.1/local_installers/cuda-repo-rhel9-12-8-local-12.8.1_570.124.06-1.x86_64.rpm
|
||||
sudo rpm -i cuda-repo-rhel9-12-8-local-12.8.1_570.124.06-1.x86_64.rpm
|
||||
sudo dnf clean all
|
||||
sudo dnf -y install cuda-toolkit-12-8
|
||||
```
|
||||
|
||||
2. 配置环境变量
|
||||
```shell
|
||||
vim ~/.bashrc
|
||||
|
||||
# 文件末尾添加
|
||||
# cuda 10.2
|
||||
export CUDA_HOME=/usr/local/cuda
|
||||
export LD_LIBRARY_PATH=$LD_LIBRARY_PATH:/usr/local/cuda/lib64:/usr/local/cuda/extras/CUPTI/lib64
|
||||
export PATH=$PATH:$CUDA_HOME/bin
|
||||
```
|
||||
|
||||
|
||||
## nvidia-smi
|
||||
|
||||
> nvidia-smi是nvidia 的系统管理界面 ,其中smi是System management interface的缩写,它可以收集各种级别的信息,查看显存使用情况。此外, 可以启用和禁用 GPU 配置选项 (如 ECC 内存功能)。
|
||||
|
||||
```shell
|
||||
@ -295,74 +240,10 @@ modelscope download --model deepseek-ai/DeepSeek-R1-Distill-Qwen-7B
|
||||
modelscope download --model deepseek-ai/DeepSeek-R1-Distill-Qwen-7B README.md --local_dir ./dir
|
||||
```
|
||||
|
||||
#### 指定下载单个文件(以'tokenizer.json'文件为例)
|
||||
|
||||
```
|
||||
modelscope download --model 'Qwen/Qwen2-7b' tokenizer.json
|
||||
```
|
||||
|
||||
#### 指定下载多个个文件
|
||||
|
||||
```
|
||||
modelscope download --model 'Qwen/Qwen2-7b' tokenizer.json config.json
|
||||
```
|
||||
|
||||
#### 指定下载某些文件
|
||||
|
||||
```
|
||||
modelscope download --model 'Qwen/Qwen2-7b' --include '*.safetensors'
|
||||
```
|
||||
|
||||
#### 过滤指定文件
|
||||
|
||||
```
|
||||
modelscope download --model 'Qwen/Qwen2-7b' --exclude '*.safetensors'
|
||||
```
|
||||
|
||||
#### 指定下载cache_dir
|
||||
|
||||
```
|
||||
modelscope download --model 'Qwen/Qwen2-7b' --include '*.json' --cache_dir './cache_dir'
|
||||
```
|
||||
|
||||
模型文件将被下载到`'cache_dir/Qwen/Qwen2-7b'`。
|
||||
|
||||
#### 指定下载local_dir
|
||||
|
||||
```
|
||||
modelscope download --model 'Qwen/Qwen2-7b' --include '*.json' --local_dir './local_dir'
|
||||
```
|
||||
|
||||
模型文件将被下载到`'./local_dir'`。
|
||||
|
||||
如果`cache_dir`和`local_dir`参数同时被指定,`local_dir`优先级高,`cache_dir`将被忽略。
|
||||
|
||||
### 环境变量配置
|
||||
|
||||
#### 默认下载目录
|
||||
|
||||
指定`modelscope`默认下载目录为`/AI/modelscope/hub`
|
||||
|
||||
```bash
|
||||
echo 'export MODELSCOPE_CACHE=/AI/modelscope/hub' >> ~/.bashrc
|
||||
```
|
||||
|
||||
# Anaconda
|
||||
|
||||
>
|
||||
|
||||
## 安装
|
||||
|
||||
### minicoda
|
||||
|
||||
[安装 Miniconda — Anaconda 文档](https://docs.anaconda.net.cn/miniconda/install/)
|
||||
|
||||
```shell
|
||||
wget https://repo.anaconda.com/miniconda/Miniconda3-latest-Linux-x86_64.sh
|
||||
bash ~/Miniconda3-latest-Linux-x86_64.sh
|
||||
source ~/.zshrc
|
||||
```
|
||||
|
||||
## 常用命令
|
||||
|
||||
### 管理环境
|
||||
@ -480,54 +361,7 @@ source ~/.zshrc
|
||||
conda init
|
||||
```
|
||||
|
||||
3. conda和pip换镜像源
|
||||
|
||||
修改conda,通过以下命令进行添加
|
||||
|
||||
```lua
|
||||
conda config --add channels https://mirrors.tuna.tsinghua.edu.cn/anaconda/pkgs/free/
|
||||
conda config --add channels https://mirrors.tuna.tsinghua.edu.cn/anaconda/pkgs/main/
|
||||
conda config --set show_channel_urls yes
|
||||
```
|
||||
|
||||
修改后可以通过以下命令查看:
|
||||
|
||||
```armasm
|
||||
conda info
|
||||
```
|
||||
|
||||
下载试试:如果两都能看到下载源,那么就更改成功。
|
||||
|
||||
```mipsasm
|
||||
conda install
|
||||
```
|
||||
|
||||
##### Linux系统下:
|
||||
|
||||
linux系统下要到用户的文件夹下新建目录.pip,并在目录新建配置文件pip.conf
|
||||
|
||||
```bash
|
||||
mkdir ~/.pip
|
||||
cd ~/.pip
|
||||
vi pip.conf
|
||||
```
|
||||
|
||||
编辑内容:
|
||||
|
||||
```ini
|
||||
[global]
|
||||
index-url=https://pypi.tuna.tsinghua.edu.cn/simple
|
||||
[install]
|
||||
trusted-host=pypi.tuna.tsinghua.edu.cn
|
||||
disable-pip-version-check = true
|
||||
timeout = 6000
|
||||
```
|
||||
|
||||
下载试试:
|
||||
|
||||
```bash
|
||||
pip install
|
||||
```
|
||||
3.
|
||||
|
||||
# Jupyter Notebook
|
||||
|
||||
@ -557,14 +391,6 @@ jupyter notebook --allow-root
|
||||
conda create -n vLLM python=3.12
|
||||
conda activate vLLM
|
||||
pip install vLLM
|
||||
|
||||
# FlashInfer is optional but required for specific functionalities such as sliding window attention with Gemma 2.
|
||||
# For CUDA 12.4 & torch 2.4 to support sliding window attention for gemma 2 and llama 3.1 style rope
|
||||
pip install flashinfer -i https://flashinfer.ai/whl/cu124/torch2.4
|
||||
# For other CUDA & torch versions, please check https://docs.flashinfer.ai/installation.html
|
||||
# 也可下载到本地
|
||||
wget https://github.com/flashinfer-ai/flashinfer/releases/download/v0.2.5/flashinfer_python-0.2.5+cu124torch2.6-cp38-abi3-linux_x86_64.whl#sha256=43d767b912c0c43a04be99595e0123eab9385fc72530a2874b5fb08e3145c0be
|
||||
pip install flashinfer_python-0.2.5+cu124torch2.6-cp38-abi3-linux_x86_64.whl --no-deps
|
||||
```
|
||||
|
||||
## 部署
|
||||
@ -582,87 +408,6 @@ CUDA_VISIBLE_DEVICES=0 vllm serve /mnt/e/modelscope/deepseek-ai/DeepSeek-R1-Dist
|
||||
- **执行启动命令:** 在终端或命令提示符中执行上述 `vllm serve` 命令。
|
||||
- **注意 GPU 显存:** 启动 vLLM 服务会占用 GPU 显存。请确保您的 GPU 显存足够运行模型。如果显存不足,可能会导致启动失败或运行缓慢。您可以尝试减小 `--max-model-len` 参数或使用更小规模的模型。
|
||||
|
||||
### Qwen/Qwen3-4B
|
||||
|
||||
```shell
|
||||
vllm serve ~/modelscope/Qwen/Qwen3-4B --api-key token-abc123 --enable-reasoning --reasoning-parser deepseek_r1 --max_model_len=2048 --gpu_memory_utilization=0.85
|
||||
```
|
||||
|
||||
#### supervisor
|
||||
|
||||
```conf
|
||||
sudo vim vLLM-Qwen-Qwen3-4B.conf
|
||||
[program:vLLM-Qwen-Qwen3-4B.conf]
|
||||
command=zsh -c "source /home/user/miniconda3/bin/activate && source activate vLLM && vllm serve ~/modelscope/Qwen/Qwen3-4B --api-key token-abc123 --enable-reasoning --reasoning-parser deepseek_r1 --max_model_len=2048 --gpu_memory_utilization=0.85"
|
||||
user=user
|
||||
autostart=true
|
||||
autorestart=true
|
||||
stderr_logfile=/var/log/supervisor/vLLM-Qwen-Qwen3-4B/err.log
|
||||
stdout_logfile=/var/log/supervisor/vLLM-Qwen-Qwen3-4B/out.log
|
||||
stopasgroup=true
|
||||
```
|
||||
|
||||
#### Docker
|
||||
|
||||
Docker Compose方式
|
||||
|
||||
```yaml
|
||||
services:
|
||||
vllm:
|
||||
image: 'vllm/vllm-openai:latest'
|
||||
container_name: vllm-Qwen-Qwen3-8B-AWQ
|
||||
restart: always
|
||||
environment:
|
||||
- 'TZ:Asia/Shanghai'
|
||||
- 'VLLM_USE_MODELSCOPE:True'
|
||||
- 'HF_HUB_OFFLINE:1'
|
||||
ports:
|
||||
- '8000:8000'
|
||||
volumes:
|
||||
- /home/user/modelscope:/root/.cache/modelscope
|
||||
- /etc/localtime:/etc/localtime:ro
|
||||
# 启用 NVIDIA GPU 支持
|
||||
# 在 Docker Desktop 上,可能只需要 'gpu',
|
||||
# 在 Linux 服务器上,通常是 'nvidia'
|
||||
# 你提供的命令行是 --runtime nvidia --gpus all
|
||||
# Docker Compose 对应的方式是:
|
||||
deploy:
|
||||
resources:
|
||||
reservations:
|
||||
devices:
|
||||
- driver: nvidia
|
||||
count: all # 或者指定具体的GPU数量,如 1, 2 等
|
||||
capabilities: [gpu] # 确保指定 GPU 能力
|
||||
# IPC 模式
|
||||
# ipc: host 允许容器与宿主机共享 IPC 命名空间,
|
||||
# 这在某些高性能场景下有用,例如共享内存。
|
||||
ipc: host
|
||||
# 容器启动时执行的命令和参数
|
||||
command:
|
||||
- --model
|
||||
- /root/.cache/modelscope/Qwen/Qwen3-8B-AWQ
|
||||
- --served_model_name
|
||||
- Qwen/Qwen3-4B # 你希望这个model暴露时的名称,如果不填默认为本地模型权重路径
|
||||
- --max_model_len
|
||||
- "8192" # 支持的最长上下文长度,根据显存大小自行匹配,注意这里需要是字符串
|
||||
# --api_key 参数在 vLLM 0.3.x 版本中可能不再是直接的命令行参数,
|
||||
# 而是通过环境变量 API_KEY 来设置的。
|
||||
# 我已将其移到 environment 部分。
|
||||
# 如果你的 vLLM 版本仍然支持命令行参数,请取消注释下一行:
|
||||
# - --api_key
|
||||
# - "<YOUR-API-KEY-HERE>"
|
||||
- --gpu_memory_utilization
|
||||
- "0.9"
|
||||
- --max-num-seqs
|
||||
- "128"
|
||||
- --api-key
|
||||
- token-abc123
|
||||
- --reasoning-parser
|
||||
- deepseek_r1
|
||||
```
|
||||
|
||||
|
||||
|
||||
# LLama.cpp
|
||||
|
||||
> `llama.cpp`是一个基于纯`C/C++`实现的高性能大语言模型推理引擎,专为优化本地及云端部署而设计。其核心目标在于通过底层硬件加速和量化技术,实现在多样化硬件平台上的高效推理,同时保持低资源占用与易用性。
|
||||
@ -781,12 +526,6 @@ python convert_hf_to_gguf.py DeepSeek-R1-Distill-Qwen-7B/
|
||||
|
||||
然后打开浏览器,输入地址`http://127.0.0.1:8088`就可以在网页上与模型进行交互了,非常方便!
|
||||
|
||||
# Ktransformers
|
||||
|
||||
安装
|
||||
|
||||
|
||||
|
||||
# LLaMA-Factory
|
||||
|
||||
> 可参考文章:[DeepSeek-R1-7B-Distill模型微调全过程记录,LLaMA_Factory训练自己的数据集,合并lora微调模型并量化为gguf,接入微信实现自动对话回复_微信_qq_53091149-DeepSeek技术社区](https://deepseek.csdn.net/67b84a893c9cd21f4cb9aab6.html#devmenu2)
|
||||
@ -817,207 +556,3 @@ python src/webui.py
|
||||
合并
|
||||
|
||||

|
||||
|
||||
# AutoAWQ量化
|
||||
|
||||
## 安装
|
||||
|
||||
```shell
|
||||
conda create -n AutoAWQ python=3.12
|
||||
conda activate AutoAWQ
|
||||
pip install torch
|
||||
pip install autoawq
|
||||
```
|
||||
|
||||
## 脚本
|
||||
|
||||
默认AutoAWQ会从Huggingface上下载数据集mit-han-lab/pile-val-backup,会因为网络问题失败
|
||||
|
||||
需事先手动下载,通过modelscope
|
||||
|
||||
```shell
|
||||
modelscope download --dataset mit-han-lab/pile-val-backup --local_dir ~/modelscope/mit-han-lab/pile-val-backup
|
||||
```
|
||||
|
||||
以`Qwen/Qwen3-4B`模型为例
|
||||
|
||||
```shell
|
||||
from awq import AutoAWQForCausalLM
|
||||
from transformers import AutoTokenizer
|
||||
from datasets import load_dataset
|
||||
|
||||
# 加载本地数据集
|
||||
def load_calib_data():
|
||||
data=load_dataset('/home/user/modelscope/mit-han-lab/pile-val-backup', split="validation")
|
||||
return [text for text in data["text"] if text.strip() != '' and len(text.split(' ')) > 20]
|
||||
|
||||
model_path = '/home/user/modelscope/Qwen/Qwen3-4B'
|
||||
quant_path = '/home/user/modelscope/Qwen/Qwen3-4B-awq'
|
||||
quant_config = { "zero_point": True, "q_group_size": 128, "w_bit": 4, "version": "GEMM" }
|
||||
|
||||
|
||||
# Load model
|
||||
# 加载模型
|
||||
|
||||
|
||||
model = AutoAWQForCausalLM.from_pretrained(
|
||||
model_path, **{"low_cpu_mem_usage": True, "use_cache": False}
|
||||
)
|
||||
tokenizer = AutoTokenizer.from_pretrained(model_path, trust_remote_code=True)
|
||||
|
||||
|
||||
# Quantize
|
||||
# 量化
|
||||
|
||||
calib_data=load_calib_data()
|
||||
model.quantize(tokenizer, quant_config=quant_config, calib_data=calib_data)
|
||||
|
||||
|
||||
# Save quantized model
|
||||
# 保存量化模型
|
||||
|
||||
|
||||
model.save_quantized(quant_path)
|
||||
tokenizer.save_pretrained(quant_path)
|
||||
|
||||
|
||||
print(f'Model is quantized and saved at "{quant_path}"')
|
||||
```
|
||||
|
||||
|
||||
|
||||
# 大模型Dense、MoE 与 Hybrid-MoE 架构的比较
|
||||
|
||||
在大模型架构设计中,Dense(全连接)、MoE(混合专家)和Hybrid-MoE(混合式MoE)是三种主流的参数组织方式,它们在模型容量、计算效率和应用场景上存在显著差异。以下从核心原理、技术特点、优缺点及适用场景进行系统对比:
|
||||
|
||||
------
|
||||
|
||||
## **1. 核心原理对比**
|
||||
|
||||
| **架构类型** | **核心思想** | **典型模型** |
|
||||
| -------------- | ------------------------------------------------------------ | -------------------------- |
|
||||
| **Dense** | 所有参数对所有输入生效,每层神经元全连接,统一处理所有输入特征。 | GPT-3、BERT、LLAMA |
|
||||
| **MoE** | 将模型划分为多个“专家”(子网络),每个输入仅激活部分专家,通过路由机制动态分配任务。 | Switch Transformer、GShard |
|
||||
| **Hybrid-MoE** | 混合Dense和MoE层:部分层全连接,部分层采用MoE结构,平衡计算效率和模型容量。 | DeepSeek-MoE、Google GLaM |
|
||||
|
||||
------
|
||||
|
||||
## **2. 技术特点与性能对比**
|
||||
|
||||
| **维度** | **Dense** | **MoE** | **Hybrid-MoE** |
|
||||
| -------------- | --------------------------------------------------- | ------------------------------------------------------------ | ----------------------------------------- |
|
||||
| **参数规模** | 总参数量=激活参数量,随层数线性增长。 | 总参数量高(专家数×专家规模),但激活参数量低(仅激活部分专家)。 | 介于两者之间,MoE层数可控。 |
|
||||
| **计算效率** | 计算成本高(FLOPs与参数量正相关),适合小规模模型。 | 相同参数量下,FLOPs显著降低(仅激活部分专家)。 | 通过调整MoE层比例,灵活平衡计算开销。 |
|
||||
| **训练稳定性** | 收敛稳定,梯度传播路径简单。 | 路由机制易导致专家负载不均衡,需复杂正则化。 | 稳定性优于纯MoE,但仍需路由优化。 |
|
||||
| **扩展性** | 参数规模受硬件限制,千亿级后成本陡增。 | 可扩展至万亿参数(如GShard-1.6T),适合超大规模模型。 | 通过局部MoE化实现高效扩展,适配中等规模。 |
|
||||
| **显存占用** | 高(需存储全部参数梯度)。 | 显存需求更高(专家参数独立存储)。 | 显存介于两者之间,取决于MoE层占比。 |
|
||||
| **应用场景** | 通用任务、资源受限场景。 | 超大规模预训练、多任务学习。 | 需平衡性能与成本的工业级应用。 |
|
||||
|
||||
------
|
||||
|
||||
## **3. 优缺点对比**
|
||||
|
||||
### **Dense架构**
|
||||
|
||||
- **优点**:
|
||||
- 结构简单,训练稳定性高。
|
||||
- 参数利用率最大化,适合小规模高精度任务。
|
||||
- **缺点**:
|
||||
- 计算成本随参数量指数级增长,难以扩展至超大规模。
|
||||
- 显存占用高,限制单卡可训练模型规模。
|
||||
|
||||
### **MoE架构**
|
||||
|
||||
- **优点**:
|
||||
- 计算效率高,相同FLOPs下模型容量更大。
|
||||
- 支持万亿级参数扩展,适合分布式训练。
|
||||
- **缺点**:
|
||||
- 路由机制复杂,易出现专家“坍缩”(部分专家未被激活)。
|
||||
- 显存和通信开销大,需定制化负载均衡策略。
|
||||
|
||||
### **Hybrid-MoE架构**
|
||||
|
||||
- **优点**:
|
||||
- 灵活性高,可通过调整MoE层位置平衡性能与成本。
|
||||
- 保留关键层的全连接特性,提升任务特定性能。
|
||||
- **缺点**:
|
||||
- 需精心设计MoE层分布,调参成本较高。
|
||||
- 仍面临部分MoE的稳定性挑战。
|
||||
|
||||
------
|
||||
|
||||
## **4. 典型应用场景**
|
||||
|
||||
| **架构** | **适用场景** |
|
||||
| -------------- | ------------------------------------------------------------ |
|
||||
| **Dense** | - 中小规模模型(<100B参数) - 对训练稳定性要求高的任务(如对话生成) - 边缘设备推理 |
|
||||
| **MoE** | - 超大规模预训练(>500B参数) - 多任务/多模态学习 - 云端高性能计算集群 |
|
||||
| **Hybrid-MoE** | - 中等规模模型(100B-500B参数) - 需兼顾通用性与效率的工业场景 - 长文本处理任务 |
|
||||
|
||||
------
|
||||
|
||||
## **5. 技术选型建议**
|
||||
|
||||
- **选择Dense的条件**:
|
||||
- 资源有限(单卡训练/推理)。
|
||||
- 任务单一,无需极高模型容量。
|
||||
- 追求极简架构和稳定收敛。
|
||||
- **选择MoE的条件**:
|
||||
- 追求极致模型性能(如AGI探索)。
|
||||
- 拥有大规模计算集群(千卡级)。
|
||||
- 多任务/多模态需求显著。
|
||||
- **选择Hybrid-MoE的条件**:
|
||||
- 需平衡模型容量与计算成本。
|
||||
- 部分任务依赖全连接层的强表征能力(如逻辑推理)。
|
||||
- 希望渐进式扩展模型规模。
|
||||
|
||||
------
|
||||
|
||||
## **6. 未来发展方向**
|
||||
|
||||
1. **Dense架构优化**:
|
||||
- 参数高效微调(LoRA、Adapter)。
|
||||
- 动态稀疏激活(如微软的DeepSpeed-MoE)。
|
||||
2. **MoE架构改进**:
|
||||
- 更智能的路由机制(如基于强化学习)。
|
||||
- 专家共享与分层MoE设计。
|
||||
3. **Hybrid-MoE创新**:
|
||||
- 自动化MoE层分布搜索(NAS技术)。
|
||||
- 异构专家设计(不同专家结构适配不同任务)。
|
||||
|
||||
------
|
||||
|
||||
## **总结**
|
||||
|
||||
- **Dense**:简单可靠,适合资源受限场景,但扩展性差。
|
||||
- **MoE**:计算高效,扩展性强,但工程复杂度高。
|
||||
- **Hybrid-MoE**:折中方案,平衡性能与成本,需精细调优。
|
||||
|
||||
实际选型需结合**任务需求**、**硬件资源**和**工程能力**综合评估。对于大多数企业级应用,Hybrid-MoE可能是当前的最优解,而科研前沿更倾向于探索纯MoE的极限能力。
|
||||
|
||||
# Dify
|
||||
|
||||
## Dify 向量存储机制简述
|
||||
|
||||
在 Dify 中,文档数据(如知识库文档、FAQ、手册等)需要经过向量化处理,才能用于语义检索和问答增强。其核心处理流程如下图所示:
|
||||
|
||||
```
|
||||
文档(原始文本)
|
||||
↓
|
||||
Embedding(由 OpenAI, Hugging Face, etc. 提供)
|
||||
↓
|
||||
向量(高维 float 数组)
|
||||
↓
|
||||
Vector Store(默认为 Weaviate)
|
||||
↓
|
||||
Dify 查询时执行语义检索,返回匹配片段
|
||||
```
|
||||
|
||||
向量存储的作用
|
||||
|
||||
Dify 本身不负责存储嵌入向量,而是通过调用第三方向量数据库来管理这些向量。向量数据库的主要职责包括:
|
||||
|
||||
- 存储文本对应的向量数据(float 数组)
|
||||
- 为每条向量建立索引,支持高效近似/精确搜索
|
||||
- 提供语义检索 API(如 top-k 相似度查找)
|
||||
- 支持元数据管理(如 document_id, source, tags 等)
|
||||
|
||||
@ -1,87 +0,0 @@
|
||||
---
|
||||
title: 对象存储
|
||||
date: 2025-07-23 14:27:11
|
||||
tags:
|
||||
---
|
||||
|
||||
# RustFS
|
||||
|
||||
## 安装
|
||||
|
||||
### Docker
|
||||
|
||||
新建rustfs目录
|
||||
|
||||
```shell
|
||||
mkdir ~/rustfs
|
||||
cd ~/rustfs
|
||||
```
|
||||
|
||||
编辑docker-compose.yml文件
|
||||
|
||||
```shell
|
||||
vim docker-compose.yml
|
||||
```
|
||||
|
||||
新增以下内容
|
||||
|
||||
```yaml
|
||||
services:
|
||||
rustfs:
|
||||
image: 'rustfs/rustfs:latest'
|
||||
container_name: 'rustfs'
|
||||
restart: always
|
||||
environment:
|
||||
- 'TZ:Asia/Shanghai'
|
||||
- 'RUSTFS_ACCESS_KEY=rustfsadmin'
|
||||
- 'RUSTFS_SECRET_KEY=rustfsadmin'
|
||||
- 'RUSTFS_CONSOLE_ENABLE=true'
|
||||
- 'RUSTFS_TLS_PATH=/certs'
|
||||
ports:
|
||||
- '9000:9000'
|
||||
volumes:
|
||||
- /etc/localtime:/etc/localtime:ro
|
||||
- /mnt/rustfs/data:/data
|
||||
- /usr/ssl:/certs
|
||||
command:
|
||||
- "rustfs"
|
||||
- "--console-enable"
|
||||
- "--server-domains"
|
||||
- "rustfs.wenyongdalucky.club"
|
||||
```
|
||||
|
||||
:wq保存后退出
|
||||
|
||||
建立数据挂载目录
|
||||
|
||||
```shell
|
||||
sudo mkdir -p /mnt/rustfs/data
|
||||
```
|
||||
|
||||
在 `~/rustfs` 目录下使用Docker Compose启动容器
|
||||
|
||||
```shell
|
||||
docker compose up -d
|
||||
```
|
||||
|
||||
查看日志
|
||||
|
||||
```shell
|
||||
docker logs rustfs -f
|
||||
```
|
||||
|
||||
使用密钥登录的方式,输入账号、密钥
|
||||
|
||||
这里查看之前 docker-compose.yml文件中的 RUSTFS_ACCESS_KEY、RUSTFS_SECRET_KEY 进行登录即可。
|
||||
|
||||
这里就都输入 rustfsadmin登录
|
||||
|
||||
进入到控制台
|
||||
|
||||
创建存储桶 hexo
|
||||
|
||||
|
||||
|
||||
需将桶配置中的访问策略改为 公有,防止无法通过Markdown访问
|
||||
|
||||
|
||||
@ -133,7 +133,7 @@ error_img:
|
||||
# A simple 404 page
|
||||
error_404:
|
||||
enable: false
|
||||
subtitle: "Page Not Found"
|
||||
subtitle: 'Page Not Found'
|
||||
background: https://i.loli.net/2020/05/19/aKOcLiyPl2JQdFD.png
|
||||
|
||||
post_meta:
|
||||
@ -551,7 +551,7 @@ canvas_fluttering_ribbon:
|
||||
# https://github.com/hustcc/canvas-nest.js
|
||||
canvas_nest:
|
||||
enable: false
|
||||
color: "0,0,255" #color of lines, default: '0,0,0'; RGB values: (R,G,B).(note: use ',' to separate.)
|
||||
color: '0,0,255' #color of lines, default: '0,0,0'; RGB values: (R,G,B).(note: use ',' to separate.)
|
||||
opacity: 0.7 # the opacity of line (0~1), default: 0.5.
|
||||
zIndex: -1 # z-index property of the background, default: -1.
|
||||
count: 99 # the number of lines, default: 99.
|
||||
@ -669,7 +669,7 @@ aside:
|
||||
enable: true
|
||||
icon: fab fa-github
|
||||
text: Follow Me
|
||||
link: https://github.com/wenyongda
|
||||
link: https://github.com/xxxxxx
|
||||
card_announcement:
|
||||
enable: true
|
||||
content: This is my Blog
|
||||
@ -735,9 +735,9 @@ translate:
|
||||
# Time delay
|
||||
translateDelay: 0
|
||||
# The text of the button when the language is Simplified Chinese
|
||||
msgToTraditionalChinese: "繁"
|
||||
msgToTraditionalChinese: '繁'
|
||||
# The text of the button when the language is Traditional Chinese
|
||||
msgToSimplifiedChinese: "簡"
|
||||
msgToSimplifiedChinese: '簡'
|
||||
|
||||
# Read Mode (閲讀模式)
|
||||
readmode: true
|
||||
@ -823,8 +823,8 @@ aplayerInject:
|
||||
snackbar:
|
||||
enable: false
|
||||
position: bottom-left
|
||||
bg_light: "#49b1f5" # The background color of Toast Notification in light mode
|
||||
bg_dark: "#1f1f1f" # The background color of Toast Notification in dark mode
|
||||
bg_light: '#49b1f5' # The background color of Toast Notification in light mode
|
||||
bg_dark: '#1f1f1f' # The background color of Toast Notification in dark mode
|
||||
|
||||
# https://instant.page/
|
||||
# prefetch (預加載)
|
||||
@ -894,7 +894,7 @@ CDN:
|
||||
# when set it to local, you need to install hexo-butterfly-extjs
|
||||
third_party_provider: jsdelivr
|
||||
|
||||
# Add version number to CDN, true or false
|
||||
# Add version number to CDN, true or false
|
||||
version: false
|
||||
|
||||
# Custom format
|
||||
@ -952,4 +952,4 @@ CDN:
|
||||
# prismjs_lineNumber_js:
|
||||
# prismjs_autoloader:
|
||||
# artalk_js:
|
||||
# artalk_css:
|
||||
# artalk_css:
|
||||
@ -40,7 +40,7 @@ search:
|
||||
algolia_search:
|
||||
input_placeholder: Search for Posts
|
||||
hits_empty: "We didn't find any results for the search: ${query}."
|
||||
hits_stats: "${hits} results found in ${time} ms"
|
||||
hits_stats: '${hits} results found in ${time} ms'
|
||||
|
||||
local_search:
|
||||
input_placeholder: Search for Posts
|
||||
@ -103,7 +103,6 @@ rightside:
|
||||
setting: Setting
|
||||
aside: Toggle between single-column and double-column
|
||||
chat: Chat
|
||||
toggle_sakura: Sakura effect toggled on or off
|
||||
|
||||
copy_copyright:
|
||||
author: Author
|
||||
|
||||
@ -40,7 +40,7 @@ search:
|
||||
algolia_search:
|
||||
input_placeholder: Search for Posts
|
||||
hits_empty: "We didn't find any results for the search: ${query}."
|
||||
hits_stats: "${hits} results found in ${time} ms"
|
||||
hits_stats: '${hits} results found in ${time} ms'
|
||||
|
||||
local_search:
|
||||
input_placeholder: Search for Posts
|
||||
@ -103,7 +103,6 @@ rightside:
|
||||
setting: Setting
|
||||
aside: Toggle between single-column and double-column
|
||||
chat: Chat
|
||||
toggle_sakura: Sakura effect toggled
|
||||
|
||||
copy_copyright:
|
||||
author: Author
|
||||
|
||||
@ -40,12 +40,12 @@ search:
|
||||
load_data: 数据库加载中
|
||||
algolia_search:
|
||||
input_placeholder: 搜索文章
|
||||
hits_empty: "找不到您查询的内容:${query}"
|
||||
hits_stats: "找到 ${hits} 条结果,用时 ${time} 毫秒"
|
||||
hits_empty: '找不到您查询的内容:${query}'
|
||||
hits_stats: '找到 ${hits} 条结果,用时 ${time} 毫秒'
|
||||
|
||||
local_search:
|
||||
input_placeholder: 搜索文章
|
||||
hits_empty: "找不到您查询的内容:${query}"
|
||||
hits_empty: '找不到您查询的内容:${query}'
|
||||
|
||||
pagination:
|
||||
prev: 上一篇
|
||||
@ -104,7 +104,6 @@ rightside:
|
||||
setting: 设置
|
||||
aside: 单栏和双栏切换
|
||||
chat: 聊天
|
||||
toggle_sakura: 樱花特效切换
|
||||
|
||||
copy_copyright:
|
||||
author: 作者
|
||||
|
||||
@ -40,12 +40,12 @@ search:
|
||||
load_data: 資料庫載入中
|
||||
algolia_search:
|
||||
input_placeholder: 搜尋文章
|
||||
hits_empty: "找不到您查詢的內容:${query}"
|
||||
hits_stats: "找到 ${hits} 條結果,用時 ${time} 毫秒"
|
||||
hits_empty: '找不到您查詢的內容:${query}'
|
||||
hits_stats: '找到 ${hits} 條結果,用時 ${time} 毫秒'
|
||||
|
||||
local_search:
|
||||
input_placeholder: 搜尋文章
|
||||
hits_empty: "找不到您查詢的內容:${query}"
|
||||
hits_empty: '找不到您查詢的內容:${query}'
|
||||
|
||||
pagination:
|
||||
prev: 上一篇
|
||||
@ -104,7 +104,6 @@ rightside:
|
||||
setting: 設定
|
||||
aside: 單欄和雙欄切換
|
||||
chat: 聊天
|
||||
toggle_sakura: 櫻花特效切換
|
||||
|
||||
copy_copyright:
|
||||
author: 作者
|
||||
|
||||
@ -13,9 +13,5 @@
|
||||
span.footer-separator |
|
||||
span= _p('footer.theme') + ' '
|
||||
a(href='https://github.com/jerryc127/hexo-theme-butterfly')= 'Butterfly'
|
||||
br
|
||||
center
|
||||
| ICP备案号:
|
||||
a(href="https://beian.miit.gov.cn" target="_blank") 辽ICP备2025052969号-1
|
||||
if theme.footer.custom_text
|
||||
.footer_custom_text!=`${theme.footer.custom_text}`
|
||||
|
||||
@ -29,16 +29,13 @@ mixin rightsideItem(array)
|
||||
if commentsJsLoad
|
||||
a#to_comment(href="#post-comment" title=_p("rightside.scroll_to_comment"))
|
||||
i.fas.fa-comments
|
||||
when 'sakura'
|
||||
button#toggle_sakura_btn(type="button" title=_p("rightside.toggle_sakura"))
|
||||
i.fas.fa-seedling
|
||||
|
||||
#rightside
|
||||
- const { enable, hide, show } = theme.rightside_item_order
|
||||
- const hideArray = enable ? hide && hide.split(',') : ['readmode','translate','darkmode','hideAside']
|
||||
- const showArray = enable ? show && show.split(',') : ['toc','chat','comment','sakura']
|
||||
|
||||
- const showArray = enable ? show && show.split(',') : ['toc','chat','comment']
|
||||
|
||||
|
||||
#rightside-config-hide
|
||||
if hideArray
|
||||
+rightsideItem(hideArray)
|
||||
|
||||
@ -146,7 +146,7 @@ document.addEventListener('DOMContentLoaded', function () {
|
||||
this.classList.toggle('expand-done')
|
||||
}
|
||||
|
||||
function createEle(lang, item, service) {
|
||||
function createEle (lang, item, service) {
|
||||
const fragment = document.createDocumentFragment()
|
||||
|
||||
if (isShowTool) {
|
||||
@ -205,7 +205,7 @@ document.addEventListener('DOMContentLoaded', function () {
|
||||
/**
|
||||
* PhotoFigcaption
|
||||
*/
|
||||
function addPhotoFigcaption() {
|
||||
function addPhotoFigcaption () {
|
||||
document.querySelectorAll('#article-container img').forEach(function (item) {
|
||||
const parentEle = item.parentNode
|
||||
const altValue = item.title || item.alt
|
||||
@ -265,7 +265,7 @@ document.addEventListener('DOMContentLoaded', function () {
|
||||
}
|
||||
|
||||
// find the scroll direction
|
||||
function scrollDirection(currentTop) {
|
||||
function scrollDirection (currentTop) {
|
||||
const result = currentTop > initTop // true is down & false is up
|
||||
initTop = currentTop
|
||||
return result
|
||||
@ -278,38 +278,38 @@ document.addEventListener('DOMContentLoaded', function () {
|
||||
const isChatBtnShow = typeof chatBtnShow === 'function'
|
||||
|
||||
const scrollTask = btf.throttle(() => {
|
||||
const currentTop = window.scrollY || document.documentElement.scrollTop
|
||||
const isDown = scrollDirection(currentTop)
|
||||
if (currentTop > 56) {
|
||||
if (isDown) {
|
||||
if ($header.classList.contains('nav-visible')) $header.classList.remove('nav-visible')
|
||||
if (isChatBtnShow && isChatShow === true) {
|
||||
chatBtnHide()
|
||||
isChatShow = false
|
||||
}
|
||||
} else {
|
||||
if (!$header.classList.contains('nav-visible')) $header.classList.add('nav-visible')
|
||||
if (isChatBtnHide && isChatShow === false) {
|
||||
chatBtnShow()
|
||||
isChatShow = true
|
||||
}
|
||||
}
|
||||
$header.classList.add('nav-fixed')
|
||||
if (window.getComputedStyle($rightside).getPropertyValue('opacity') === '0') {
|
||||
$rightside.style.cssText = 'opacity: 0.8; transform: translateX(-58px)'
|
||||
}
|
||||
} else {
|
||||
if (!$header.classList.contains('nav-visible')) $header.classList.add('nav-visible')
|
||||
if (isChatBtnHide && isChatShow === false) {
|
||||
chatBtnShow()
|
||||
isChatShow = true
|
||||
if (currentTop === 0) {
|
||||
$header.classList.remove('nav-fixed', 'nav-visible')
|
||||
}
|
||||
$rightside.style.cssText = "opacity: ''; transform: ''"
|
||||
}
|
||||
$header.classList.add('nav-fixed')
|
||||
if (window.getComputedStyle($rightside).getPropertyValue('opacity') === '0') {
|
||||
|
||||
if (document.body.scrollHeight <= innerHeight) {
|
||||
$rightside.style.cssText = 'opacity: 0.8; transform: translateX(-58px)'
|
||||
}
|
||||
} else {
|
||||
if (currentTop === 0) {
|
||||
$header.classList.remove('nav-fixed', 'nav-visible')
|
||||
}
|
||||
$rightside.style.cssText = "opacity: ''; transform: ''"
|
||||
}
|
||||
|
||||
if (document.body.scrollHeight <= innerHeight) {
|
||||
$rightside.style.cssText = 'opacity: 0.8; transform: translateX(-58px)'
|
||||
}
|
||||
}, 200)
|
||||
|
||||
}, 200)
|
||||
|
||||
window.scrollCollect = scrollTask
|
||||
|
||||
window.addEventListener('scroll', scrollCollect)
|
||||
@ -455,7 +455,7 @@ document.addEventListener('DOMContentLoaded', function () {
|
||||
newEle.className = 'fas fa-sign-out-alt exit-readmode'
|
||||
$body.appendChild(newEle)
|
||||
|
||||
function clickFn() {
|
||||
function clickFn () {
|
||||
$body.classList.remove('read-mode')
|
||||
newEle.remove()
|
||||
newEle.removeEventListener('click', clickFn)
|
||||
@ -501,17 +501,6 @@ document.addEventListener('DOMContentLoaded', function () {
|
||||
: saveToLocal.set('aside-status', 'hide', 2)
|
||||
$htmlDom.toggle('hide-aside')
|
||||
},
|
||||
toggleSakuraBtn: () => {
|
||||
const toggleBtn = document.getElementById('toggle_sakura_btn');
|
||||
if (toggleBtn) {
|
||||
// toggleBtn.addEventListener('click', function () {
|
||||
const sakuraEffect = document.getElementById('canvas_sakura');
|
||||
if (sakuraEffect) {
|
||||
sakuraEffect.style.display = (sakuraEffect.style.display === 'none' || sakuraEffect.style.display === '') ? 'block' : 'none';
|
||||
}
|
||||
// });
|
||||
}
|
||||
},
|
||||
|
||||
runMobileToc: () => {
|
||||
if (window.getComputedStyle(document.getElementById('card-toc')).getPropertyValue('opacity') === '0') window.mobileToc.open()
|
||||
@ -540,9 +529,6 @@ document.addEventListener('DOMContentLoaded', function () {
|
||||
case 'hide-aside-btn':
|
||||
rightSideFn.hideAsideBtn()
|
||||
break
|
||||
case 'toggle_sakura_btn':
|
||||
rightSideFn.toggleSakuraBtn()
|
||||
break
|
||||
default:
|
||||
break
|
||||
}
|
||||
@ -570,10 +556,10 @@ document.addEventListener('DOMContentLoaded', function () {
|
||||
let textFont; const copyFont = window.getSelection(0).toString()
|
||||
if (copyFont.length > copyright.limitCount) {
|
||||
textFont = copyFont + '\n' + '\n' + '\n' +
|
||||
copyright.languages.author + '\n' +
|
||||
copyright.languages.link + window.location.href + '\n' +
|
||||
copyright.languages.source + '\n' +
|
||||
copyright.languages.info
|
||||
copyright.languages.author + '\n' +
|
||||
copyright.languages.link + window.location.href + '\n' +
|
||||
copyright.languages.source + '\n' +
|
||||
copyright.languages.info
|
||||
} else {
|
||||
textFont = copyFont
|
||||
}
|
||||
|
||||
100
yarn.lock
@ -403,6 +403,17 @@ character-parser@^2.2.0:
|
||||
dependencies:
|
||||
is-regex "^1.0.3"
|
||||
|
||||
cheerio@^0.19.0:
|
||||
version "0.19.0"
|
||||
resolved "https://registry.npmmirror.com/cheerio/-/cheerio-0.19.0.tgz"
|
||||
integrity sha512-Fwcm3zkR37STnPC8FepSHeSYJM5Rd596TZOcfDUdojR4Q735aK1Xn+M+ISagNneuCwMjK28w4kX+ETILGNT/UQ==
|
||||
dependencies:
|
||||
css-select "~1.0.0"
|
||||
dom-serializer "~0.1.0"
|
||||
entities "~1.1.1"
|
||||
htmlparser2 "~3.8.1"
|
||||
lodash "^3.2.0"
|
||||
|
||||
cheerio@^0.22.0:
|
||||
version "0.22.0"
|
||||
resolved "https://registry.npmmirror.com/cheerio/-/cheerio-0.22.0.tgz"
|
||||
@ -575,6 +586,16 @@ cross-spawn@^7.0.0, cross-spawn@^7.0.3:
|
||||
shebang-command "^2.0.0"
|
||||
which "^2.0.1"
|
||||
|
||||
css-select@~1.0.0:
|
||||
version "1.0.0"
|
||||
resolved "https://registry.npmmirror.com/css-select/-/css-select-1.0.0.tgz"
|
||||
integrity sha512-/xPlD7betkfd7ChGkLGGWx5HWyiHDOSn7aACLzdH0nwucPvB0EAm8hMBm7Xn7vGfAeRRN7KZ8wumGm8NoNcMRw==
|
||||
dependencies:
|
||||
boolbase "~1.0.0"
|
||||
css-what "1.0"
|
||||
domutils "1.4"
|
||||
nth-check "~1.0.0"
|
||||
|
||||
css-select@~1.2.0:
|
||||
version "1.2.0"
|
||||
resolved "https://registry.npmmirror.com/css-select/-/css-select-1.2.0.tgz"
|
||||
@ -585,6 +606,11 @@ css-select@~1.2.0:
|
||||
domutils "1.5.1"
|
||||
nth-check "~1.0.1"
|
||||
|
||||
css-what@1.0:
|
||||
version "1.0.0"
|
||||
resolved "https://registry.npmmirror.com/css-what/-/css-what-1.0.0.tgz"
|
||||
integrity sha512-60SUMPBreXrLXgvpM8kYpO0AOyMRhdRlXFX5BMQbZq1SIJCyNE56nqFQhmvREQdUJpedbGRYZ5wOyq3/F6q5Zw==
|
||||
|
||||
css-what@2.1:
|
||||
version "2.1.3"
|
||||
resolved "https://registry.npmmirror.com/css-what/-/css-what-2.1.3.tgz"
|
||||
@ -754,6 +780,13 @@ domexception@^4.0.0:
|
||||
dependencies:
|
||||
webidl-conversions "^7.0.0"
|
||||
|
||||
domhandler@2.3:
|
||||
version "2.3.0"
|
||||
resolved "https://registry.npmmirror.com/domhandler/-/domhandler-2.3.0.tgz"
|
||||
integrity sha512-q9bUwjfp7Eif8jWxxxPSykdRZAb6GkguBGSgvvCrhI9wB71W2K/Kvv4E61CF/mcCfnVJDeDWx/Vb/uAqbDj6UQ==
|
||||
dependencies:
|
||||
domelementtype "1"
|
||||
|
||||
domhandler@^2.3.0:
|
||||
version "2.4.2"
|
||||
resolved "https://registry.npmmirror.com/domhandler/-/domhandler-2.4.2.tgz"
|
||||
@ -780,7 +813,14 @@ dompurify@^3.0.3:
|
||||
resolved "https://registry.npmmirror.com/dompurify/-/dompurify-3.0.6.tgz"
|
||||
integrity sha512-ilkD8YEnnGh1zJ240uJsW7AzE+2qpbOUYjacomn3AvJ6J4JhKGSZ2nh4wUIXPZrEPppaCLx5jFe8T89Rk8tQ7w==
|
||||
|
||||
domutils@1.5.1:
|
||||
domutils@1.4:
|
||||
version "1.4.3"
|
||||
resolved "https://registry.npmmirror.com/domutils/-/domutils-1.4.3.tgz"
|
||||
integrity sha512-ZkVgS/PpxjyJMb+S2iVHHEZjVnOUtjGp0/zstqKGTE9lrZtNHlNQmLwP/lhLMEApYbzc08BKMx9IFpKhaSbW1w==
|
||||
dependencies:
|
||||
domelementtype "1"
|
||||
|
||||
domutils@1.5, domutils@1.5.1:
|
||||
version "1.5.1"
|
||||
resolved "https://registry.npmmirror.com/domutils/-/domutils-1.5.1.tgz"
|
||||
integrity sha512-gSu5Oi/I+3wDENBsOWBiRK1eoGxcywYSqg3rR960/+EfY0CF4EX1VPkgHOZ3WiS/Jg2DtliF6BhWcHlfpYUcGw==
|
||||
@ -841,7 +881,12 @@ ent@^2.2.0:
|
||||
resolved "https://registry.npmmirror.com/ent/-/ent-2.2.0.tgz"
|
||||
integrity sha512-GHrMyVZQWvTIdDtpiEXdHZnFQKzeO09apj8Cbl4pKWy4i0Oprcq17usfDt5aO63swf0JOeMWjWQE/LzgSRuWpA==
|
||||
|
||||
entities@^1.1.1, entities@~1.1.1:
|
||||
entities@1.0:
|
||||
version "1.0.0"
|
||||
resolved "https://registry.npmmirror.com/entities/-/entities-1.0.0.tgz"
|
||||
integrity sha512-LbLqfXgJMmy81t+7c14mnulFHJ170cM6E+0vMXR9k/ZiZwgX8i5pNgjTCX3SO4VeUsFLV+8InixoretwU+MjBQ==
|
||||
|
||||
entities@^1.1.1, entities@^1.1.2, entities@~1.1.1:
|
||||
version "1.1.2"
|
||||
resolved "https://registry.npmmirror.com/entities/-/entities-1.1.2.tgz"
|
||||
integrity sha512-f2LZMYl1Fzu7YSBKg+RoROelpOaNrcGmE9AZubeDfrCEia483oW4MI4VyFd5VNHIgQ/7qm1I0wUHK1eJnn2y2w==
|
||||
@ -1246,10 +1291,13 @@ hasown@^2.0.0:
|
||||
dependencies:
|
||||
function-bind "^1.1.2"
|
||||
|
||||
hexo-asset-img@^1.2.0:
|
||||
version "1.2.0"
|
||||
resolved "https://registry.npmmirror.com/hexo-asset-img/-/hexo-asset-img-1.2.0.tgz#d6d816fbea47ff3da97da13bce58bd0314bdaaee"
|
||||
integrity sha512-PfjFF8DvG22KZ9ZldzpCFJUerH+IJ7e4ARw9BsD3PtJsAbYJGLQfLt/XFnel/r9d2dDYjMlQf1urFdLirseqEA==
|
||||
hexo-asset-image@^1.0.0:
|
||||
version "1.0.0"
|
||||
resolved "https://registry.npmmirror.com/hexo-asset-image/-/hexo-asset-image-1.0.0.tgz"
|
||||
integrity sha512-jkuUJNPRMH6v7HqzP2BAwEZavMzVxNWhl8jZl9BmFYB22/aq2+zixGIhV4vedI9cLPydjn9DfII41/MMXtzJTA==
|
||||
dependencies:
|
||||
cheerio "^0.19.0"
|
||||
entities "^1.1.2"
|
||||
|
||||
hexo-bunyan@^1.0.0:
|
||||
version "1.0.0"
|
||||
@ -1574,6 +1622,17 @@ htmlparser2@^9.0.0:
|
||||
domutils "^3.1.0"
|
||||
entities "^4.5.0"
|
||||
|
||||
htmlparser2@~3.8.1:
|
||||
version "3.8.3"
|
||||
resolved "https://registry.npmmirror.com/htmlparser2/-/htmlparser2-3.8.3.tgz"
|
||||
integrity sha512-hBxEg3CYXe+rPIua8ETe7tmG3XDn9B0edOE/e9wH2nLczxzgdu0m0aNHY+5wFZiviLWLdANPJTssa92dMcXQ5Q==
|
||||
dependencies:
|
||||
domelementtype "1"
|
||||
domhandler "2.3"
|
||||
domutils "1.5"
|
||||
entities "1.0"
|
||||
readable-stream "1.1"
|
||||
|
||||
http-errors@2.0.0:
|
||||
version "2.0.0"
|
||||
resolved "https://registry.npmjs.org/http-errors/-/http-errors-2.0.0.tgz"
|
||||
@ -1617,7 +1676,7 @@ inflight@^1.0.4:
|
||||
once "^1.3.0"
|
||||
wrappy "1"
|
||||
|
||||
inherits@2, inherits@2.0.4, inherits@^2.0.1, inherits@^2.0.3, inherits@^2.0.4, inherits@~2.0.3:
|
||||
inherits@2, inherits@2.0.4, inherits@^2.0.1, inherits@^2.0.3, inherits@^2.0.4, inherits@~2.0.1, inherits@~2.0.3:
|
||||
version "2.0.4"
|
||||
resolved "https://registry.npmjs.org/inherits/-/inherits-2.0.4.tgz"
|
||||
integrity sha512-k/vGaX4/Yla3WzyMCvTQOXYeIHvqOKtnqBduzTHpzpQZzAskKMhZ2K+EnBiSM9zGSoIFeMpXKxa4dYeZIQqewQ==
|
||||
@ -1815,6 +1874,11 @@ is-wsl@^2.2.0:
|
||||
dependencies:
|
||||
is-docker "^2.0.0"
|
||||
|
||||
isarray@0.0.1:
|
||||
version "0.0.1"
|
||||
resolved "https://registry.npmmirror.com/isarray/-/isarray-0.0.1.tgz"
|
||||
integrity sha512-D2S+3GLxWH+uhrNEcoh/fnmYeP8E8/zHl644d/jdA0g2uyXvy3sb0qxotE+ne0LtccHknQzWwZEzhak7oJ0COQ==
|
||||
|
||||
isarray@1.0.0, isarray@~1.0.0:
|
||||
version "1.0.0"
|
||||
resolved "https://registry.npmmirror.com/isarray/-/isarray-1.0.0.tgz"
|
||||
@ -2008,6 +2072,11 @@ lodash.some@^4.4.0:
|
||||
resolved "https://registry.npmmirror.com/lodash.some/-/lodash.some-4.6.0.tgz"
|
||||
integrity sha512-j7MJE+TuT51q9ggt4fSgVqro163BEFjAt3u97IqU+JA2DkWl80nFTrowzLpZ/BnpN7rrl0JA/593NAdd8p/scQ==
|
||||
|
||||
lodash@^3.2.0:
|
||||
version "3.10.1"
|
||||
resolved "https://registry.npmmirror.com/lodash/-/lodash-3.10.1.tgz"
|
||||
integrity sha512-9mDDwqVIma6OZX79ZlDACZl8sBm0TEnkf99zV3iMA4GzkIT/9hiqP5mY0HoT1iNLCrKc/R1HByV+yJfRWVJryQ==
|
||||
|
||||
lower-case@^2.0.2:
|
||||
version "2.0.2"
|
||||
resolved "https://registry.npmjs.org/lower-case/-/lower-case-2.0.2.tgz"
|
||||
@ -2276,7 +2345,7 @@ normalize-path@^3.0.0, normalize-path@~3.0.0:
|
||||
resolved "https://registry.npmjs.org/normalize-path/-/normalize-path-3.0.0.tgz"
|
||||
integrity sha512-6eZs5Ls3WtCisHWp9S2GUy8dqkpGi4BVSz3GaqiE6ezub0512ESztXUwUB6C6IKbQkY2Pnb/mD4WYojCRwcwLA==
|
||||
|
||||
nth-check@~1.0.1:
|
||||
nth-check@~1.0.0, nth-check@~1.0.1:
|
||||
version "1.0.2"
|
||||
resolved "https://registry.npmmirror.com/nth-check/-/nth-check-1.0.2.tgz"
|
||||
integrity sha512-WeBOdju8SnzPN5vTUJYxYUxLeXpCaVP5i5e0LF8fg7WORF2Wd7wFX/pk0tYZk7s8T+J7VLy0Da6J1+wCT0AtHg==
|
||||
@ -2621,6 +2690,16 @@ range-parser@~1.2.1:
|
||||
resolved "https://registry.npmjs.org/range-parser/-/range-parser-1.2.1.tgz"
|
||||
integrity sha512-Hrgsx+orqoygnmhFbKaHE6c296J+HTAQXoxEF6gNupROmmGJRoyzfG3ccAveqCBrwr/2yxQ5BVd/GTl5agOwSg==
|
||||
|
||||
readable-stream@1.1:
|
||||
version "1.1.14"
|
||||
resolved "https://registry.npmmirror.com/readable-stream/-/readable-stream-1.1.14.tgz"
|
||||
integrity sha512-+MeVjFf4L44XUkhM1eYbD8fyEsxcV81pqMSR5gblfcLCHfZvbrqy4/qYHE+/R5HoBUT11WV5O08Cr1n3YXkWVQ==
|
||||
dependencies:
|
||||
core-util-is "~1.0.0"
|
||||
inherits "~2.0.1"
|
||||
isarray "0.0.1"
|
||||
string_decoder "~0.10.x"
|
||||
|
||||
readable-stream@3, readable-stream@^3.1.1:
|
||||
version "3.6.0"
|
||||
resolved "https://registry.npmjs.org/readable-stream/-/readable-stream-3.6.0.tgz"
|
||||
@ -2966,6 +3045,11 @@ string_decoder@^1.1.1:
|
||||
dependencies:
|
||||
safe-buffer "~5.2.0"
|
||||
|
||||
string_decoder@~0.10.x:
|
||||
version "0.10.31"
|
||||
resolved "https://registry.npmmirror.com/string_decoder/-/string_decoder-0.10.31.tgz"
|
||||
integrity sha512-ev2QzSzWPYmy9GuqfIVildA4OdcGLeFZQrq5ys6RtiuF+RQQiZWr8TZNyAcuVXyQRYfEO+MsoB/1BuQVhOJuoQ==
|
||||
|
||||
string_decoder@~1.1.1:
|
||||
version "1.1.1"
|
||||
resolved "https://registry.npmmirror.com/string_decoder/-/string_decoder-1.1.1.tgz"
|
||||
|
||||